Data Contributor in the User Interface
As a Data Contributor, you can create new studies and manage data efficiently through the Open Data Manager interface. Follow these steps to get started.
Create a New Study
Understanding the Data Model in ODM
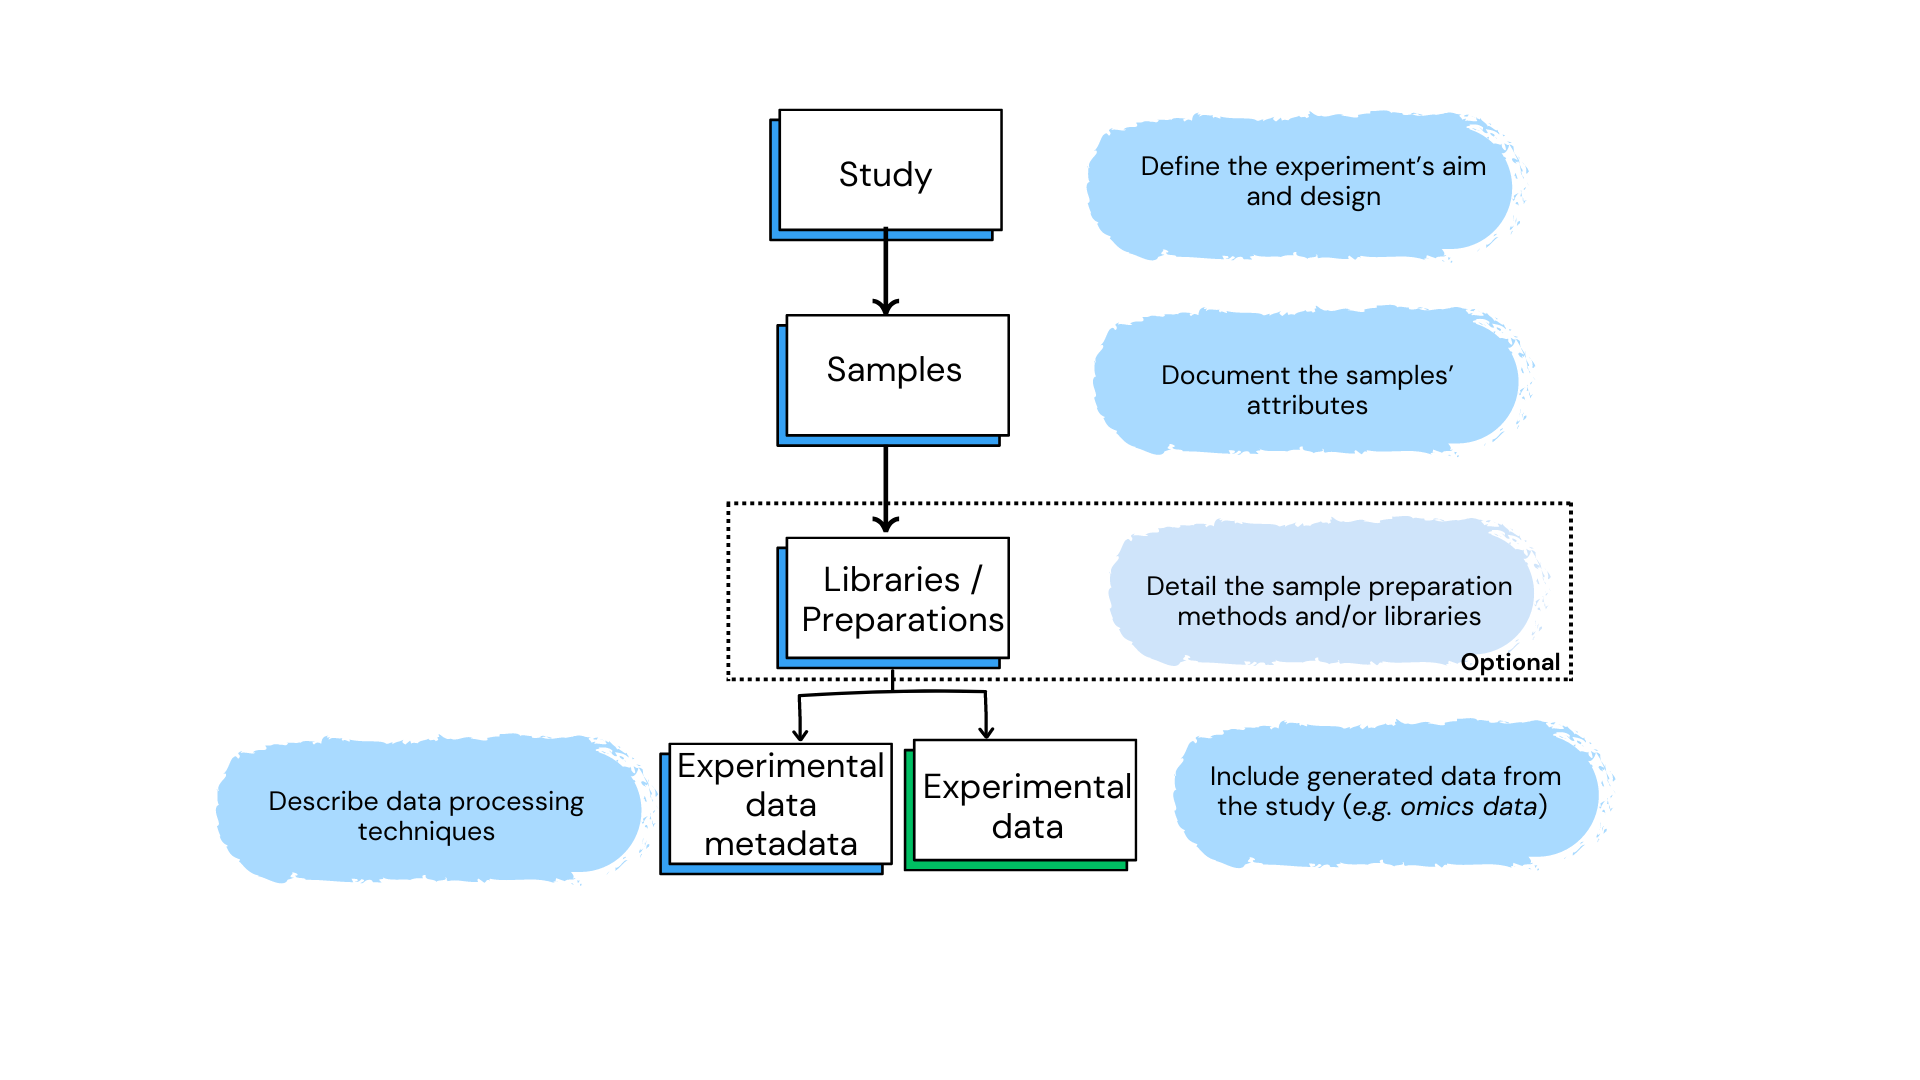
The organization of data and metadata in ODM ensures thorough documentation and seamless integration from study design to data analysis.
- Study: Defines the context, aims, and statistical design.
- Samples Metadata: Documents biological attributes like tissue type, disease status, and treatment conditions.
- Libraries/Preparations: Details sample preparation methods and libraries used, if applicable.
- Experimental Data Metadata: Describes data processing techniques, including normalization, instrumentation, and data types (e.g., GCT, VCF).
- Experimental Data: The actual data generated from the study (e.g. bulk transcriptomics, gene variant, etc.).
The diagram below outlines the flow of data in a biological study, highlighting key stages:
Create a Study
To create a new study in the Open Data Manager, follow these steps:
-
Click on "Create new study": Start by selecting the option to Create new study on the main dashboard (a), or from the menu in the top left corner, then click on Create New Study (b).
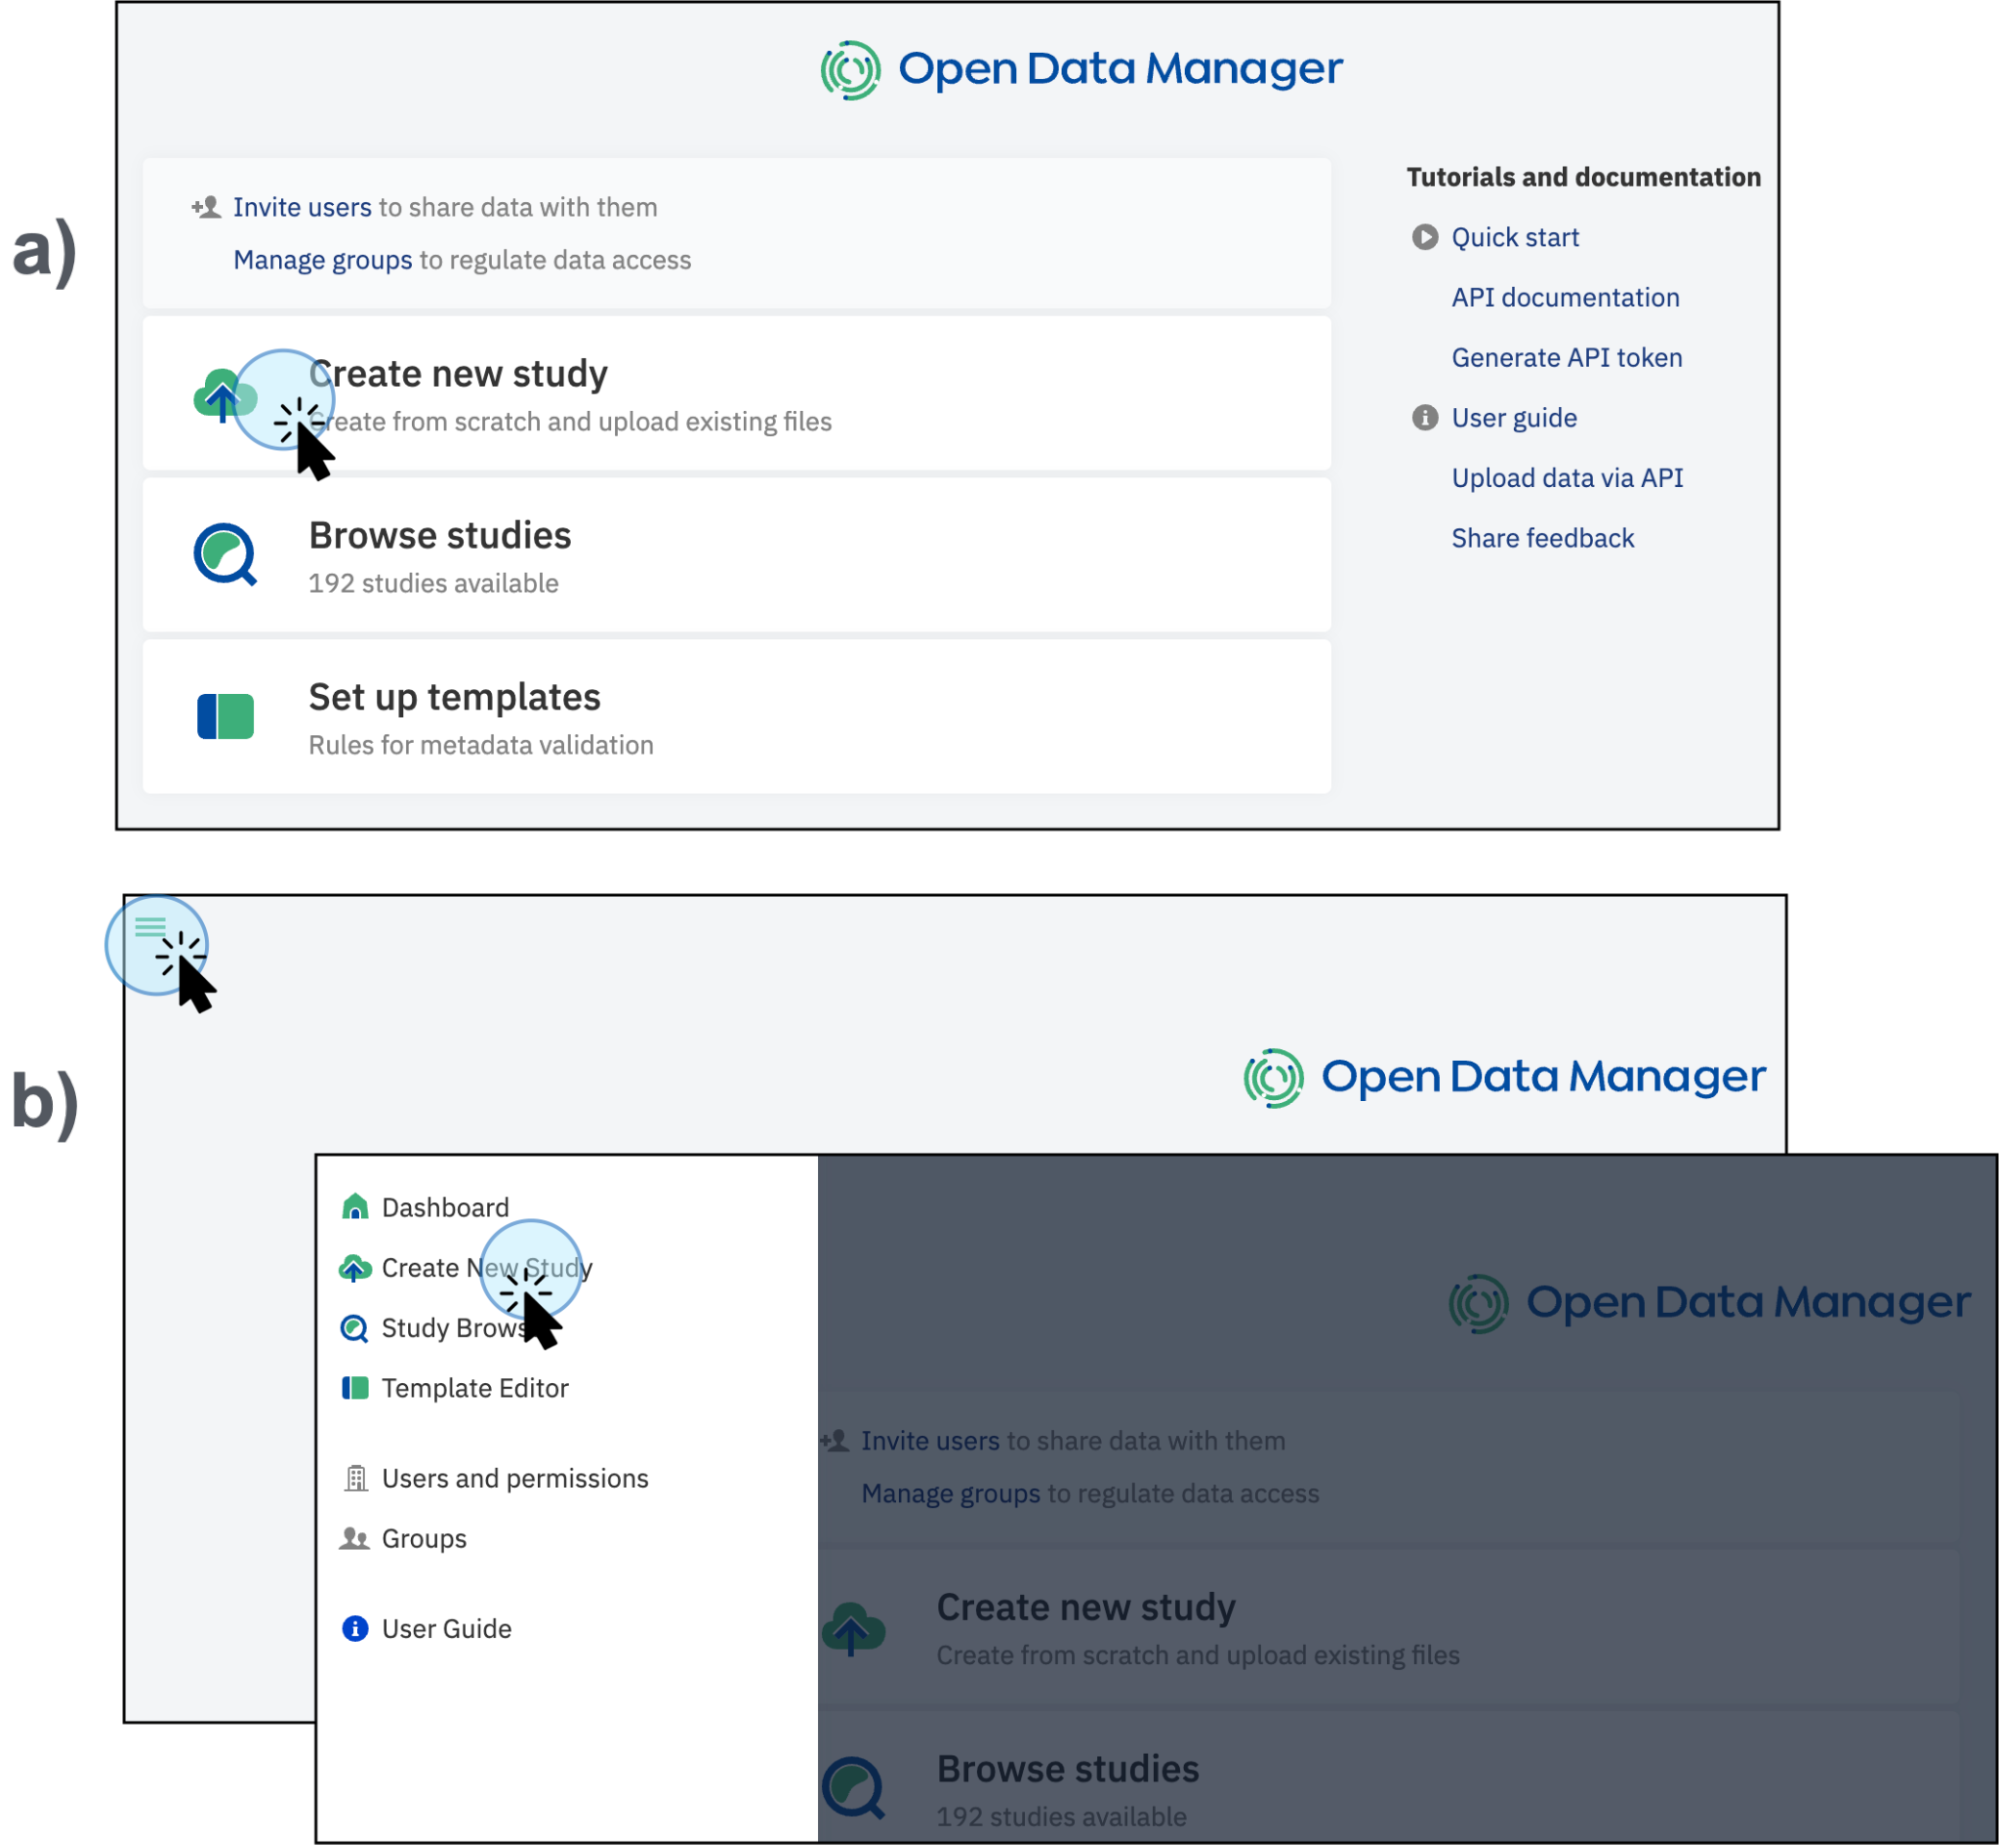
Available routes to create a new study, a) directly from the main dashboard, b) access the option on the top left panel -
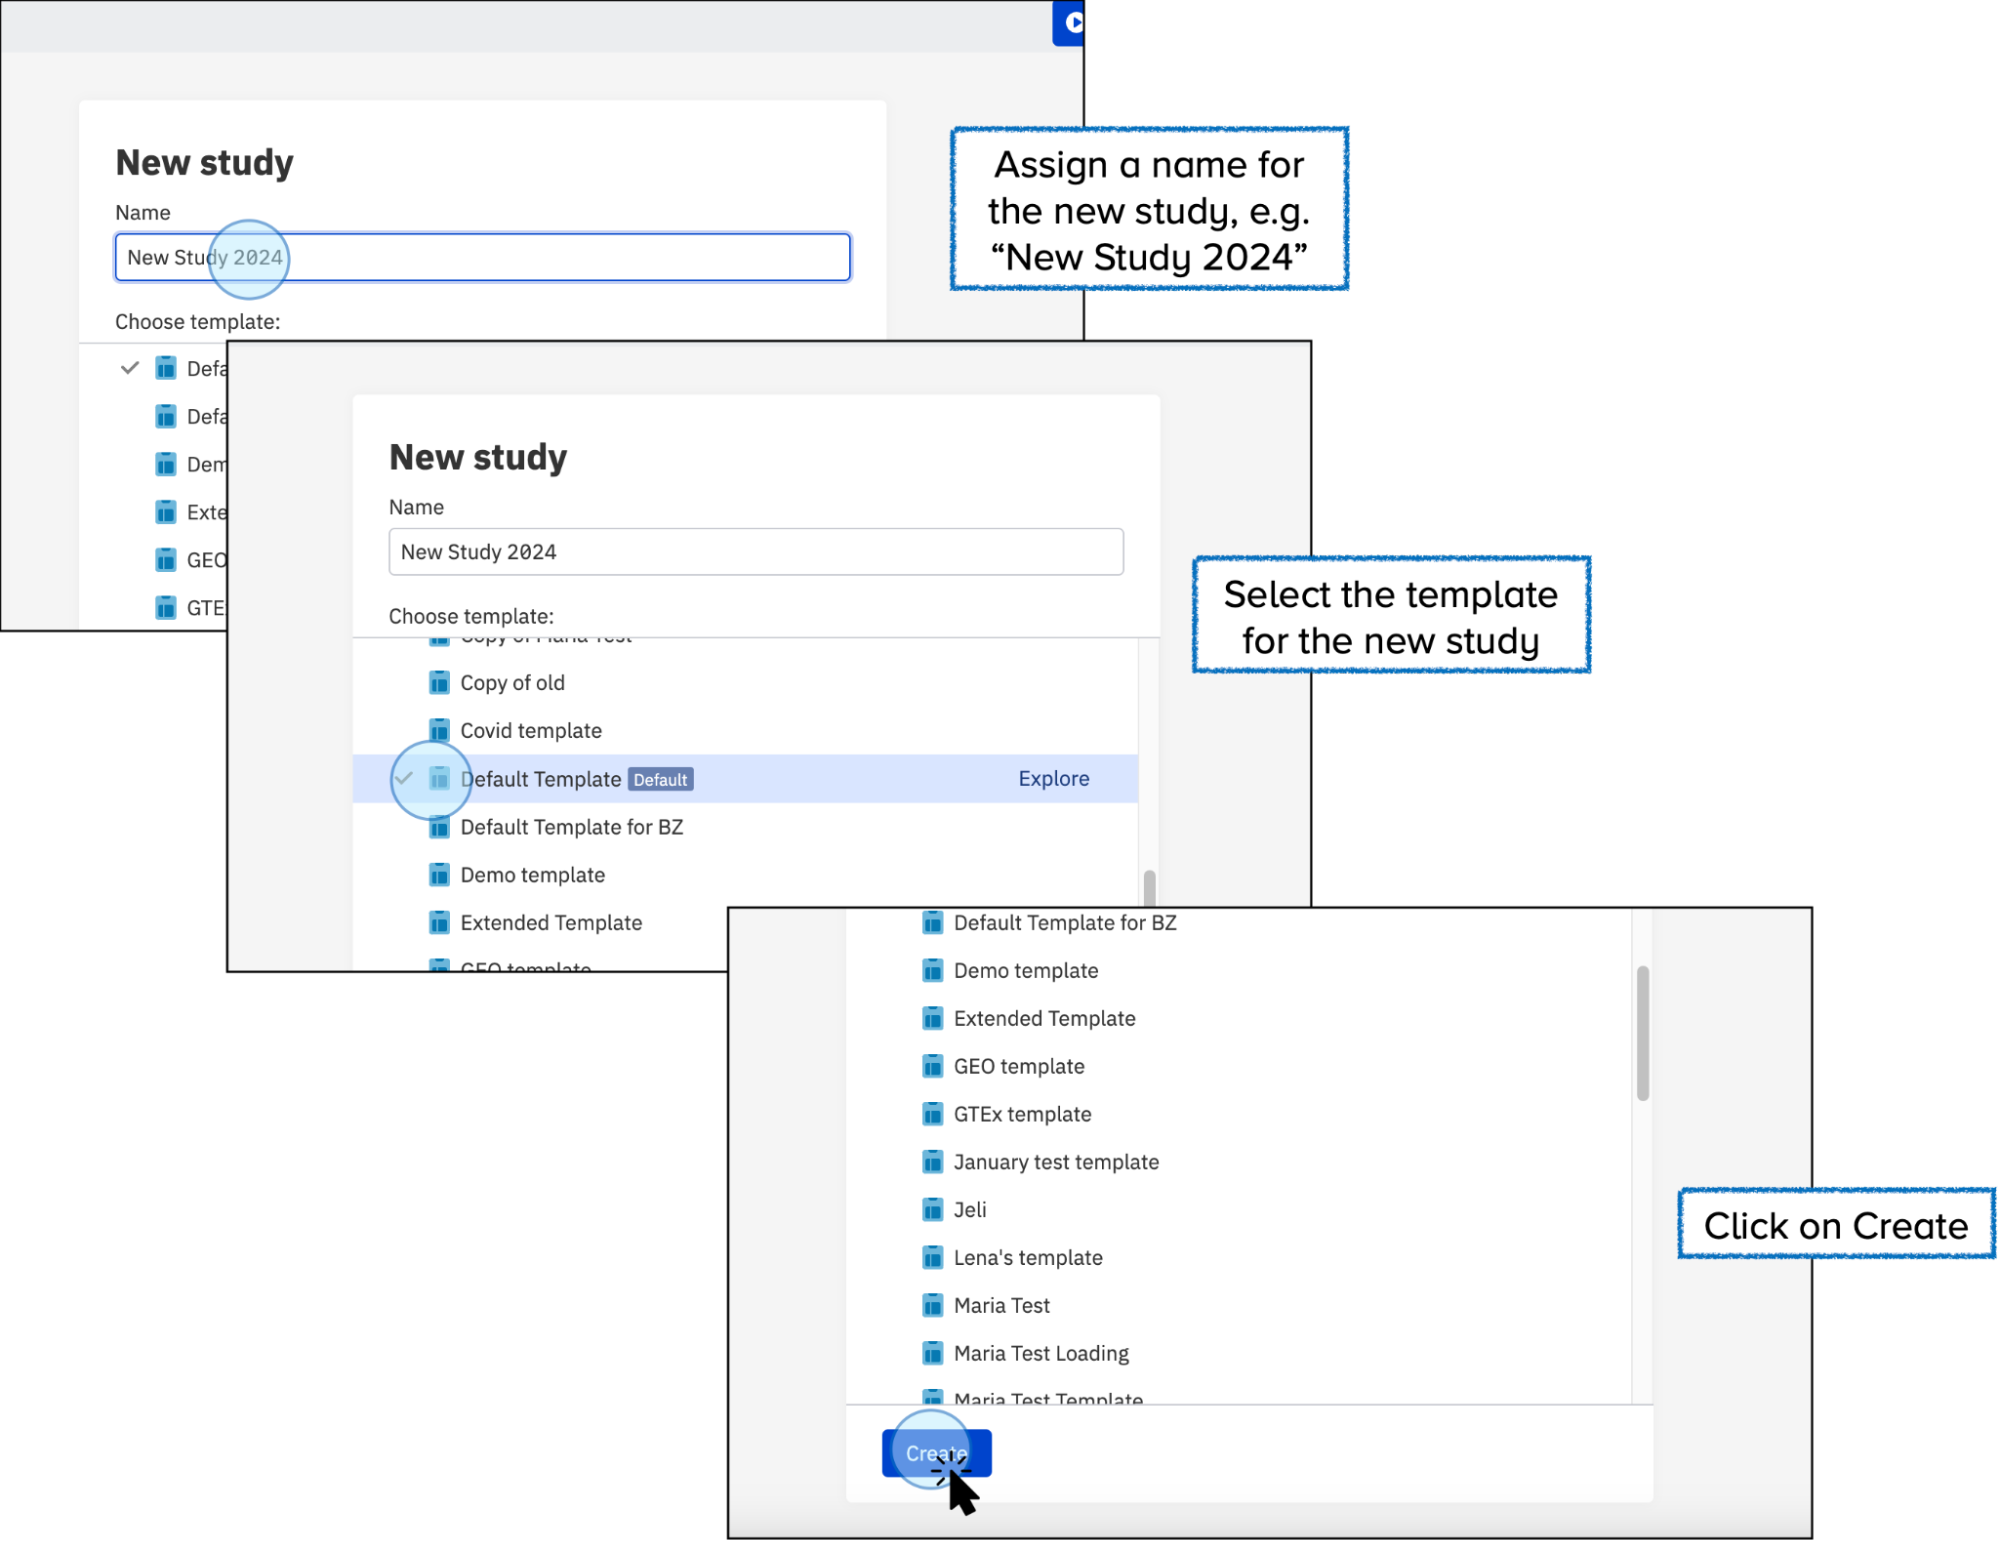
Assign a Name: Give your study a descriptive name to identify it easily.
- Select the Template: Choose the template you want to use for your study. Templates define the metadata structure and validation rules for your study. You can create your own template, and there is no limit on the number of templates you can use.
Understanding Templates
For more information about what a template is and how it works, refer to the Key Concepts section. This section provides definitions and details about templates, including how to create and edit them. If you require more information or need detailed guidance, explore the Templates section.
Explore and Edit Study Details
Once you click on Create, a new study will be automatically created, and you will be redirected to it. Here, you can explore the various tabs and features that are available.
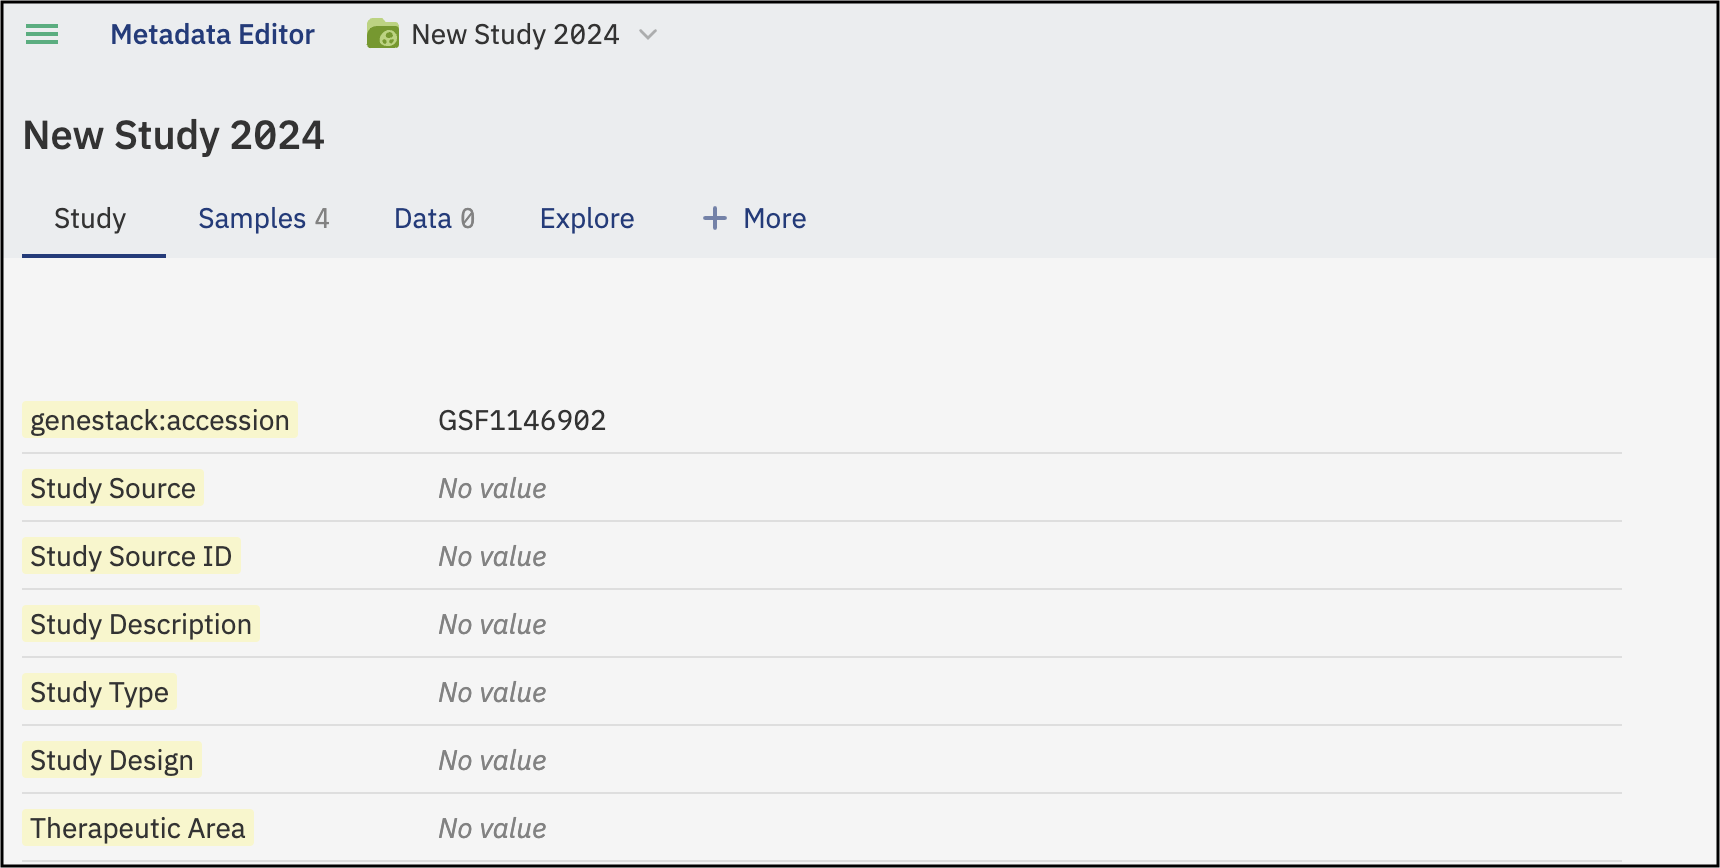
Accession number
In addition, a unique accession number is automatically generated for each study in the ODM. The accession number allows you to identify the specific study and to further work with the study via API endpoints.
Edit details
-
To edit the details of your study, select a tab and click on Edit (at the bottom of the page).
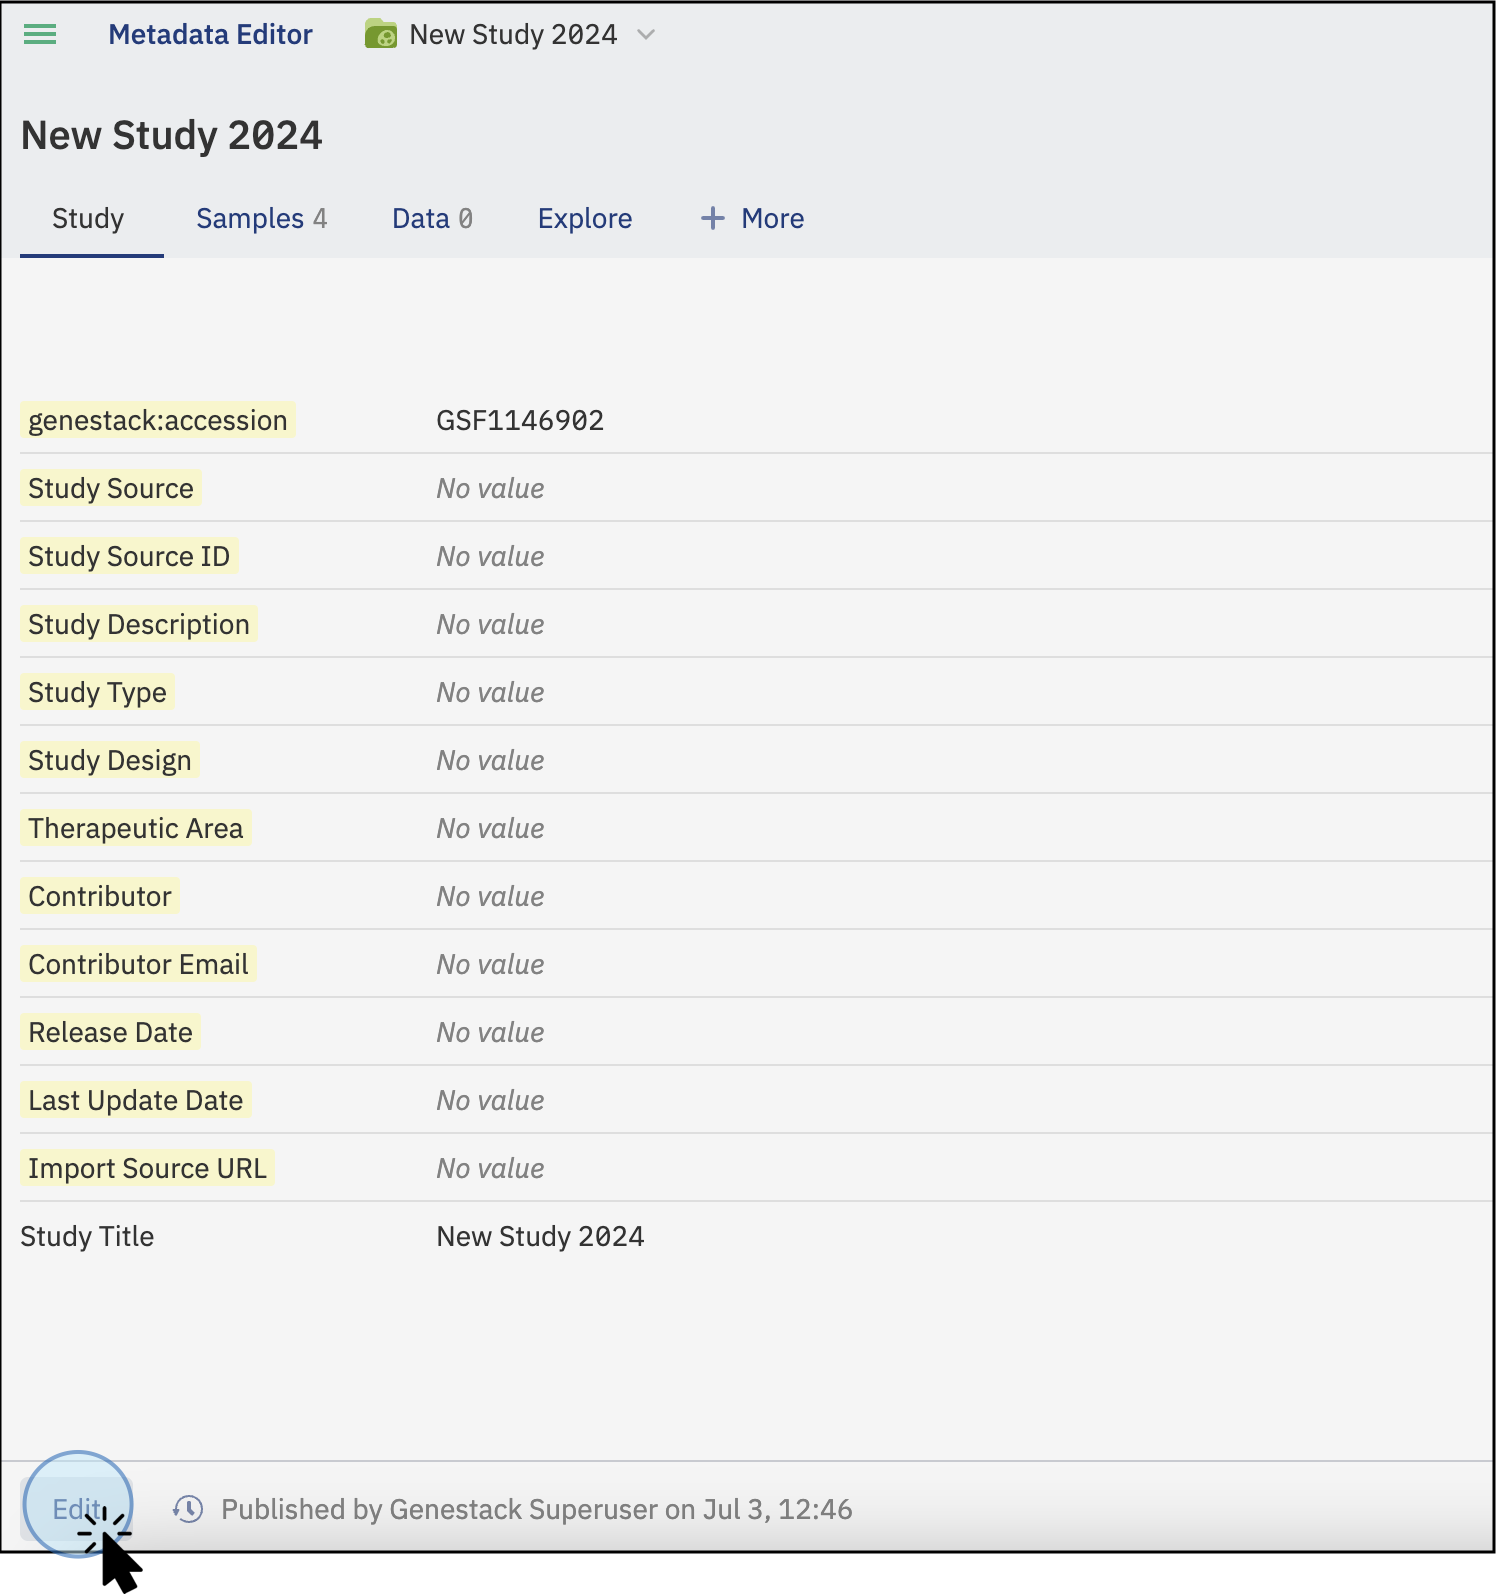
To make changes on the Study tab, click on the Edit button -
Select the feature you want to edit, for example, Study Source. Type the new value for the field.
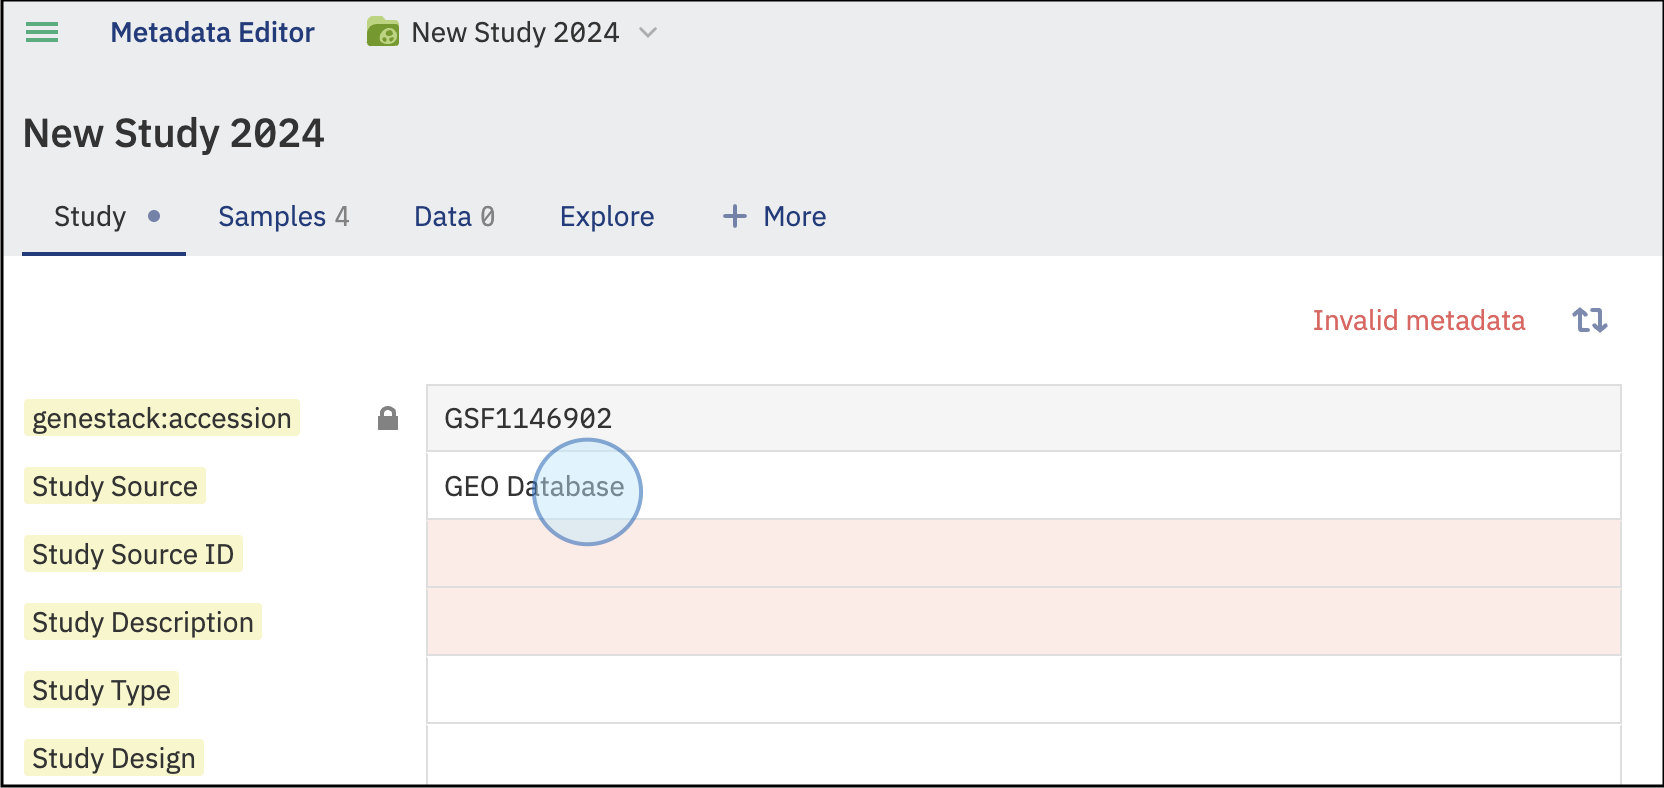
Select and manually edit the Study tab details -
Click Publish to save the changes. You can customize the name for the version you are updating by clicking the Publish button at the bottom of the screen. A new window will pop up, allowing you to customize the version name.
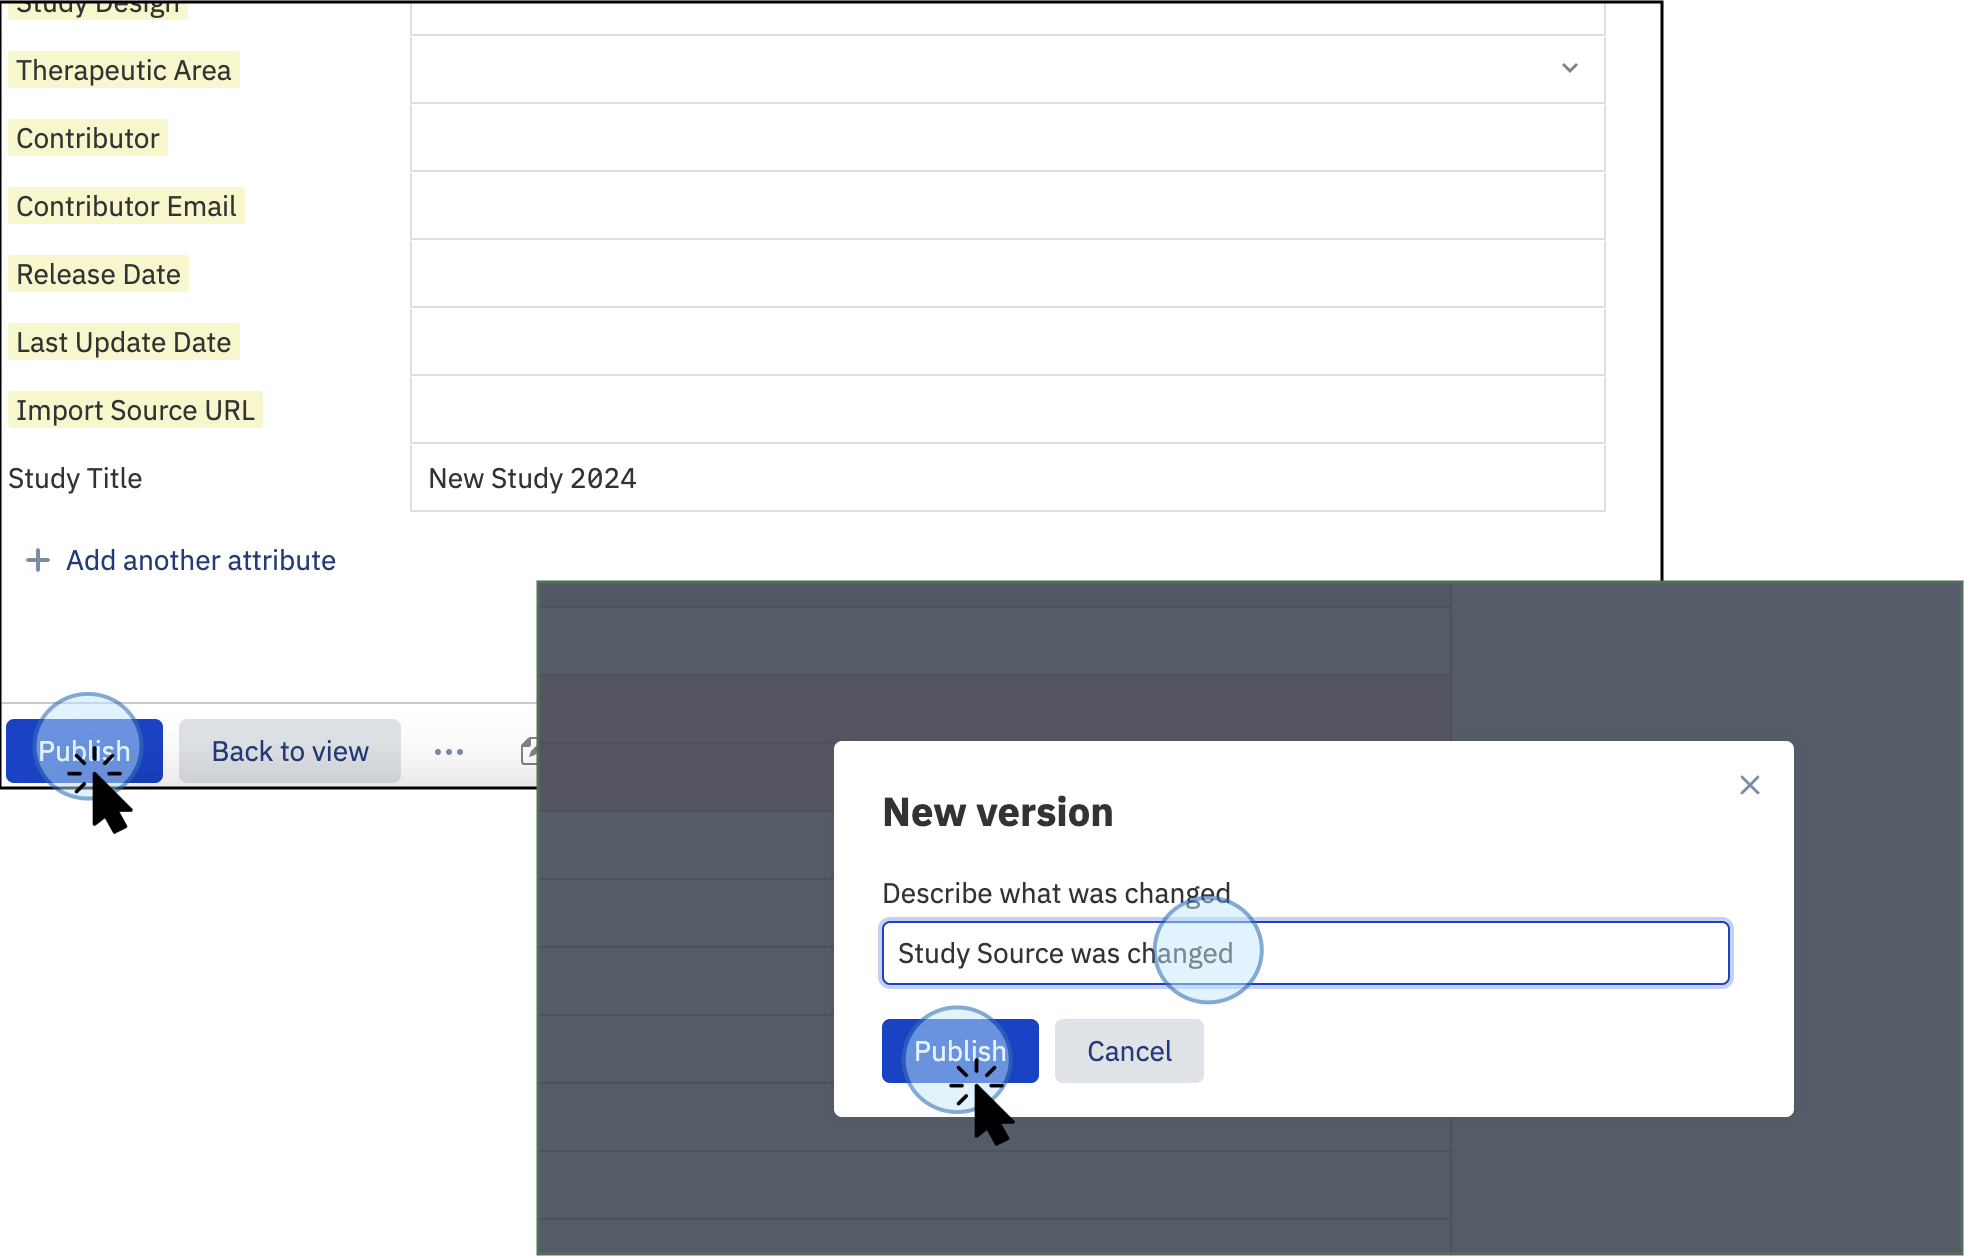
Customize the changes by adding a name to this new version, e.g., Study Source was changed
Upload Samples Metadata
-
To upload sample metadata, click on the Samples tab on the main screen of the study.
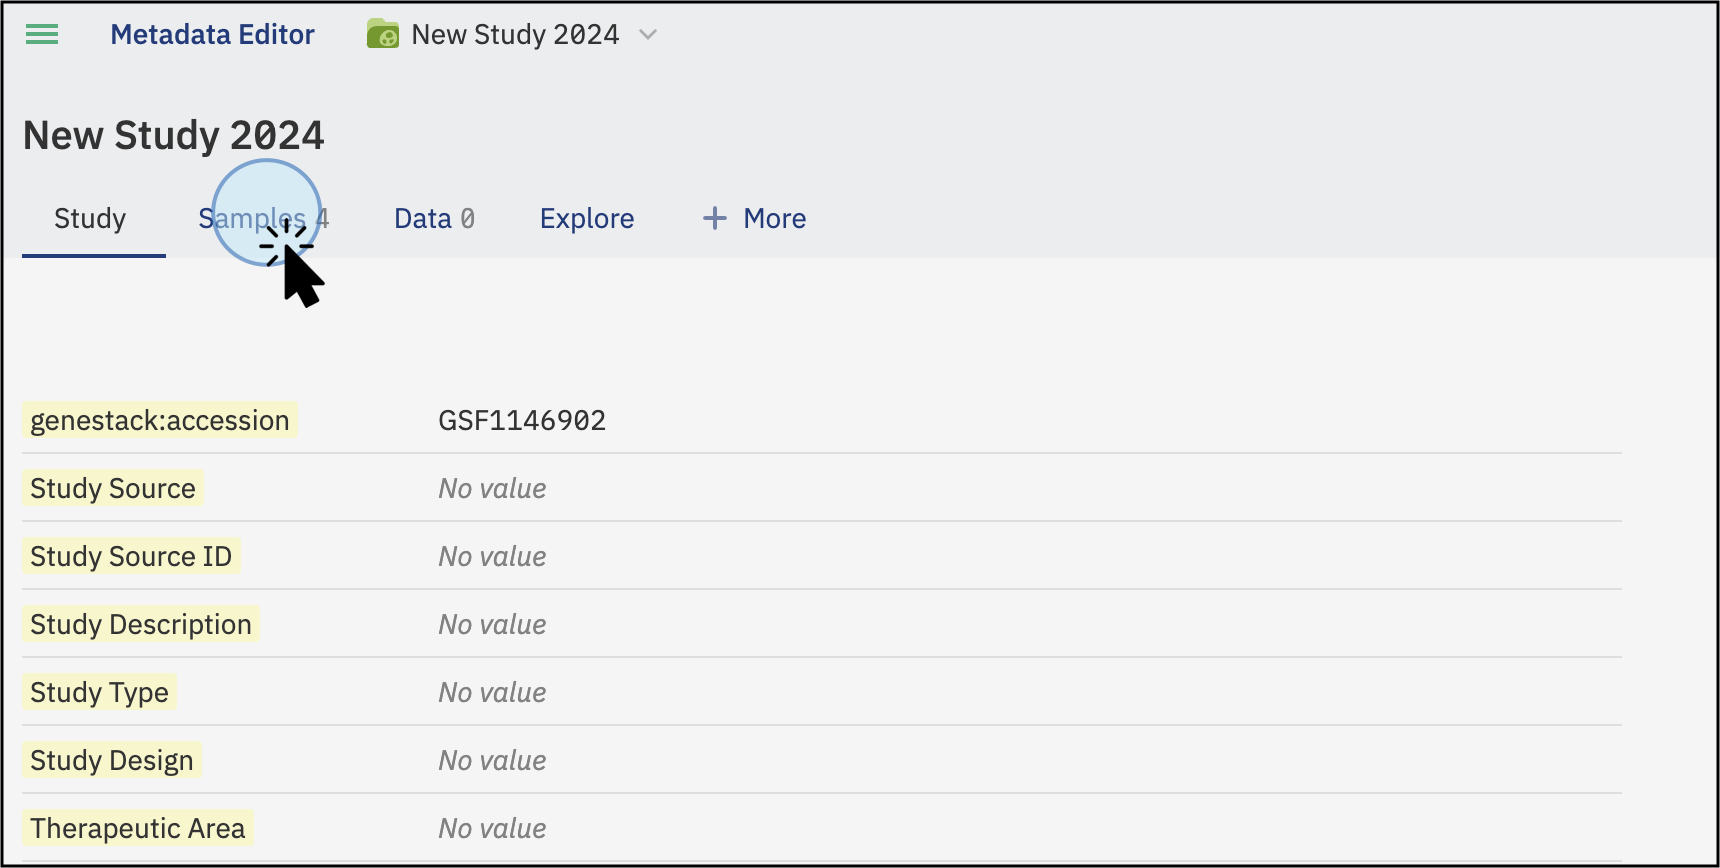
Click on the Samples tab to access details about the samples' metadata -
Click on Edit at the bottom left of your sample table.
-
Select tabular files (TSV) by clicking on the cloud symbol in the top right of your sample table. You can upload sample metadata from any experiment (e.g., flow cytometry, gene variant, transcriptomics) as long as the file is in a tabular format (TSV).
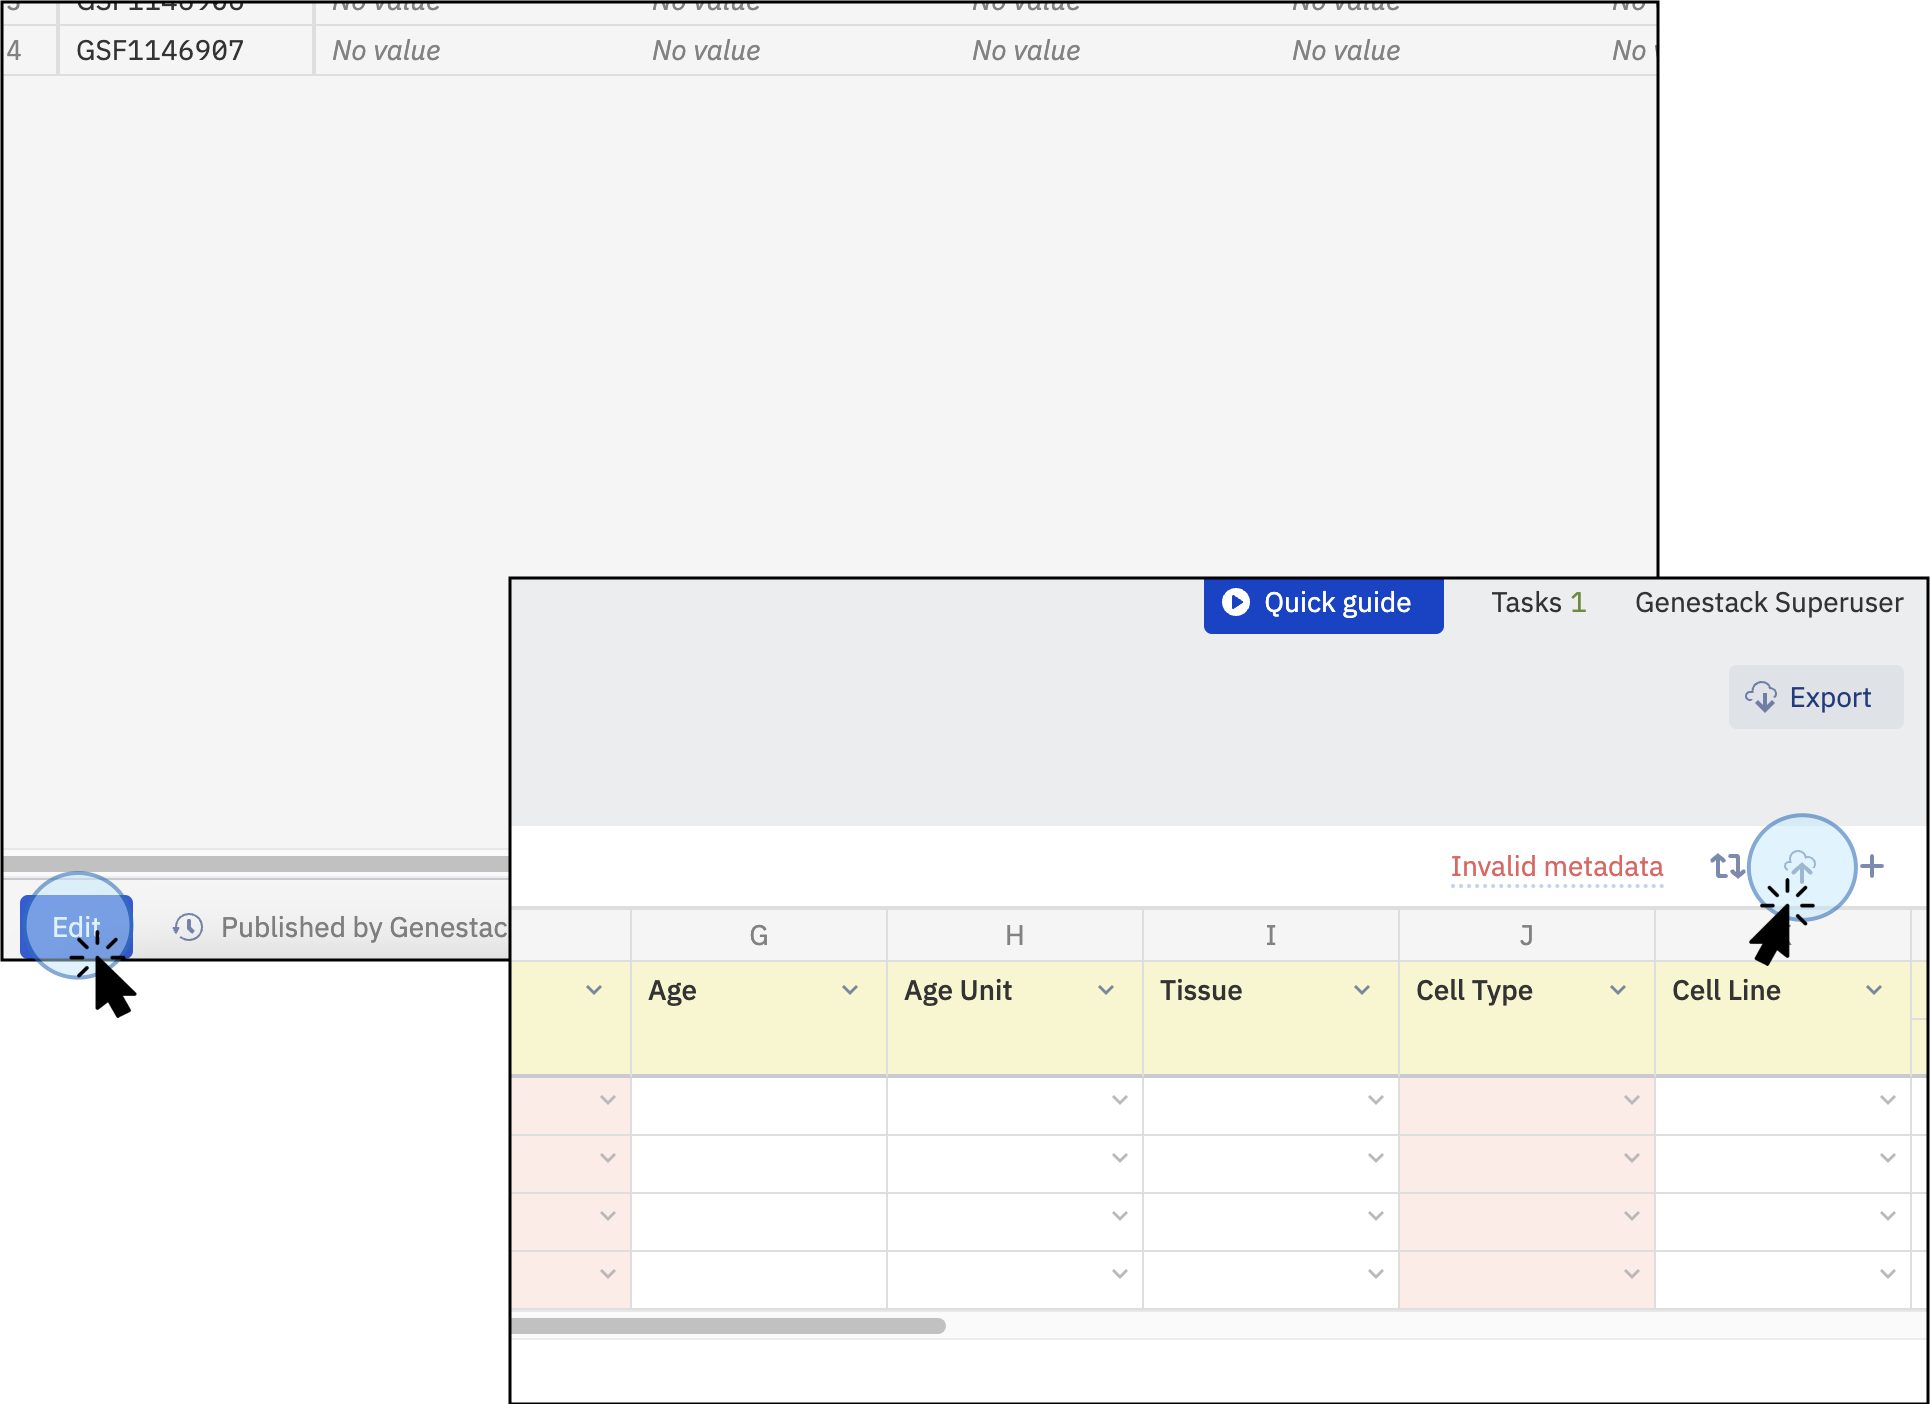
To import metadata sample files, click the Edit button at the bottom, then select the cloud icon to upload tabular files from your local computer -
A new window will pop up. Click Select tsv file... and choose your file.
-
Once your file is recognized, click Import.
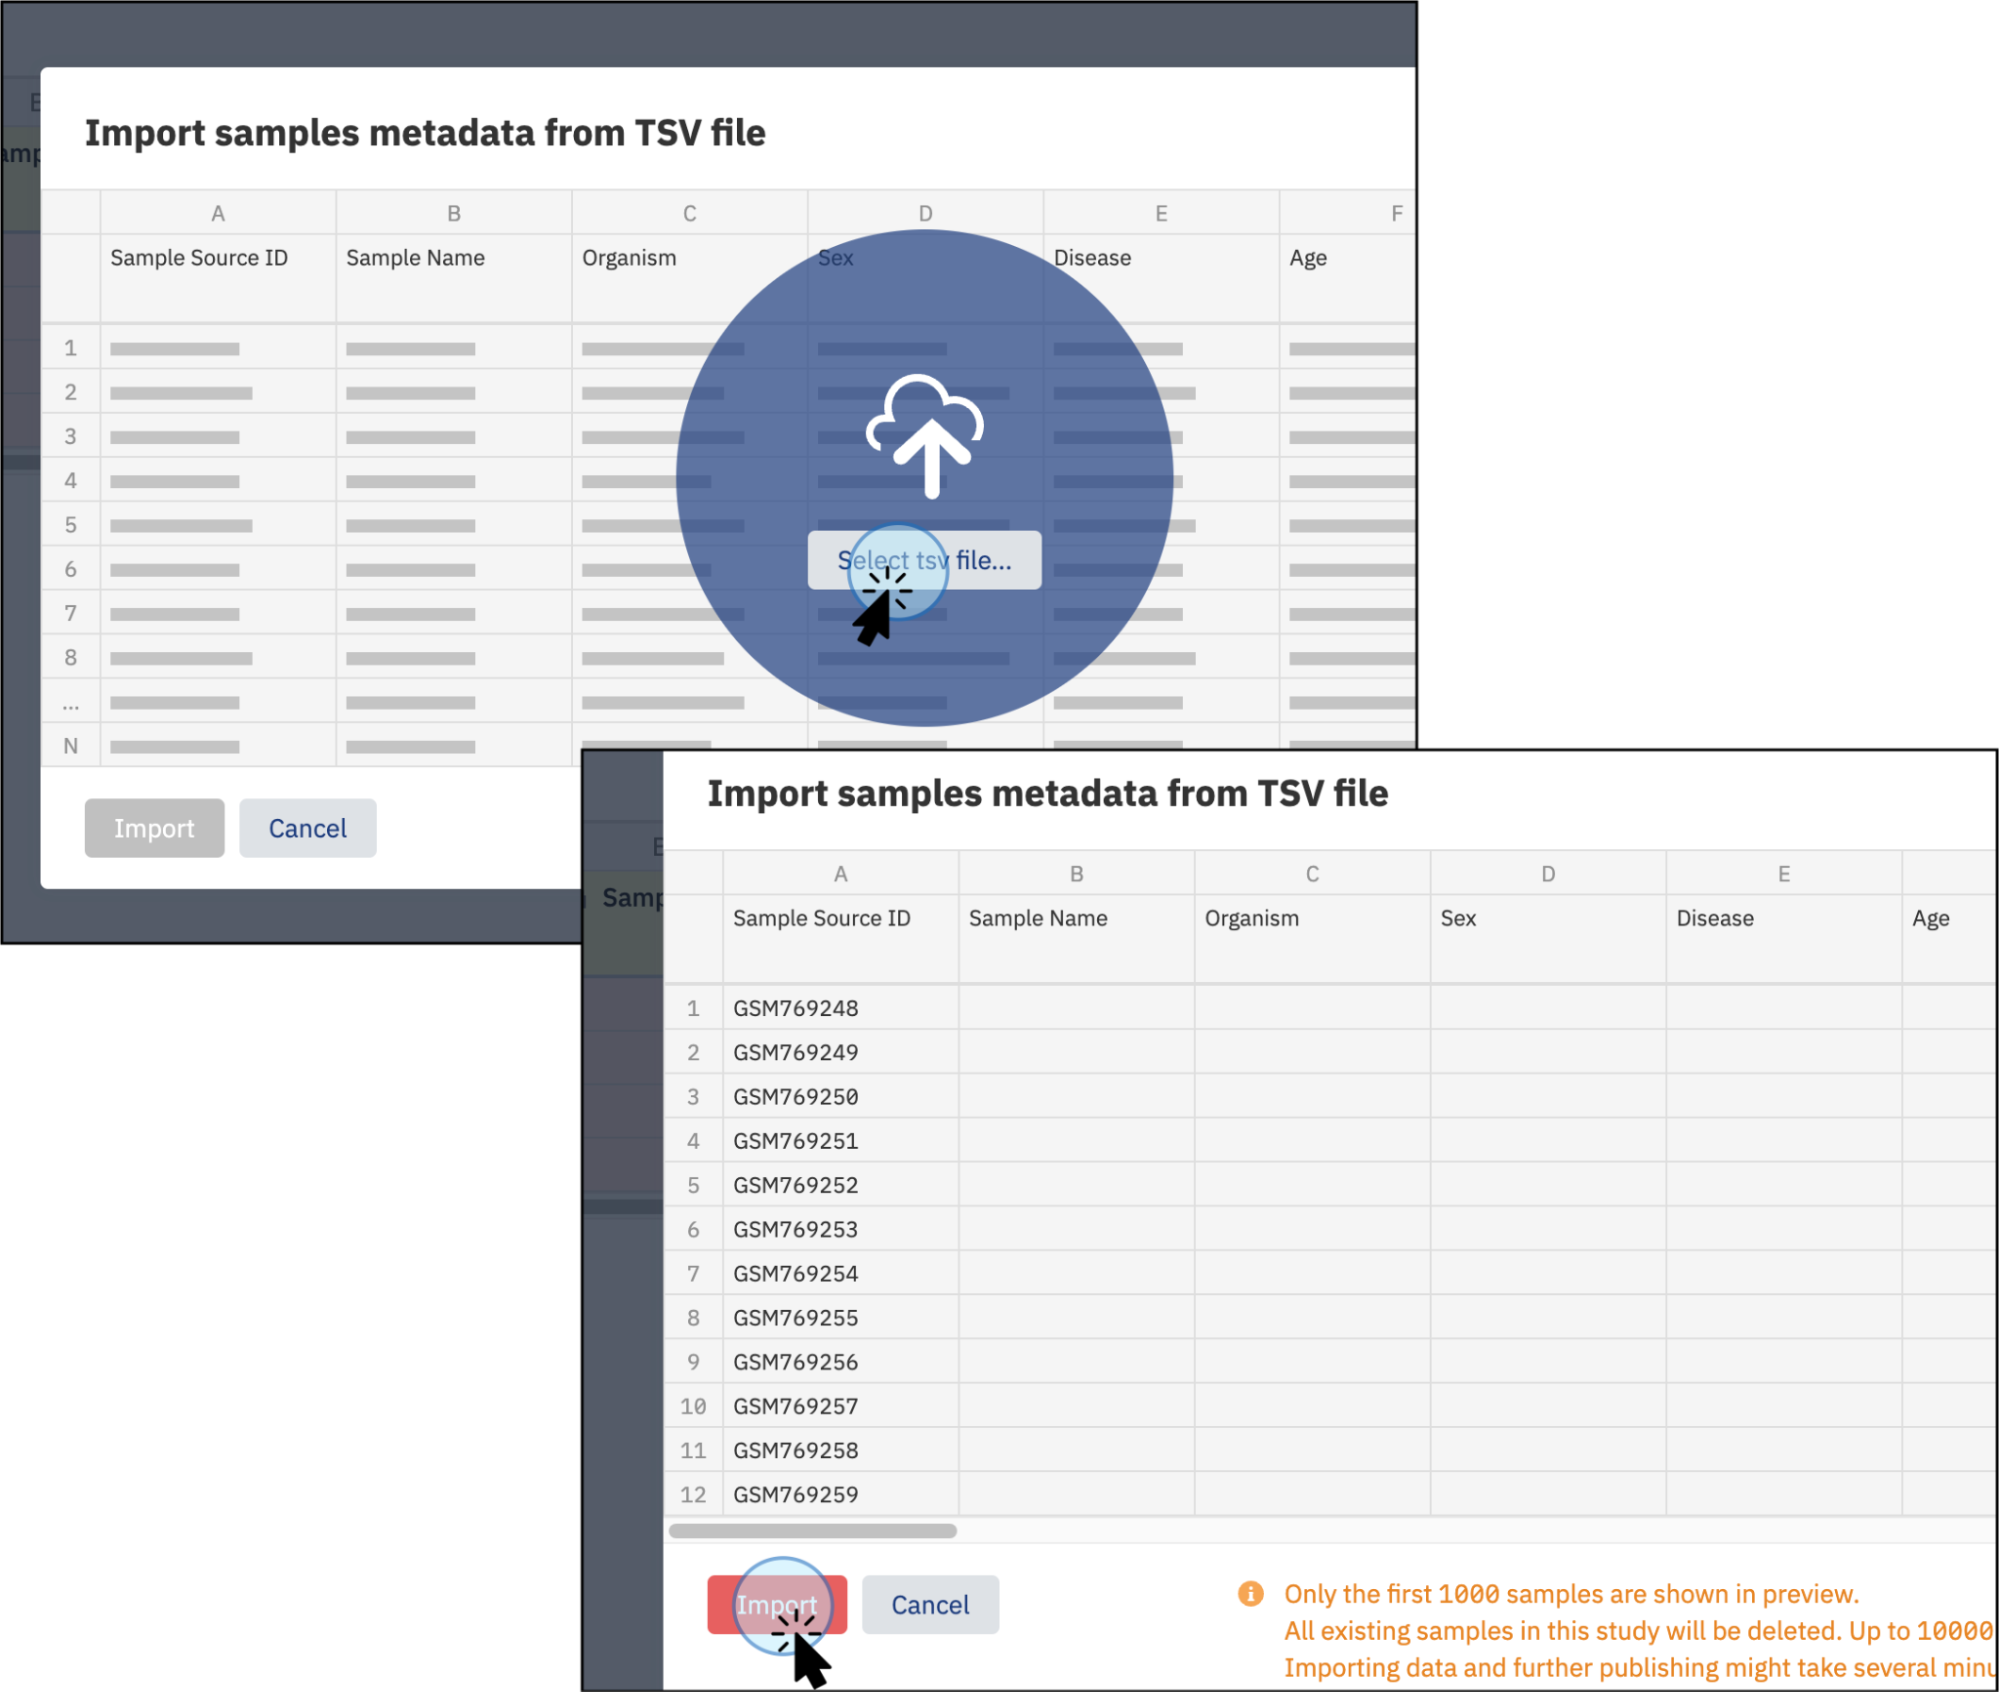
Click Select tsv file... to select the desired file from your local computer. Once the file is recognized, click Import to upload it -
Ensure the changes are saved by clicking Publish.
-
In the resulting pop-up box, enter the preferred name, label, or description for the activity you just performed to add it to the version log, e.g., “Sample Metadata has been added.” For more information on versioning, see the Metadata Versioning section below.
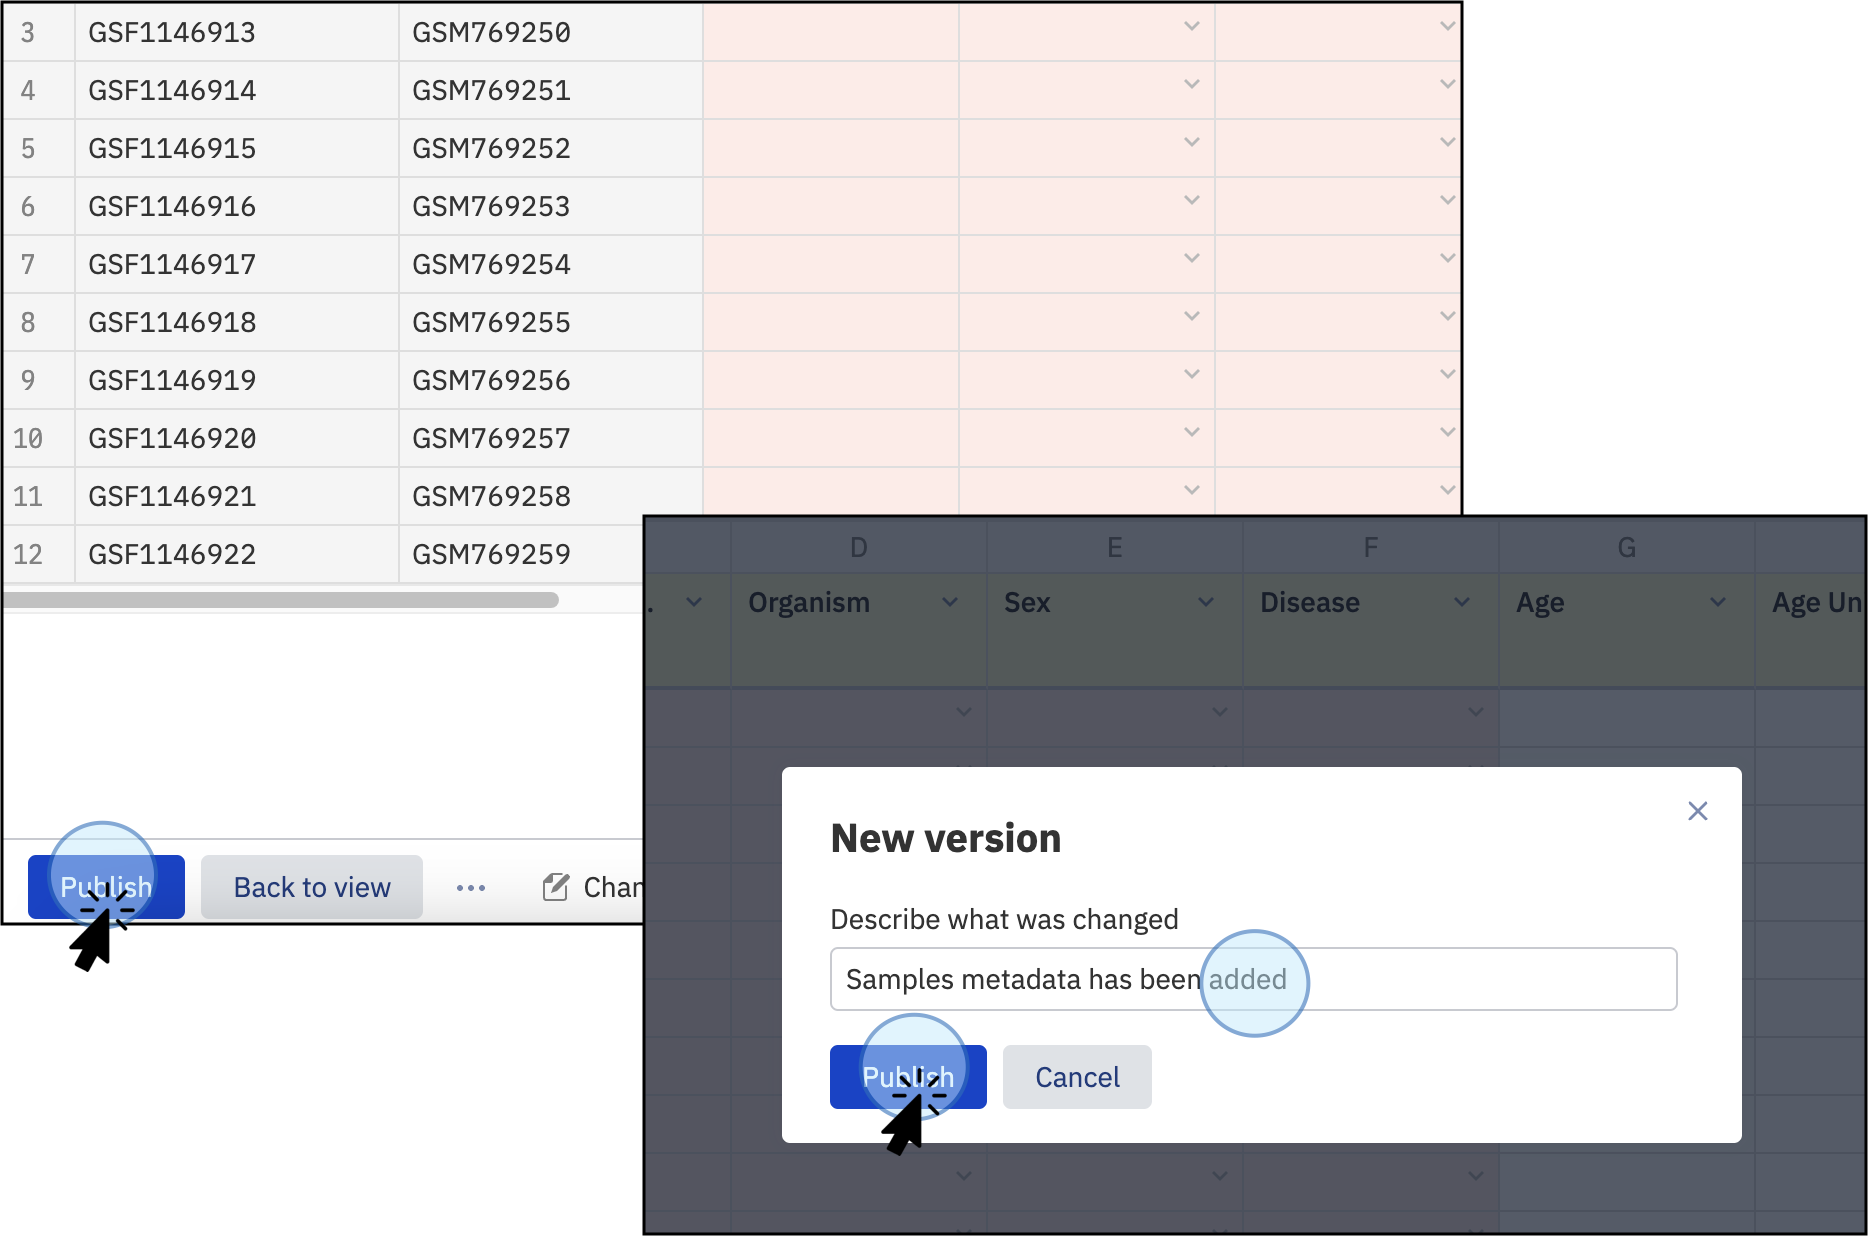
Once the sample metadata file has been imported, click Publish to save the changes. Save the changes by adding a name to this new version, e.g., Samples metadata has been added. The version names can be customized with names, dates, descriptions, etc.
Metadata Versioning
-
To see all the versions of your metadata previously published, click on the clock icon at the bottom of the page.
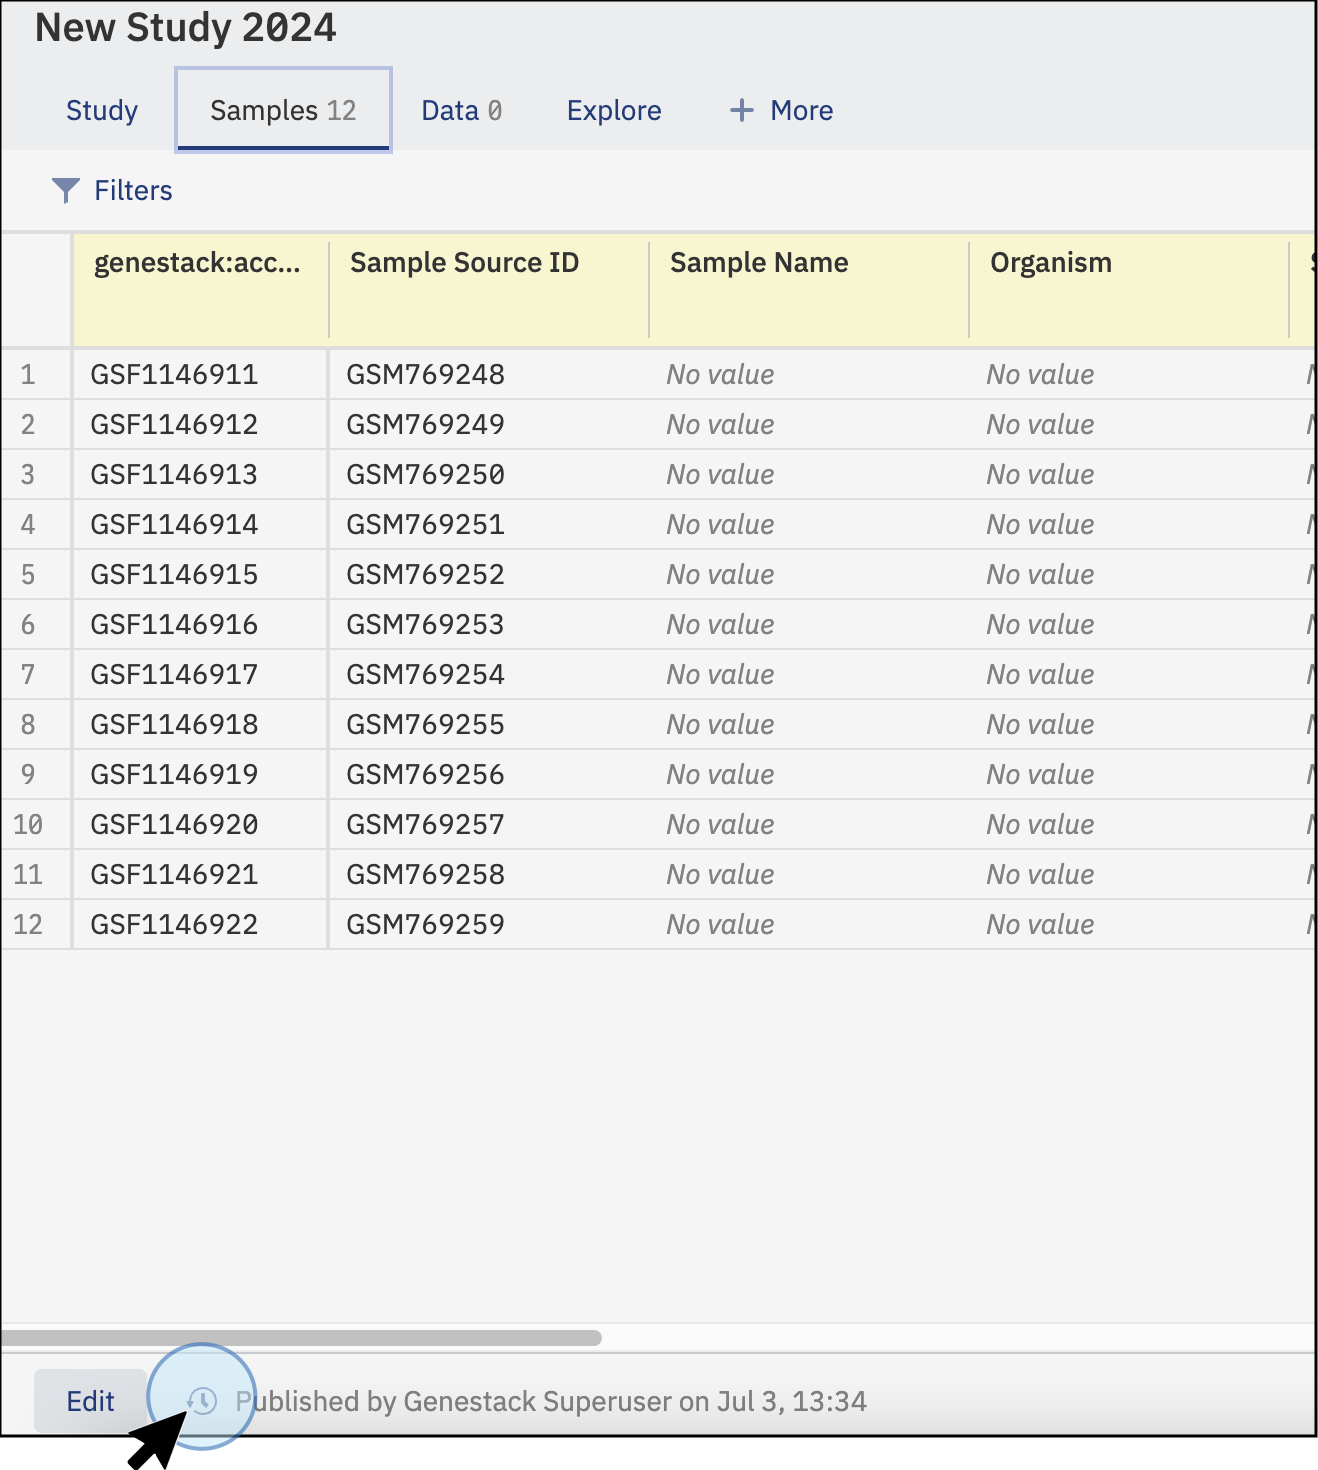
Click on the clock symbol at the bottom of the page (of the Samples tab) to access all the versions that have been created -
The resulting view will show you all the previously created versions of this data when they were created, the description entered at the time of publication, and the user who altered the data.
- You can click on any of the lines in the table and then Restore at the bottom of the page to restore a previous version of the data.
-
To return to the latest version without changing the version simply click on Back to the latest version at the bottom of the screen.
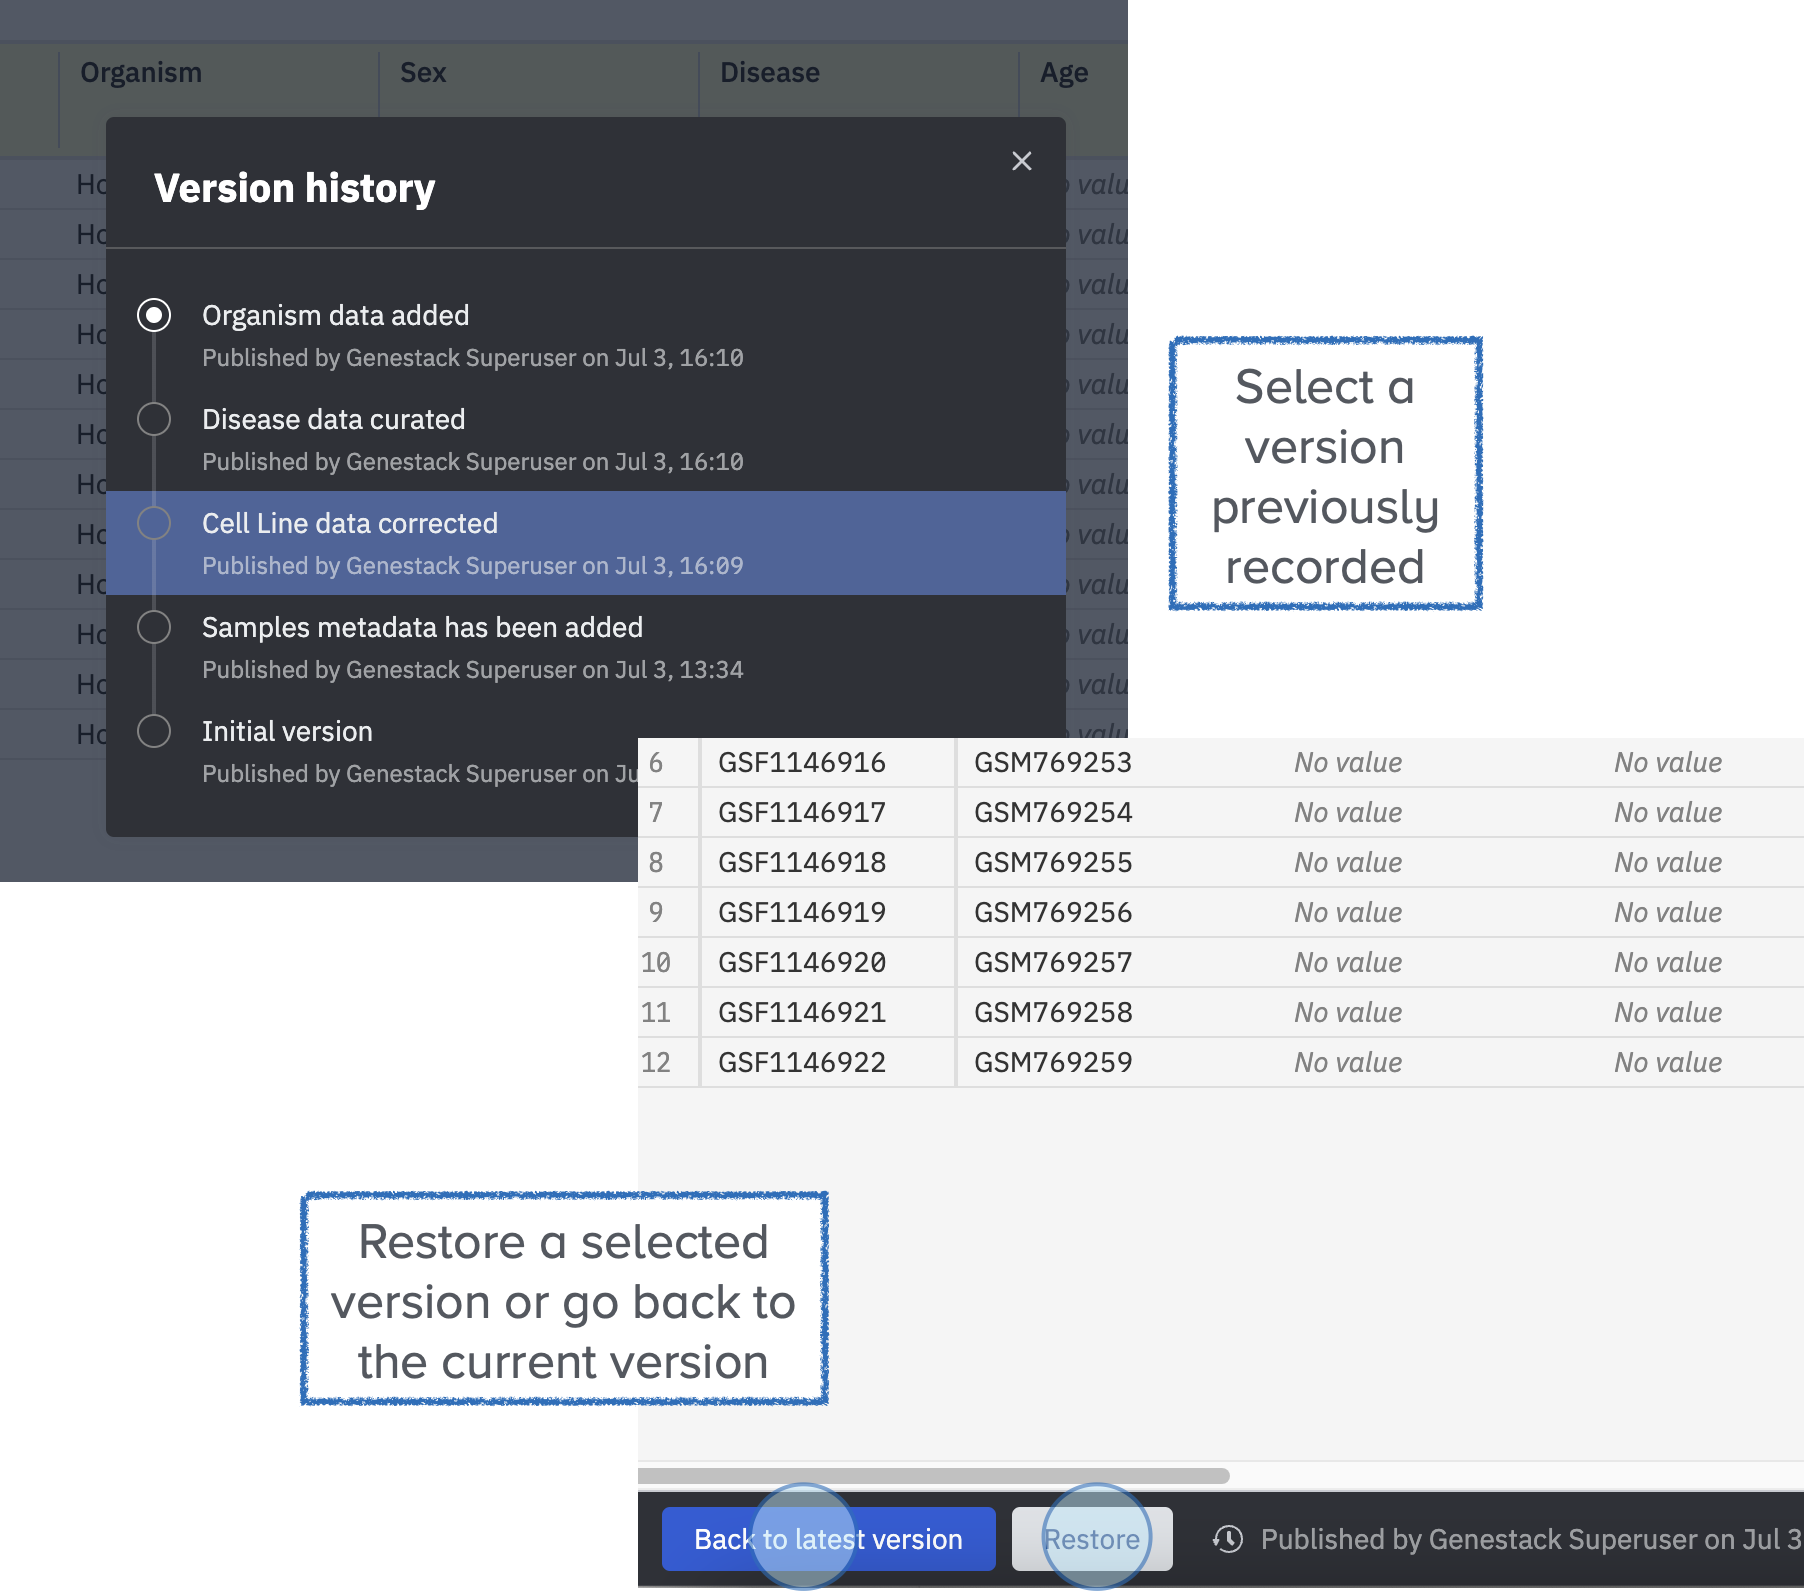
Data versioning allows you to track the changes performed on the metadata. You can restore a previous version or go back to the current version
Metadata Versioning
Learn more about metadata versioning and definitions, by exploring the section Metadata Versioning
Upload Libraries and Preparations
Add Libraries and Preparations
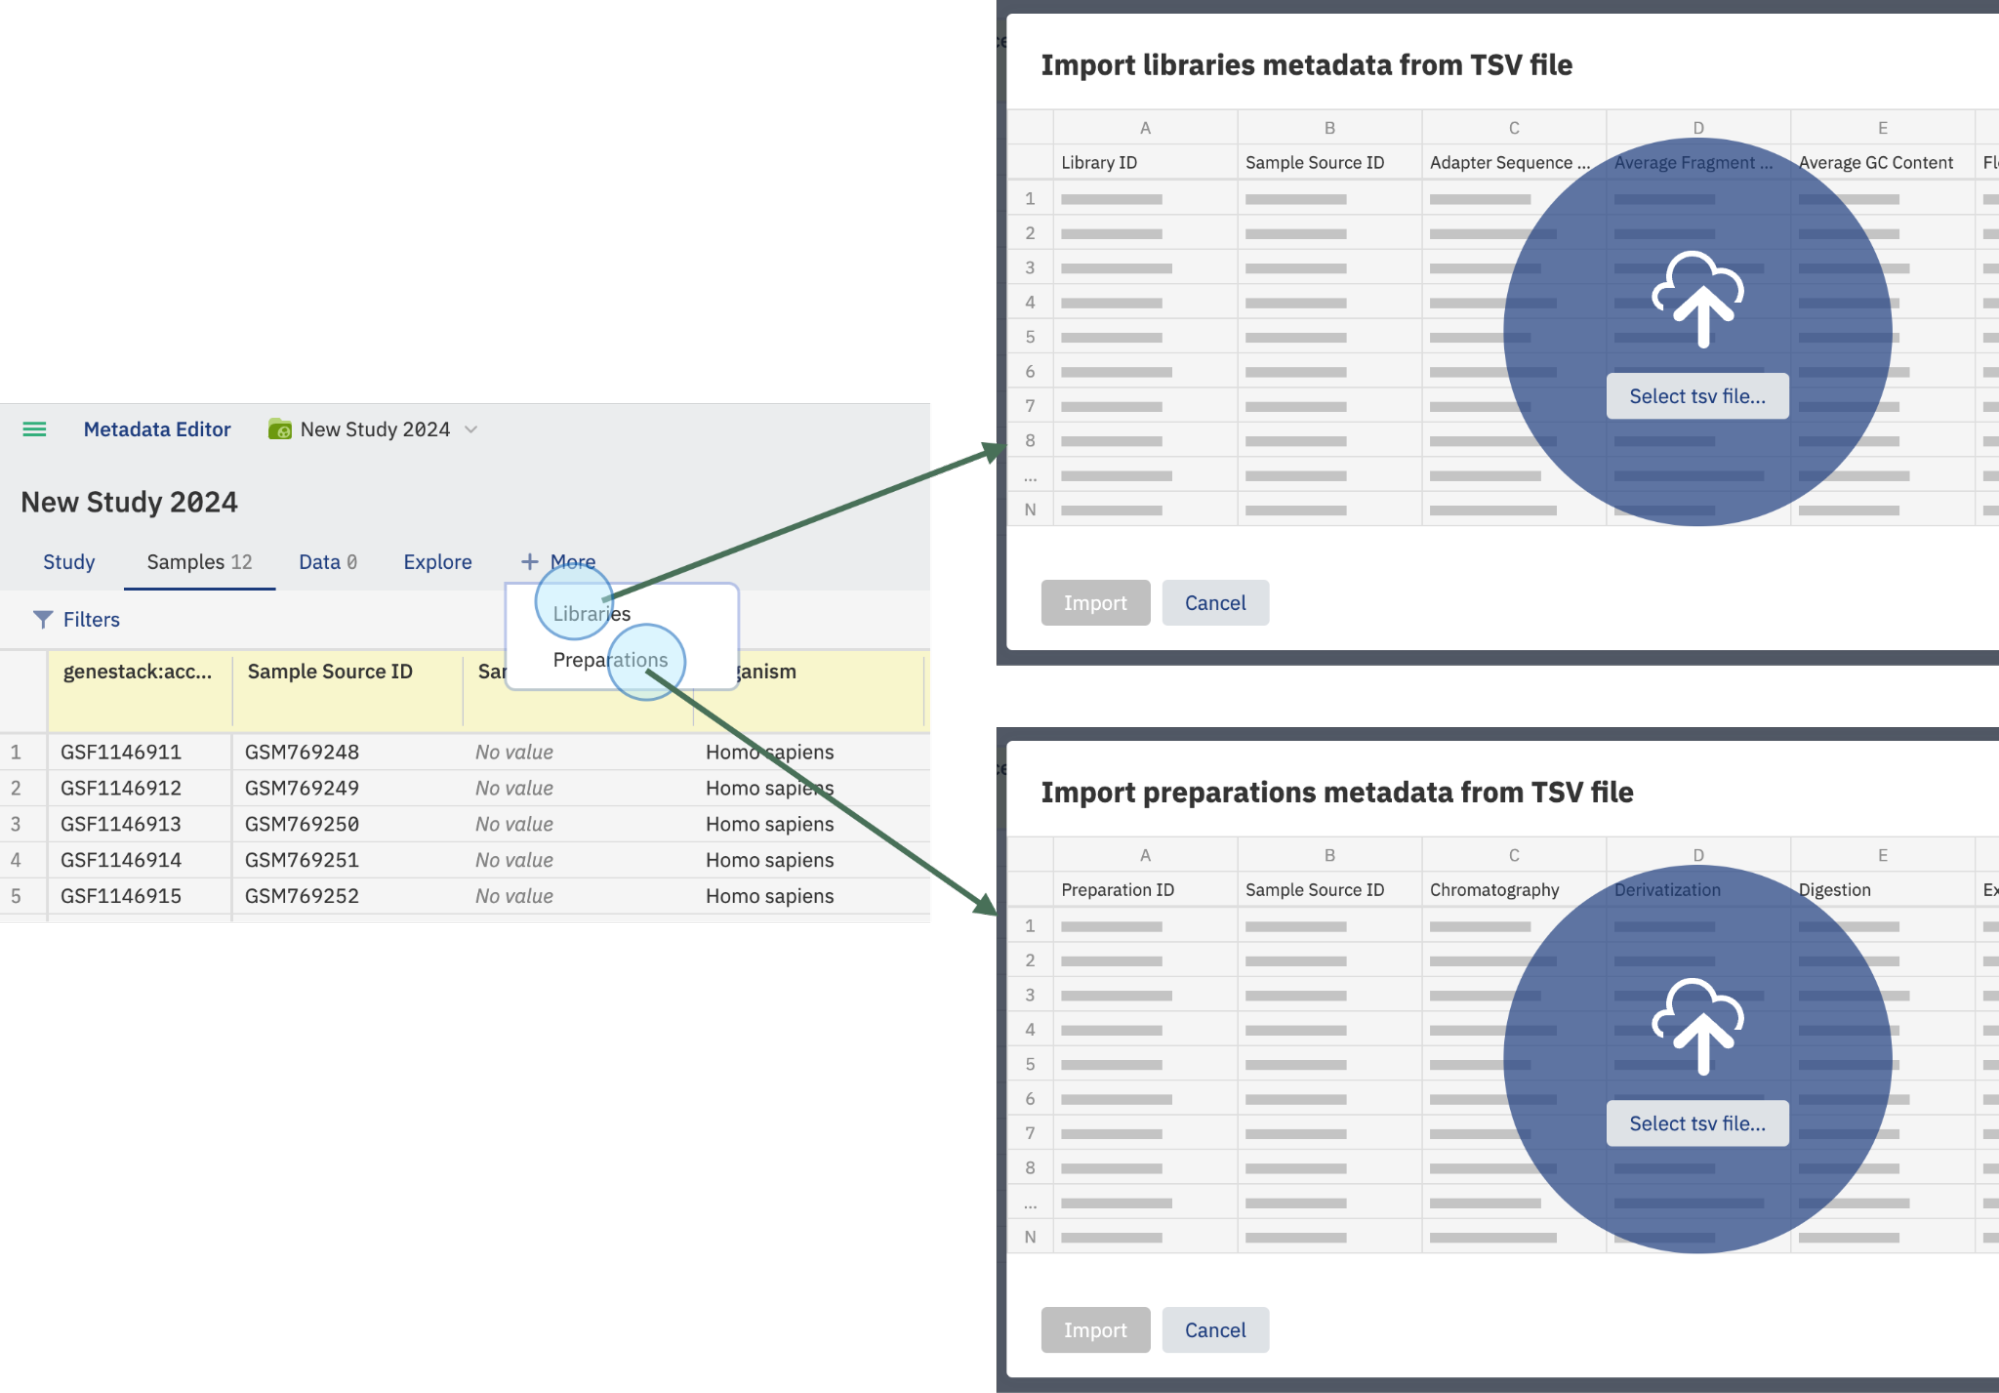
In addition to sample metadata, you can also add Libraries and Preparations metadata. To do so, click on the tab +More to display both options:
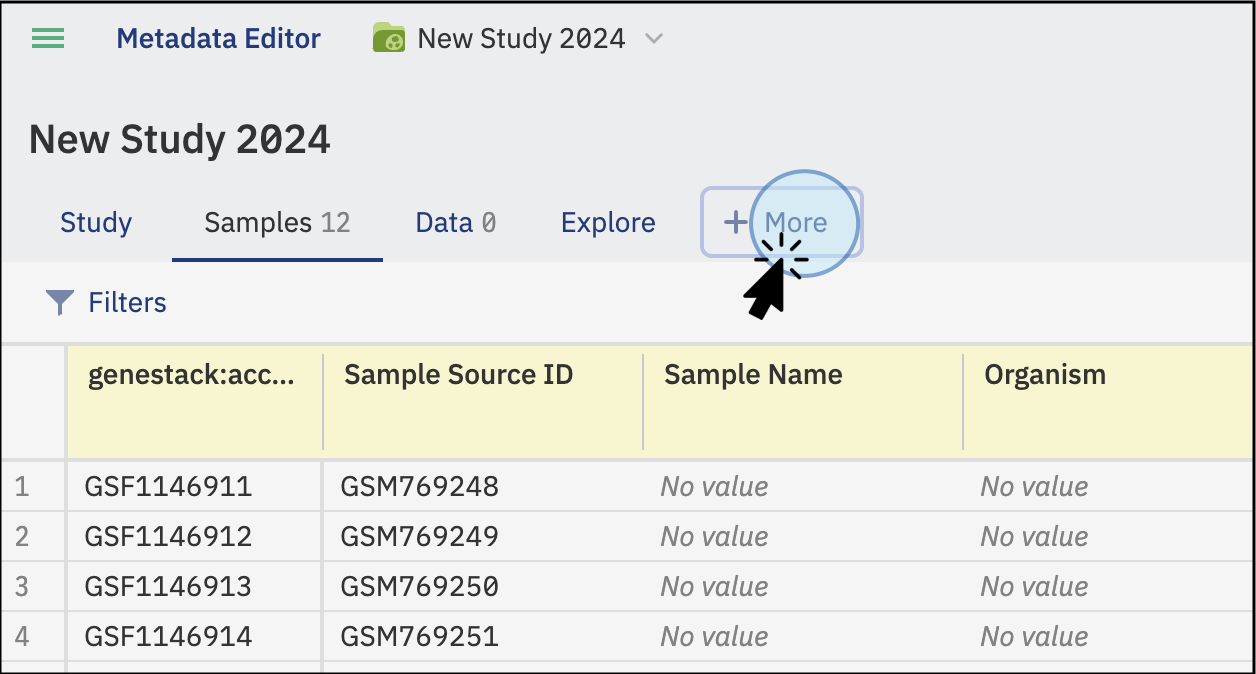
- To add libraries, click on Libraries and select the tabular file to import from your local computer.
- To add preparations, click on Preparations and select the tabular file to import from your local computer.
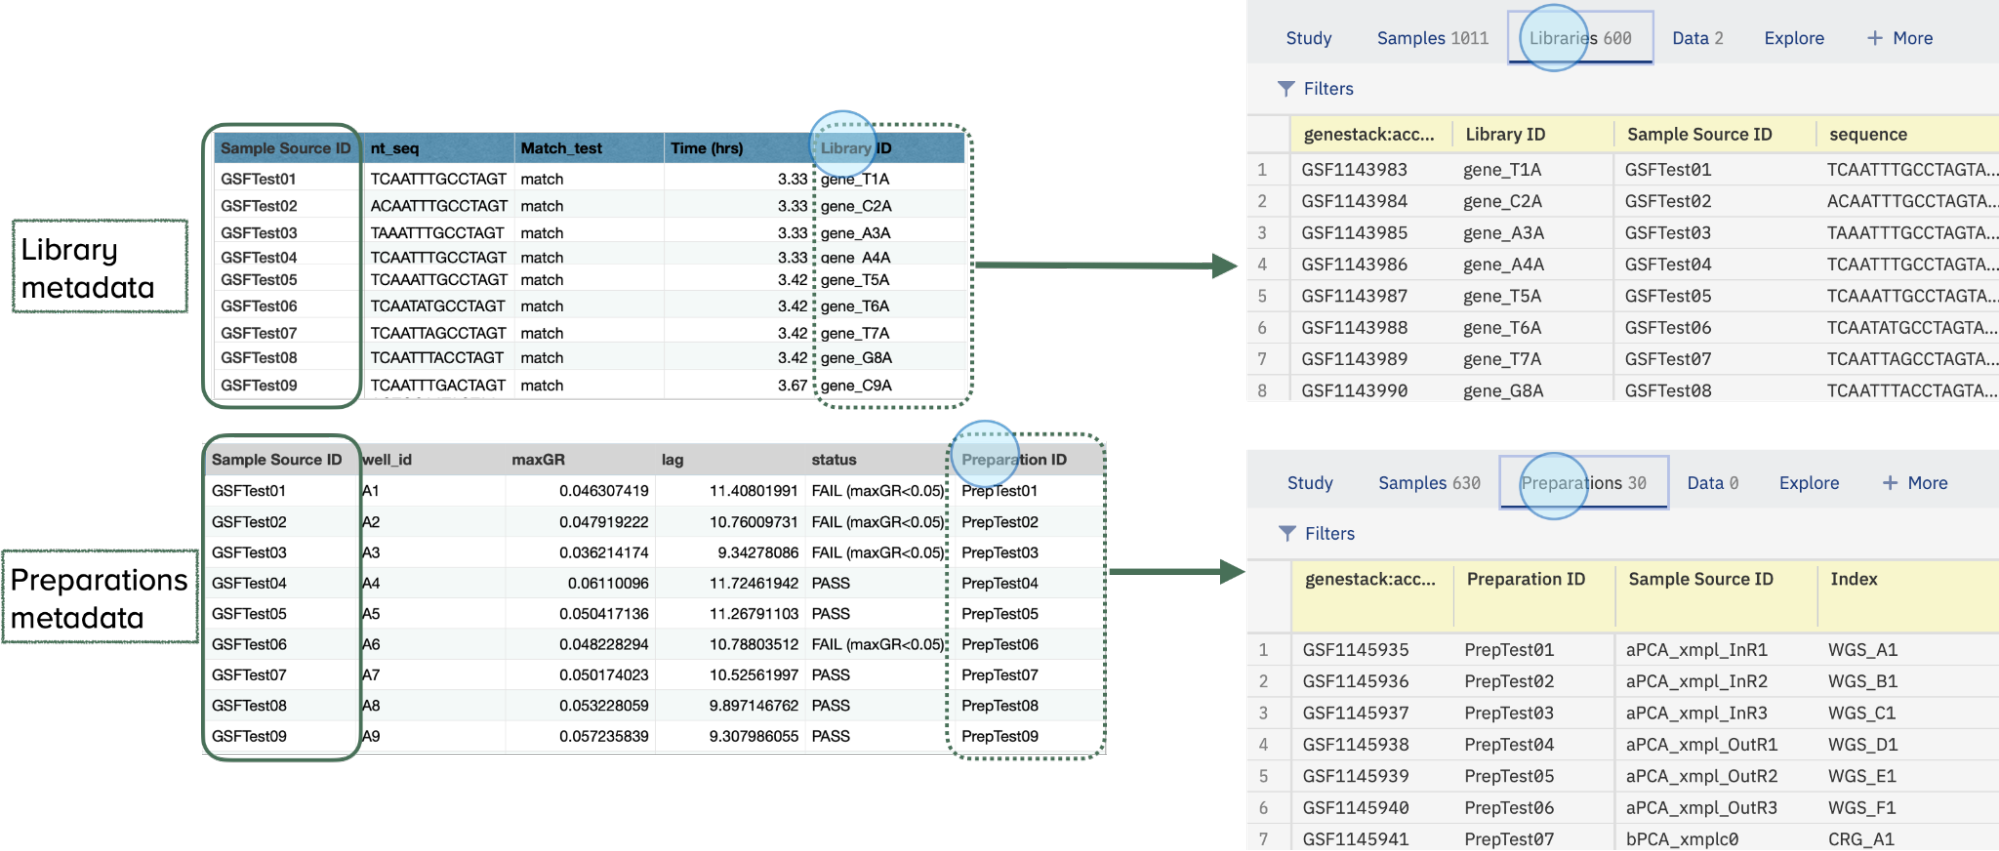
Both types of files are linked to the samples metadata file (from the Samples tab) via the Sample Source ID column. Ensure this column is included in all files to maintain the link between sample metadata, libraries, and preparations.
Link Metadata Files
- Ensure that the Sample Source ID column is included in all files to maintain the link between samples metadata, libraries, and preparations.
- Additionally, include the Library ID column for libraries and the Preparation ID column for preparations to ensure proper recognition and linking of the data.
- Once the data is recognized and linked via these columns, the new metadata tabs will display the recently added data.
Upload experimental Data and attach files
In addition to the samples, libraries, and preparations metadata described above, you can upload experimental data, such as bulk transcriptomics, lipidomics, proteomics, single-cell data, gene variants, etc., that are linked to your study via sample metadata and libraries/preparations. You can also supplement your study by attaching related research materials like PDFs, XLSX, DOCX, PPTX files, images, and more.
Note
The contents of the attached files won't be indexed or made searchable.
- To upload experimental data or attach files, navigate to the Data Tab: On the main screen of the study, click on the Data tab to import and attach data.
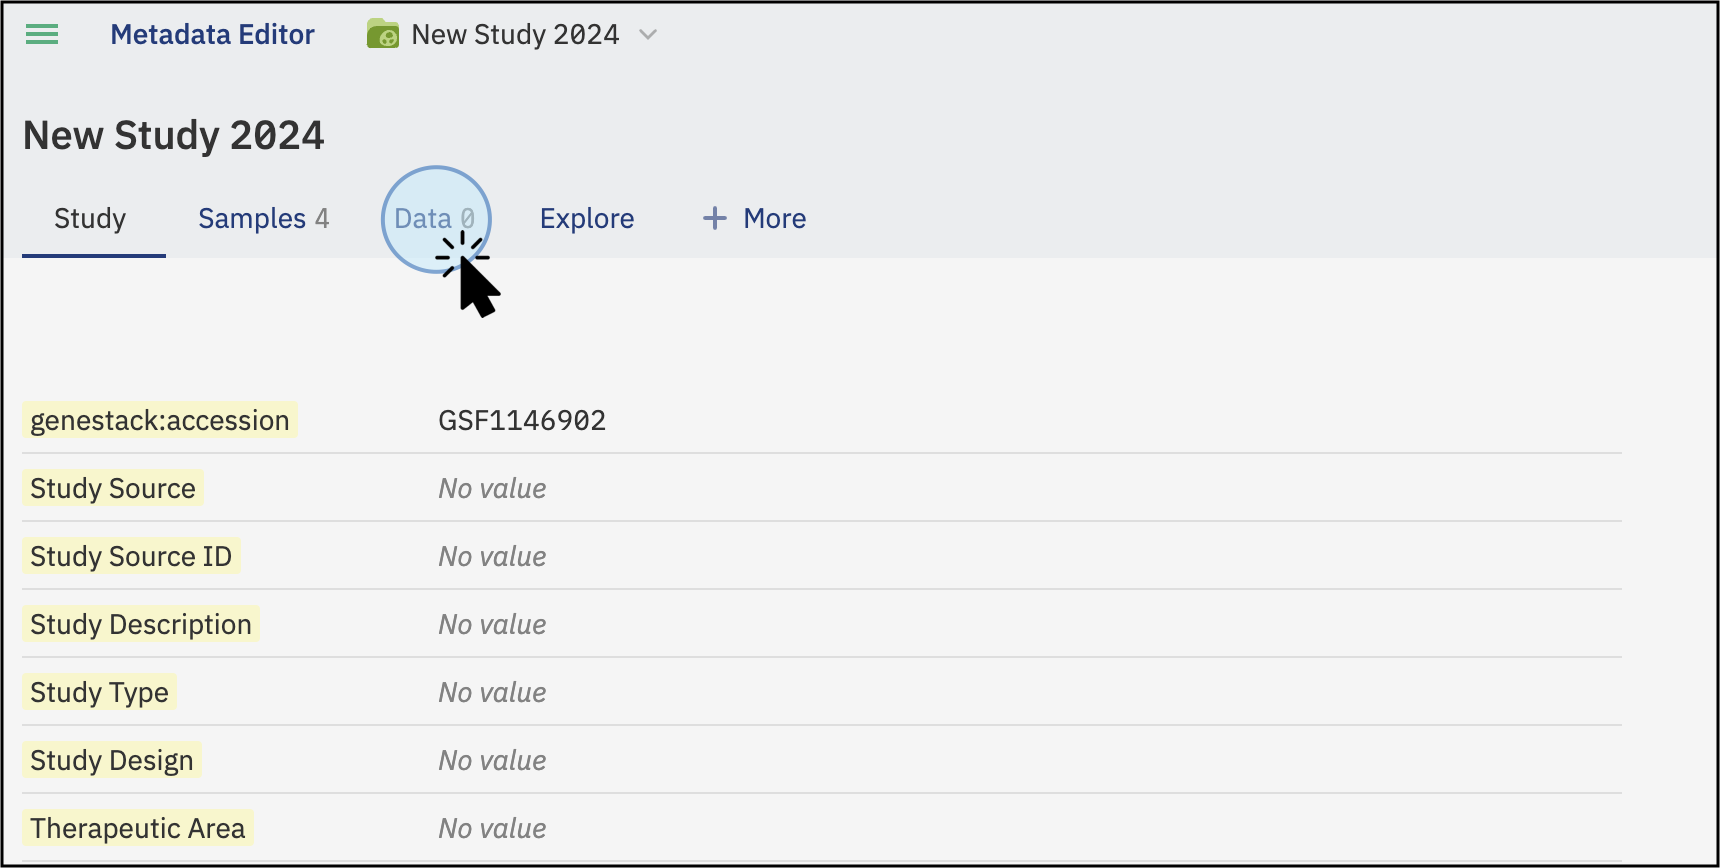
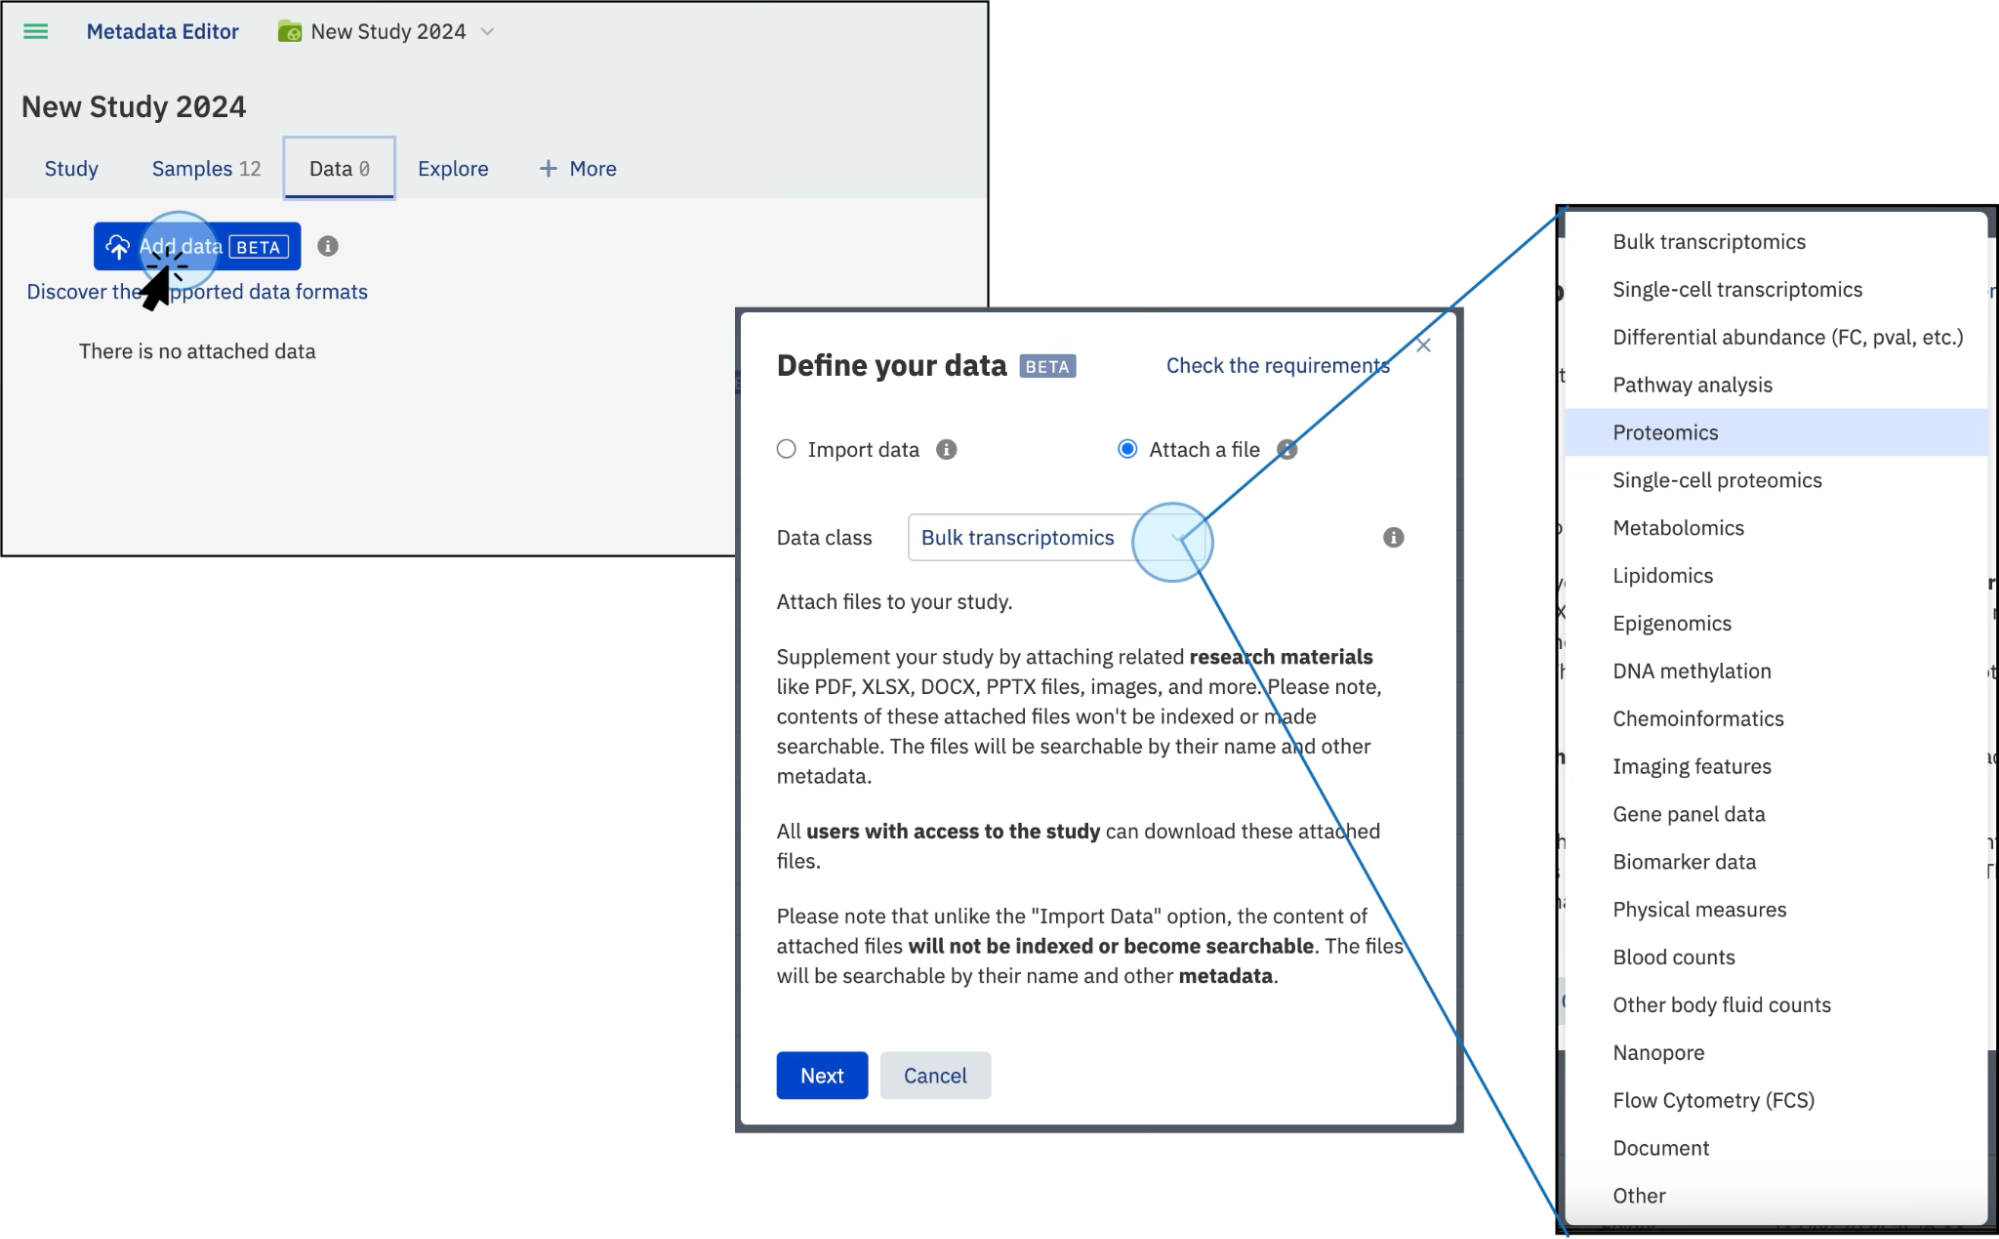
- On the Data tab, click on the Add data button. This will open a new window where you can select the action to perform: import data or attach a file.
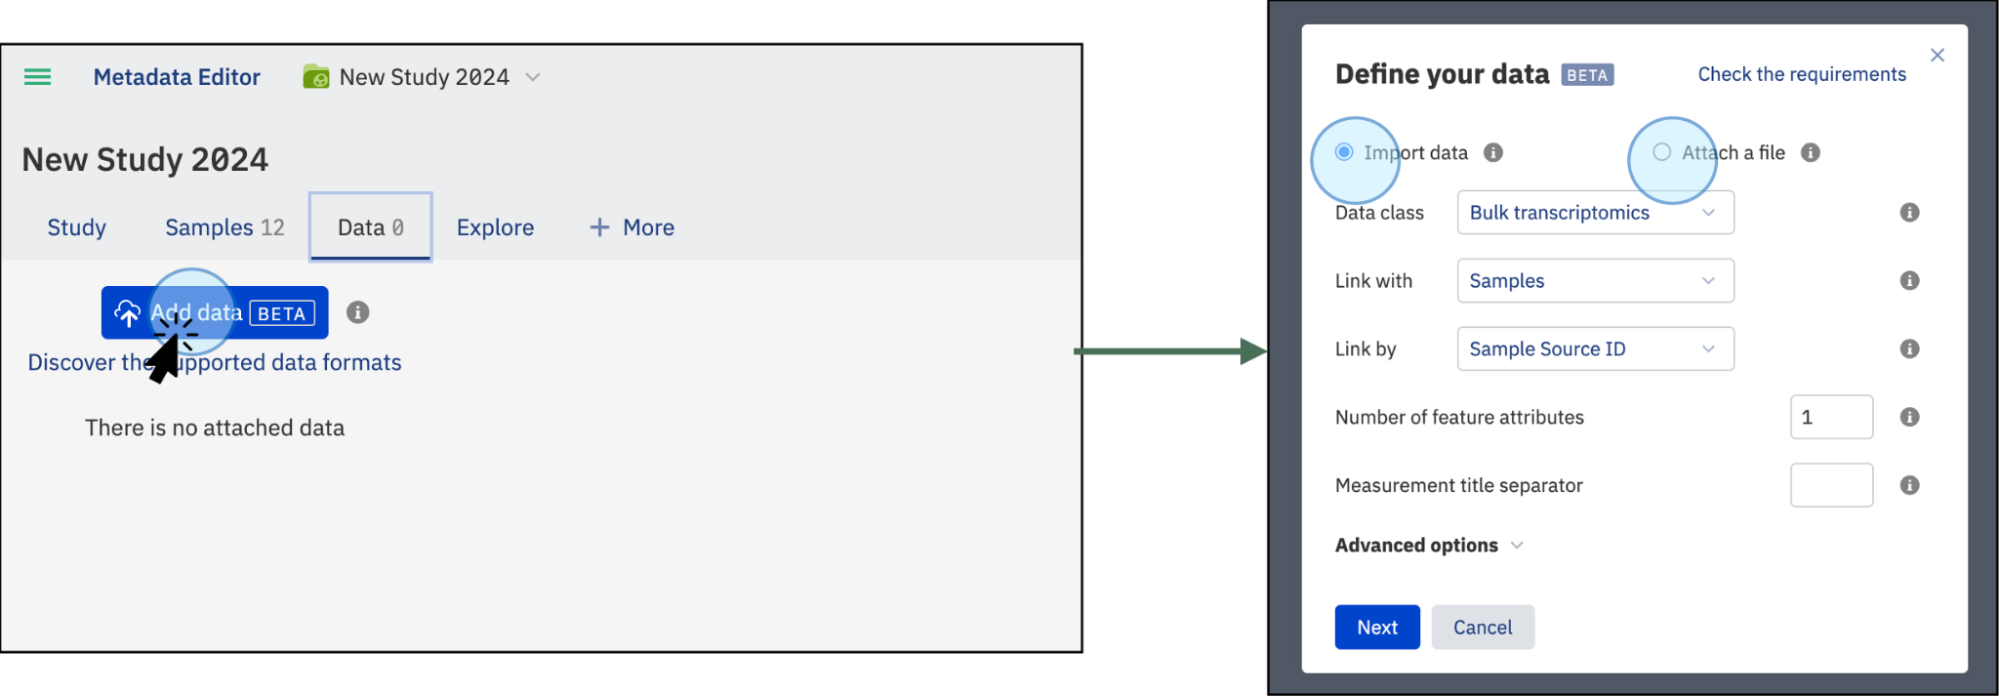
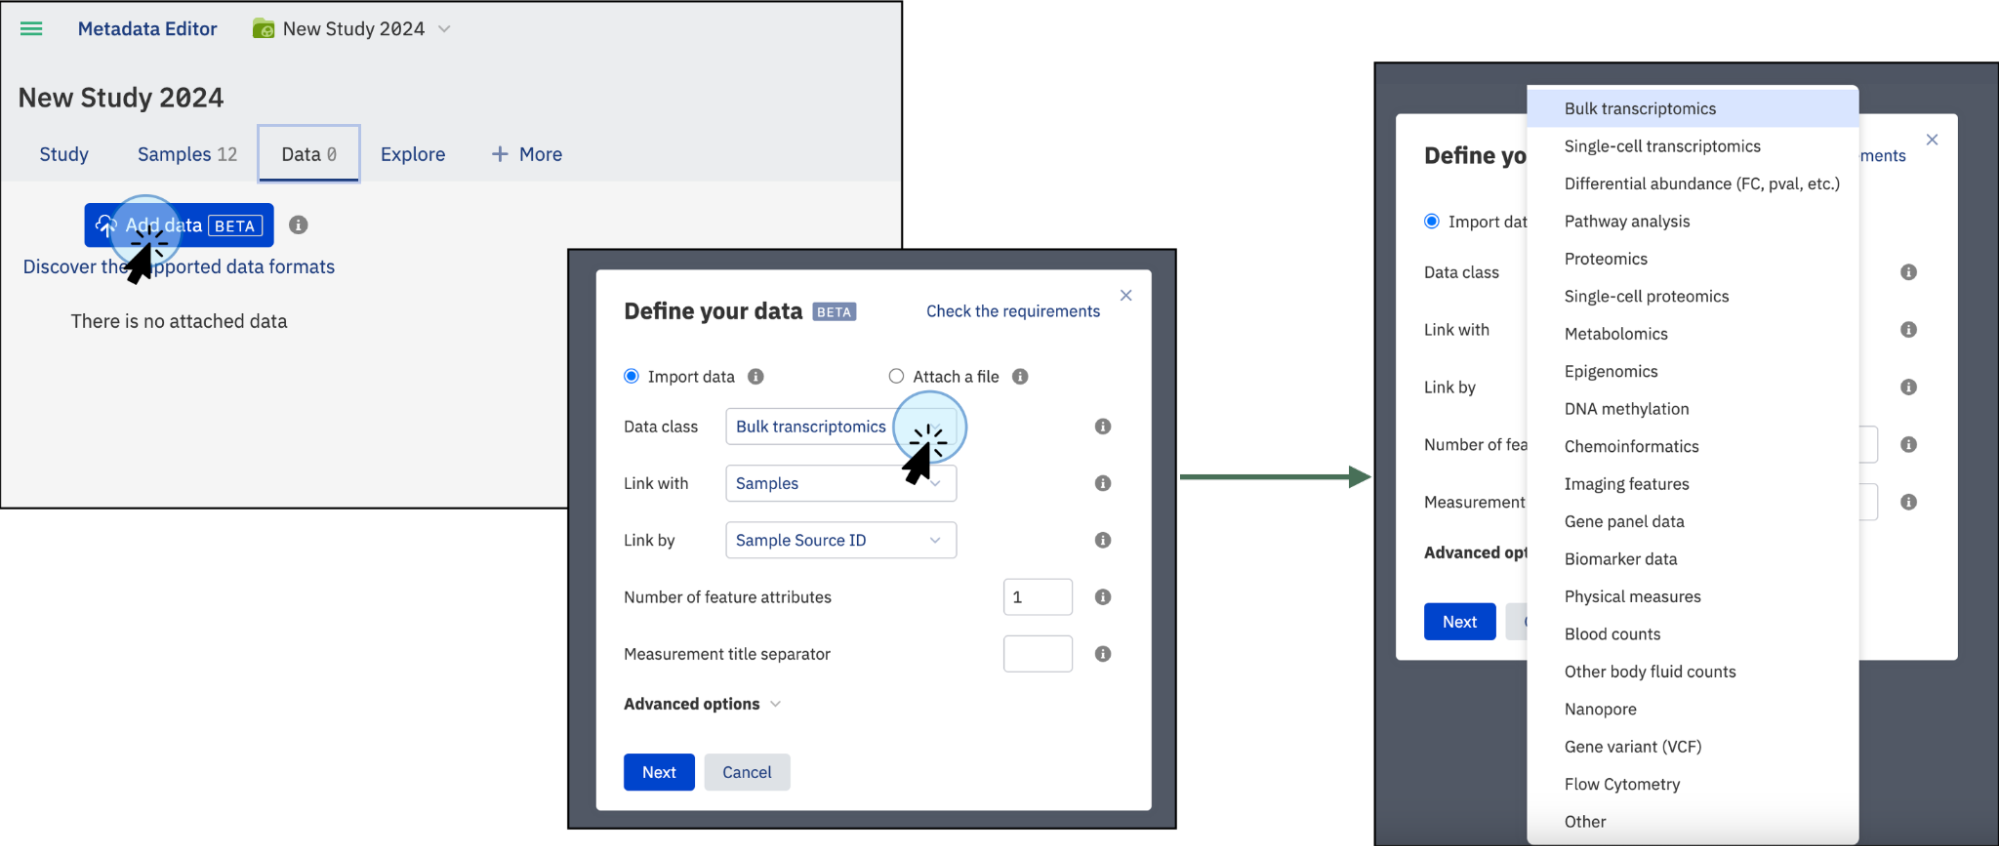
You can upload your experimental data, such as bulk transcriptomics, proteomics, chemoinformatics, and more, in a supported tabular format like TSV, GCT, VCF, or FACS. The contents of the uploaded file will be indexed and searchable. Select Data class to choose the type of data to import. If the type of data is not listed, select the Other option.
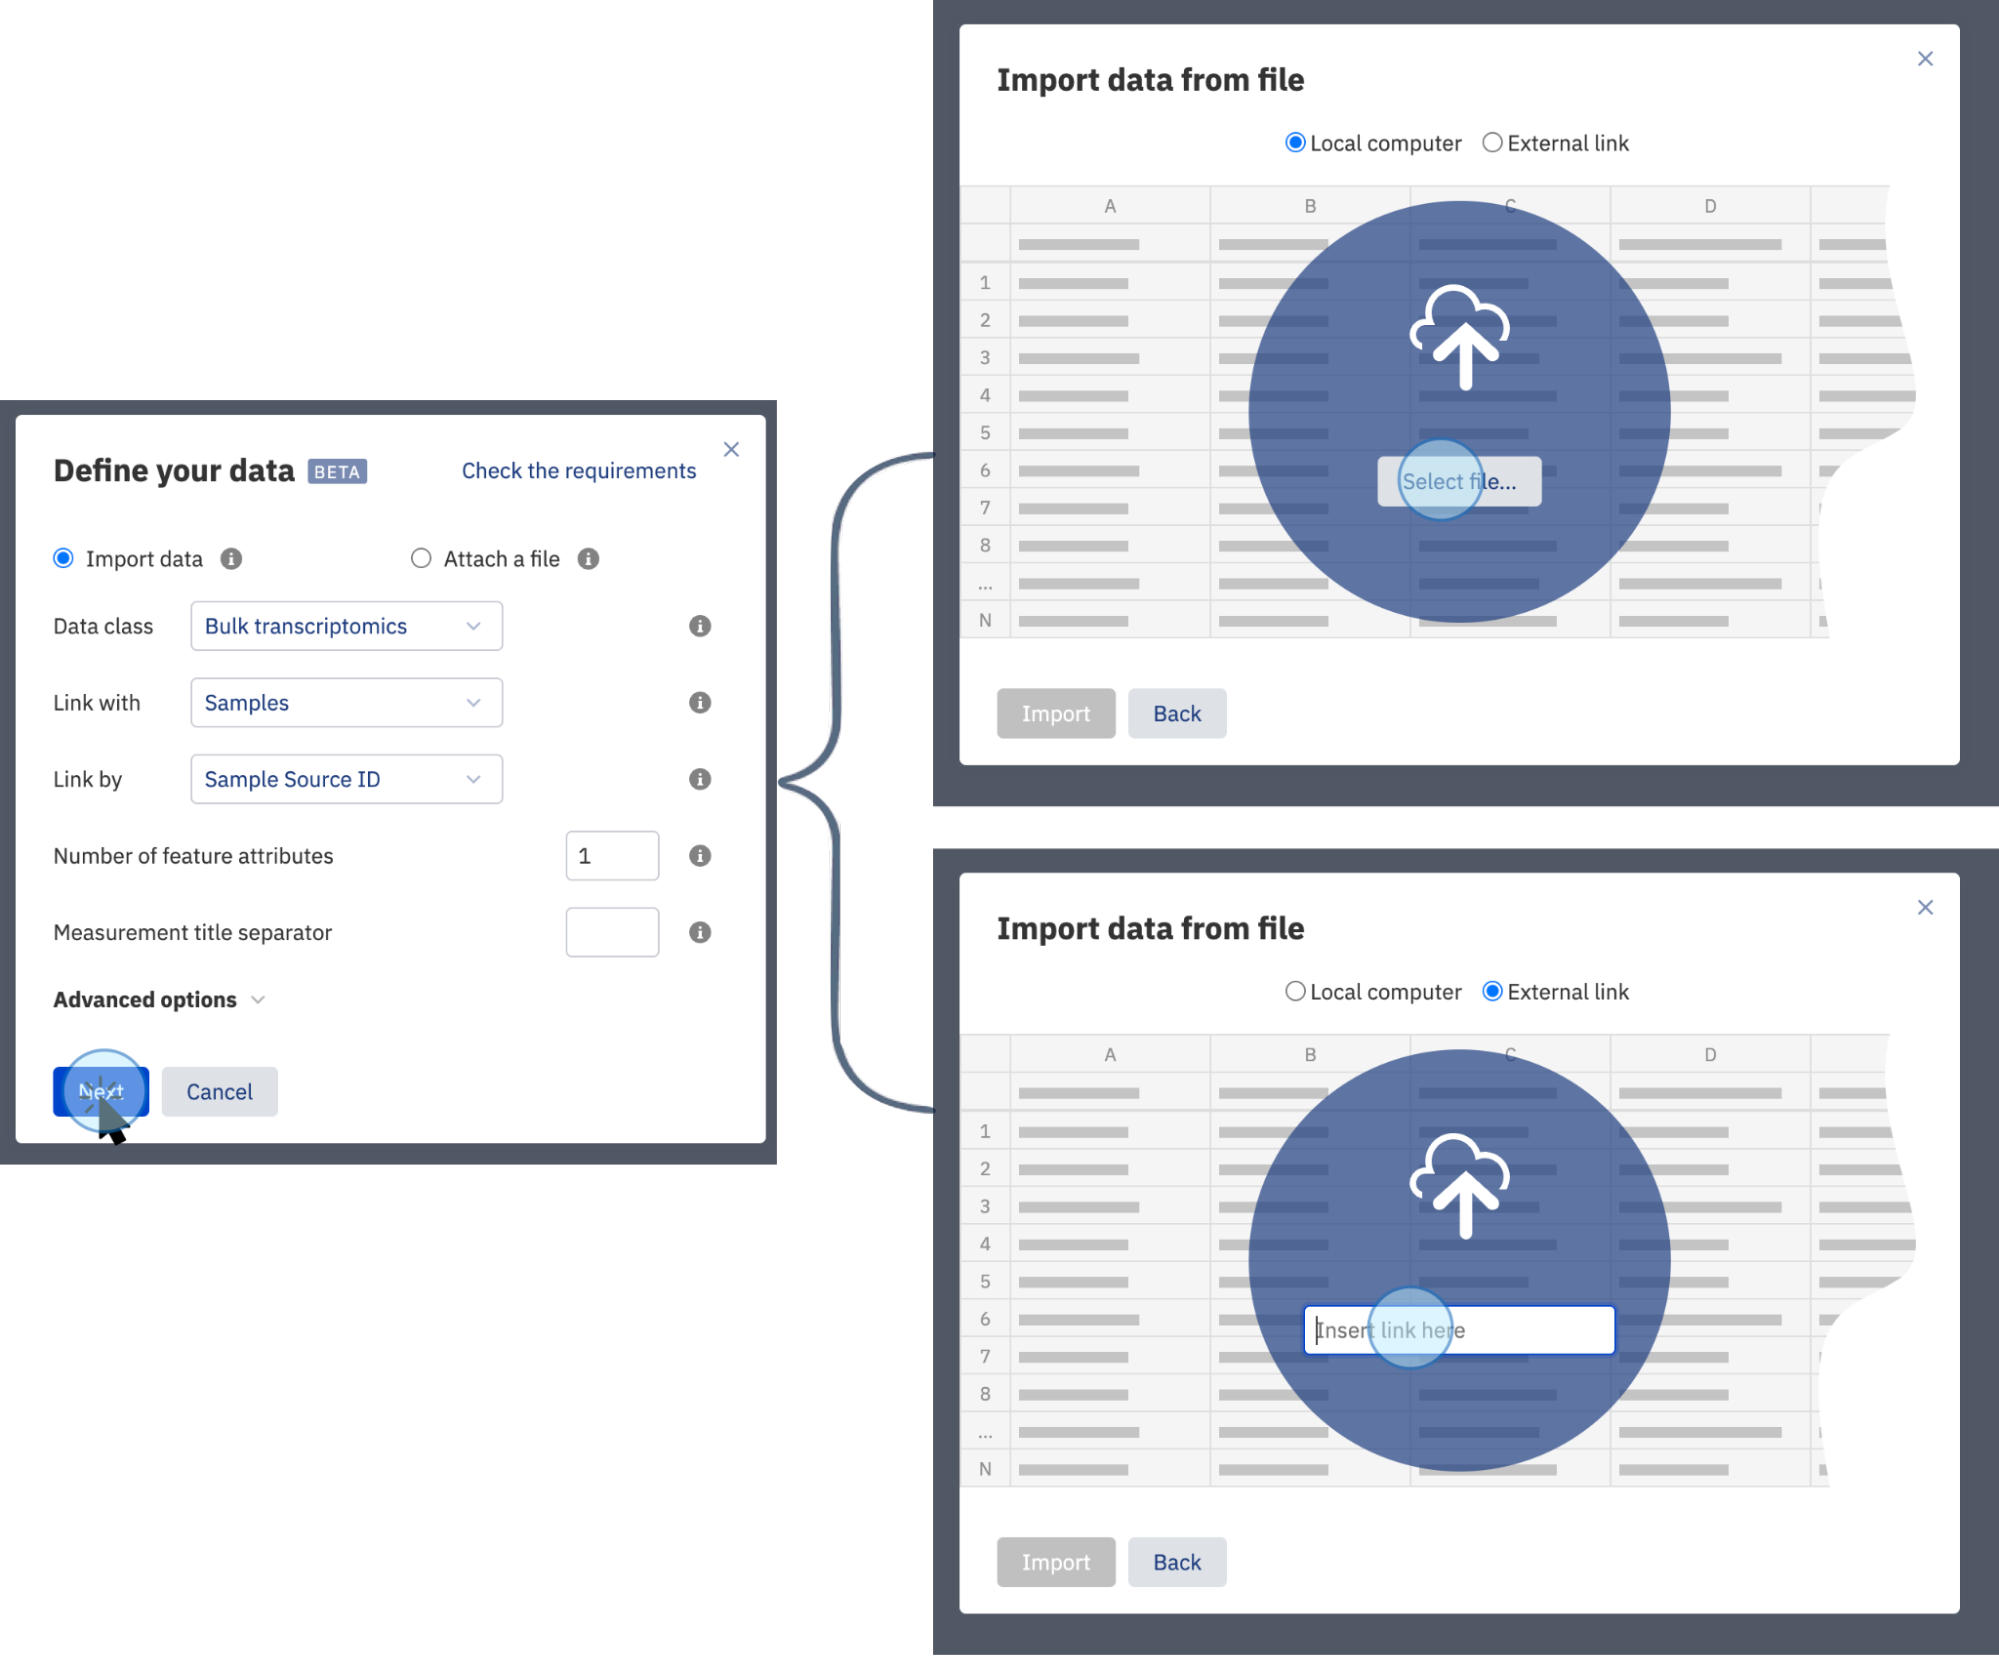
- Click Next. This will open a window where you can select a file containing experimental data from your local computer or a from an external storage system (such as AWS)
Linking Data
- Default Linking: By default, the data is linked with the Samples file using the Sample Source ID column. To ensure proper linking, make sure your file includes a column called Sample Source ID with the same IDs used in the Sample Metadata table uploaded previously (see section "Upload Samples Metadata").
- Custom Linking: Alternatively you can select a different column to link the experimental data, such as Sample Name, Date, etc.
Only template attribute can be used as a custom linking attribute.
This provides flexibility in how data is associated, but it is recommended to include the Sample Source ID column for consistent referencing and linking samples metadata files with additional data types like libraries and preparations.
Data can be linked to Library or Preparation metadata by using Library ID and Preparation ID.
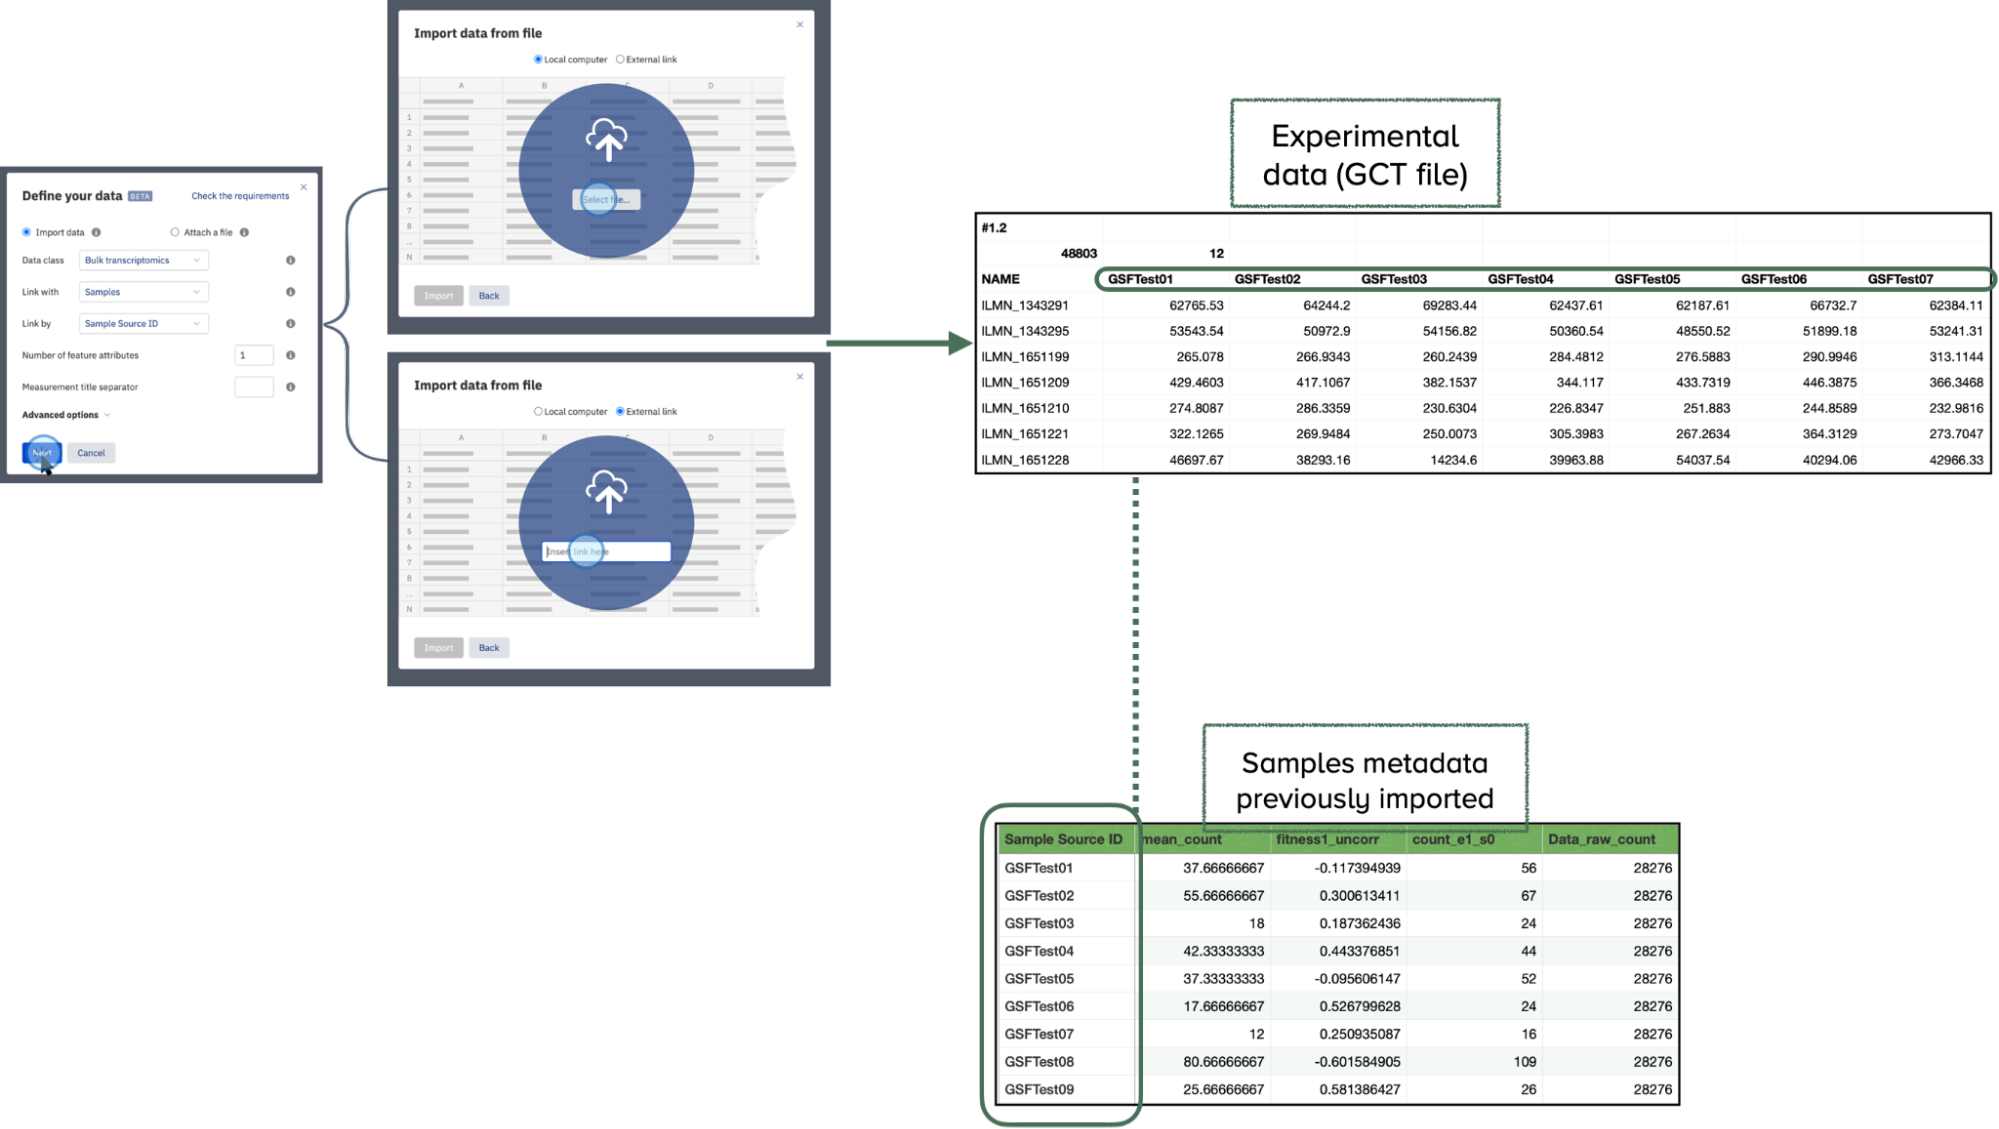
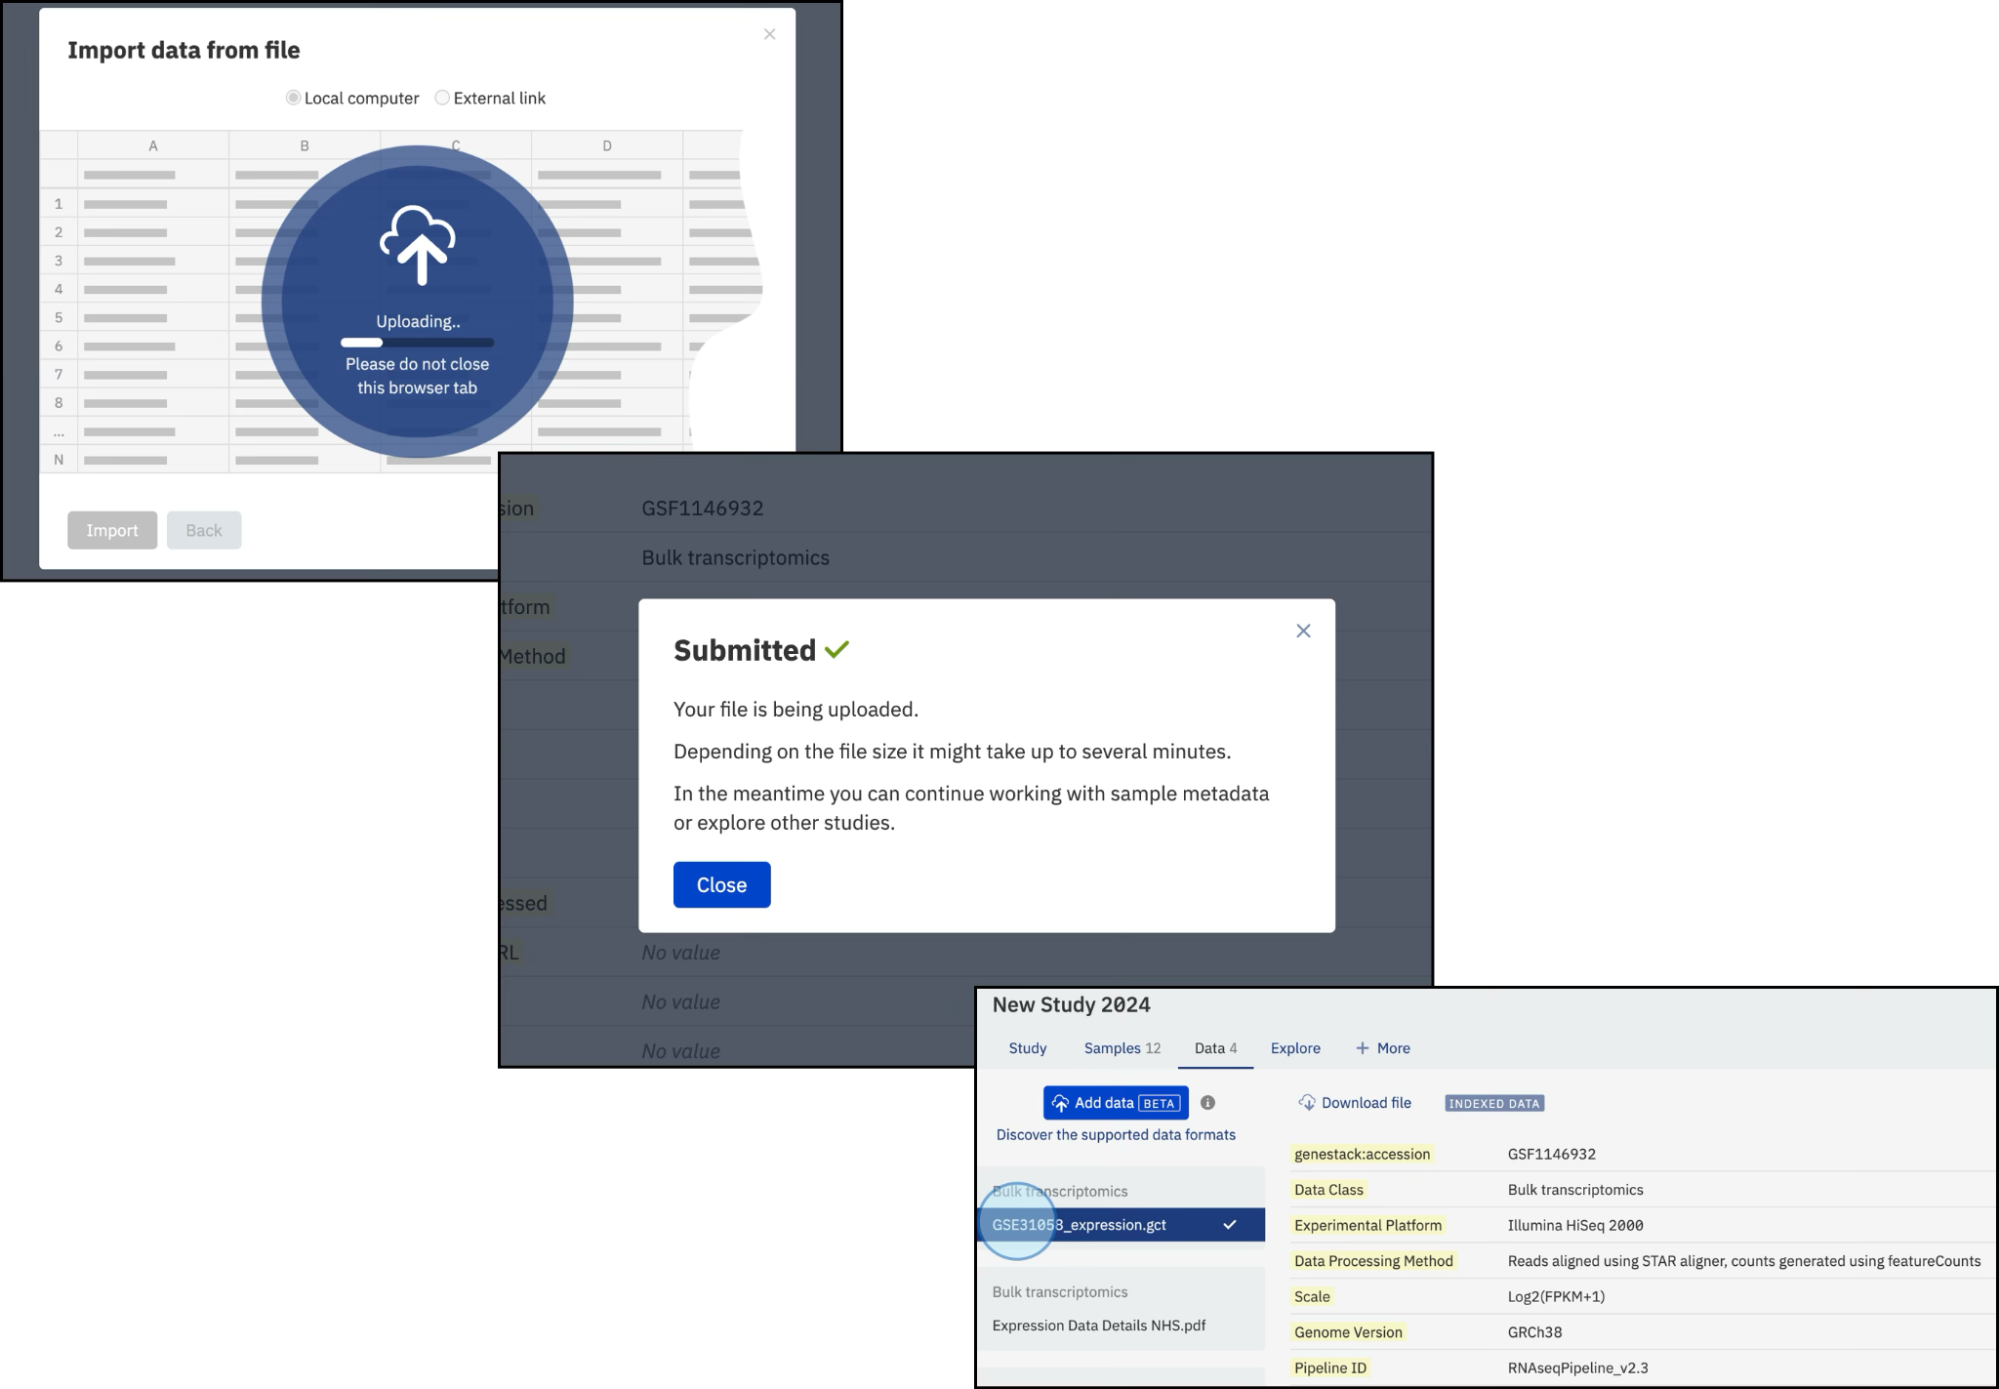
The selected files will be scanned to find an appropriate link (typically the Sample Source ID column) and the uploading will automatically begin.
Attach a file
Enhance your study by attaching supplementary research materials such as PDFs, XLSX, DOCX, PPTX files, images, and more. These attachments differ from linked files, as they are not directly associated with sample metadata or experimental data. Instead, they serve as complementary materials, such as Budget reports, manuscripts, presentations, logos, etc.
To attach a file:
- Click on Add data and then select Attach a file.
- You can attach any format files such as PDF, PNG, etc.
- Select the Data class for the file. You can select the data class Other if the preferred class is not listed
- Click Select file.... Select the file from your local computer.
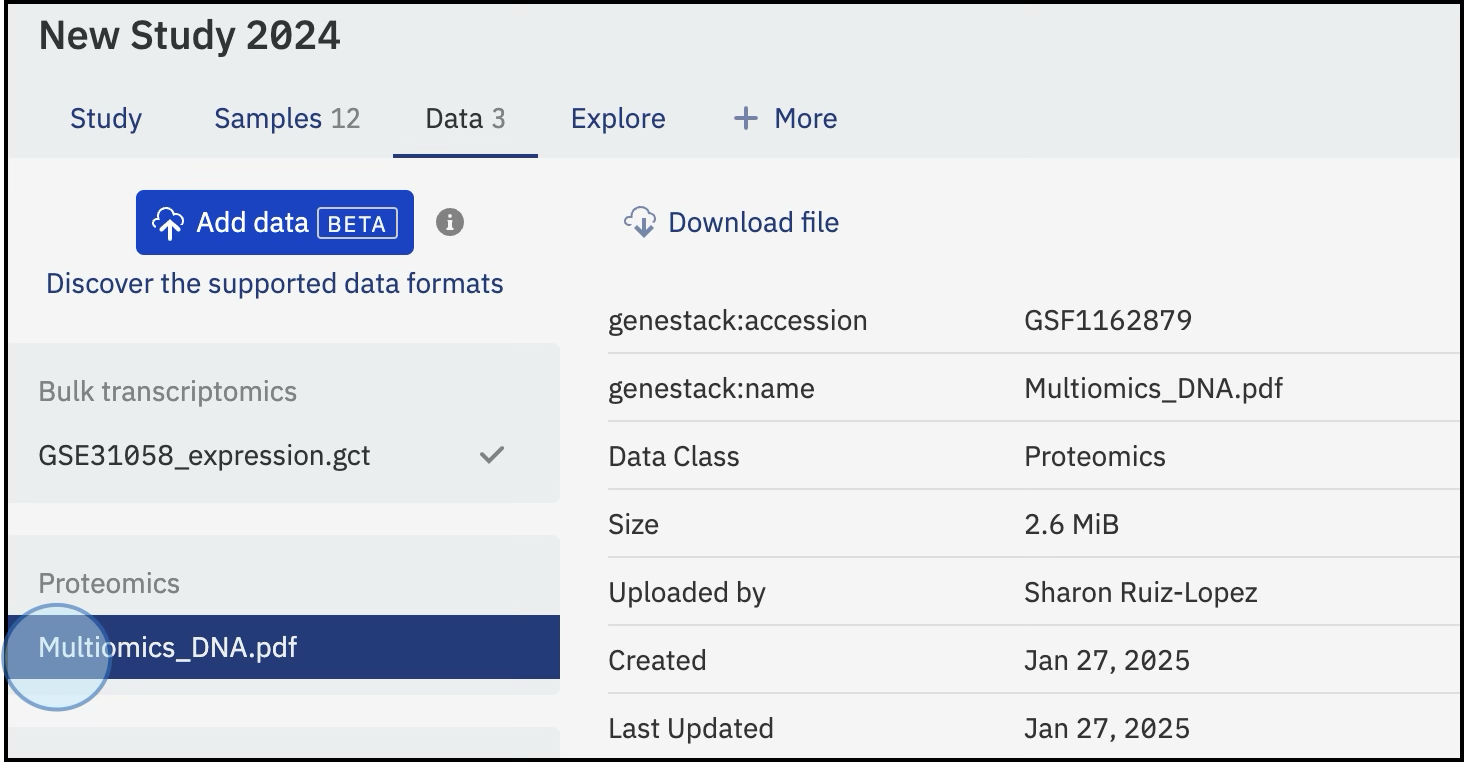
Once the files are selected, the upload will begin and the files will be attached. Available data will be displayed in the Data tab by type, e.g. Proteomics.
Key Differences Between Imported and Attached Data
Users can specify the type of data they are attaching, improving organization and accessibility. Once the file is imported into the ODM, it will be automatically categorized under the appropriate section.
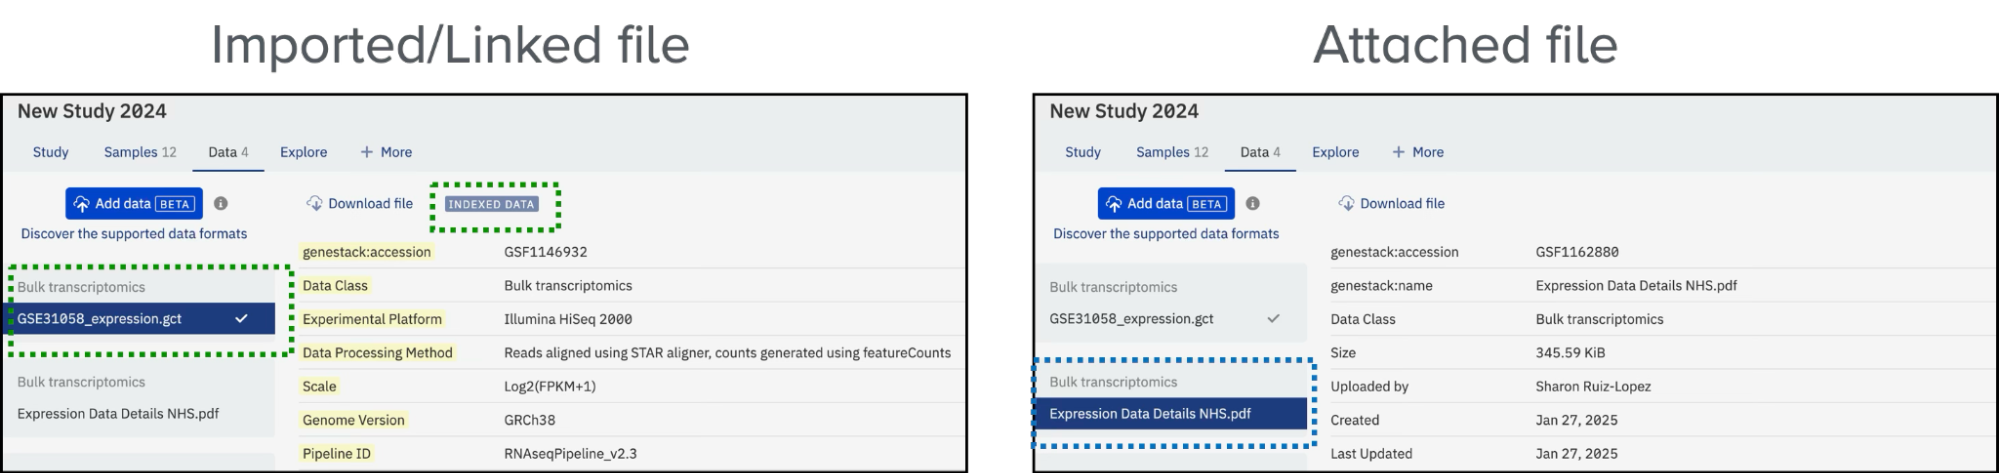
Imported Data: - Indexed and searchable within the platform. - Located under the relevant data type tab (e.g., Bulk Transcriptomics). - Visual indicators: - A tick symbol to denote successful indexing. - A legend labeled Indexed Data.
Attached Data: - Not indexed or searchable. - Displayed under the relevant section (e.g., Bulk Transcriptomics) with associated metadata. - Metadata is currently not editable.
For example, importing a GCT file linked as experimental data will be listed under Bulk Transcriptomics, with visual indicators like a tick symbol and the Indexed Data legend. A manuscript in PDF format will appear under the Bulk Transcriptomics section with relevant metadata.
Data curation
Data curation involves the process of creating, organizing, and maintaining data sets so they can be accessed and used by people looking for information. This process includes collecting, structuring, indexing, and cataloging data for users in an organization, group, or the general public. In ODM, you can validate and harmonize your metadata across studies to ensure it conforms to your data model, allowing you to spend less time on data wrangling and more time on data analysis. Follow these steps to integrate and curate your data seamlessly.
Access the Samples Tab:
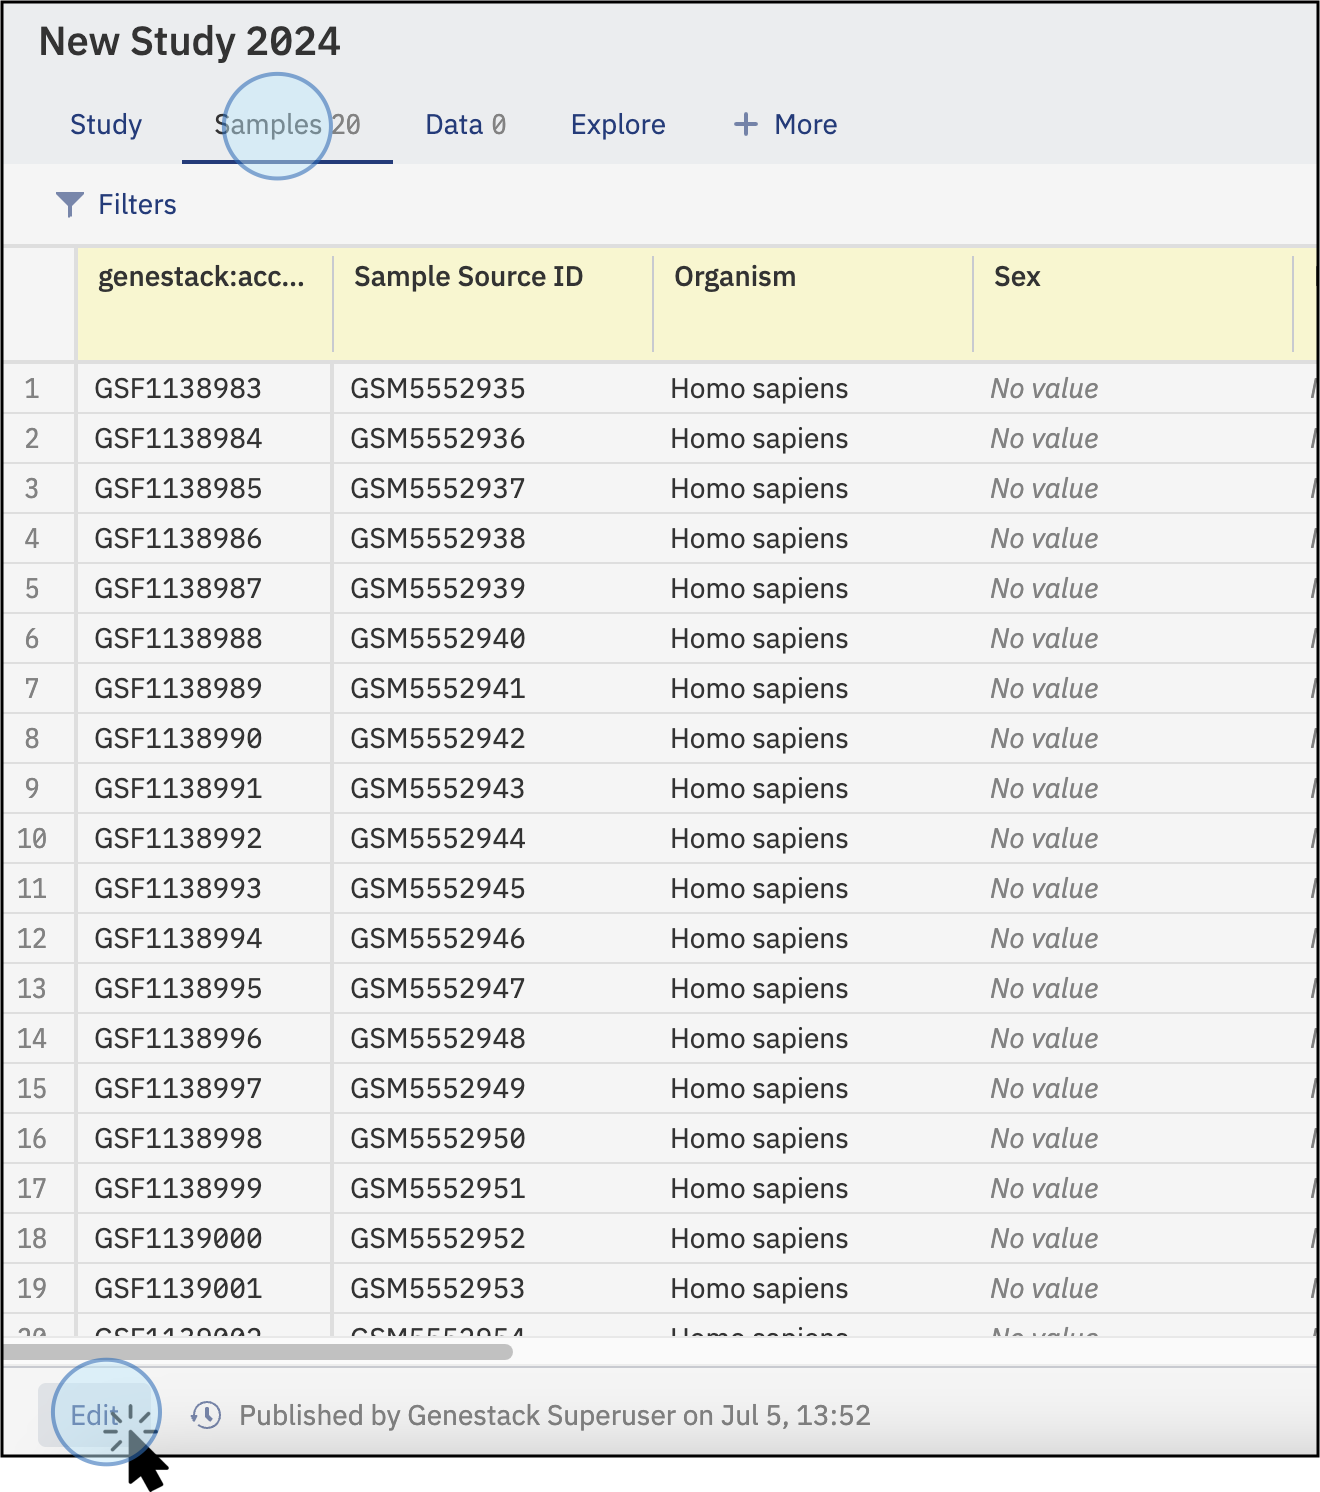
- Click on the Samples tab from the main study screen to explore previously uploaded data.
- To start the curation process, click on Edit in the bottom left corner of your window.
Identify any data
- Identify any data that is not valid according to the applied template. Invalid data will be highlighted in red under the yellow template columns.
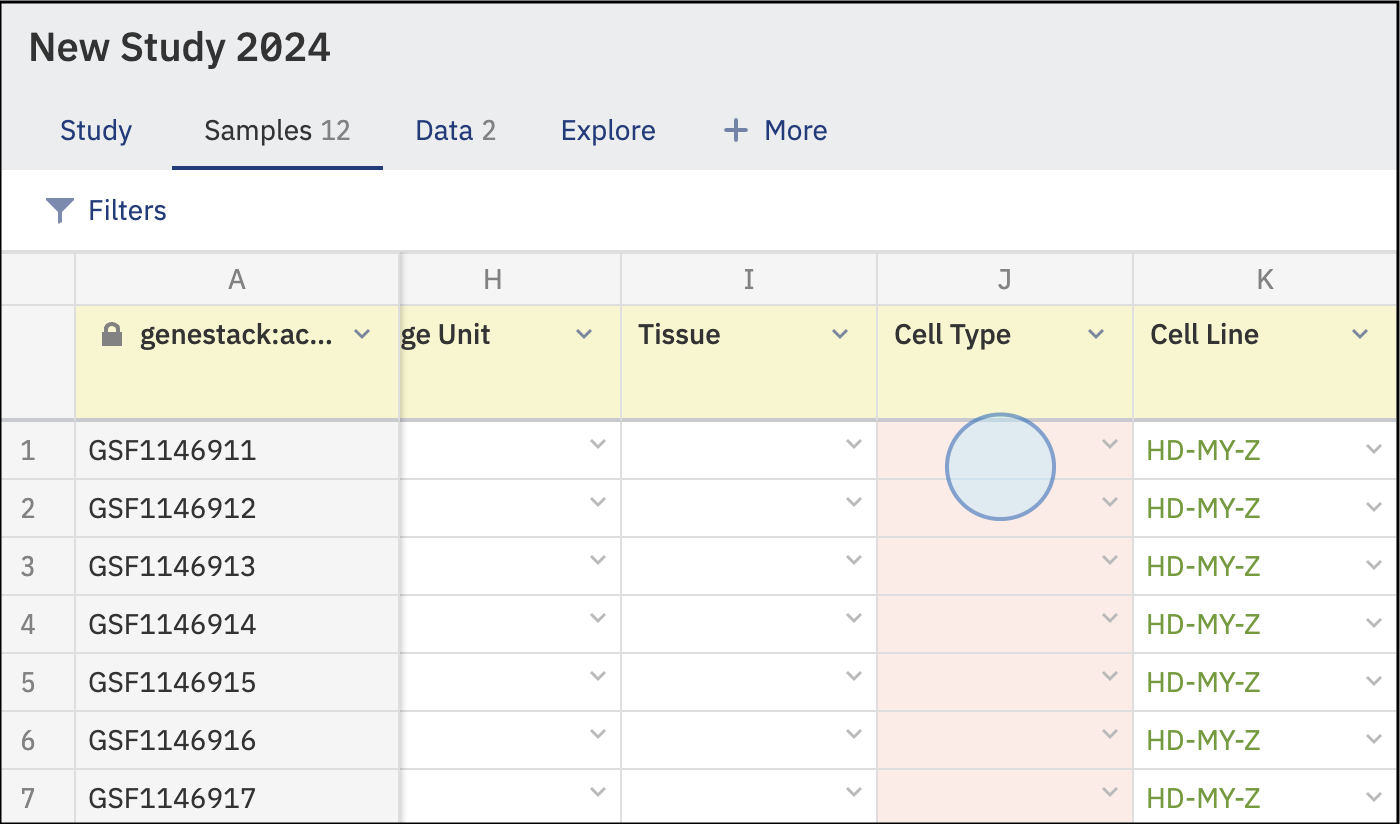
- Validation is crucial for ensuring data quality, facilitating data harmonization, and streamlining data management.
Find more information regarding validation in the Key Concepts section.
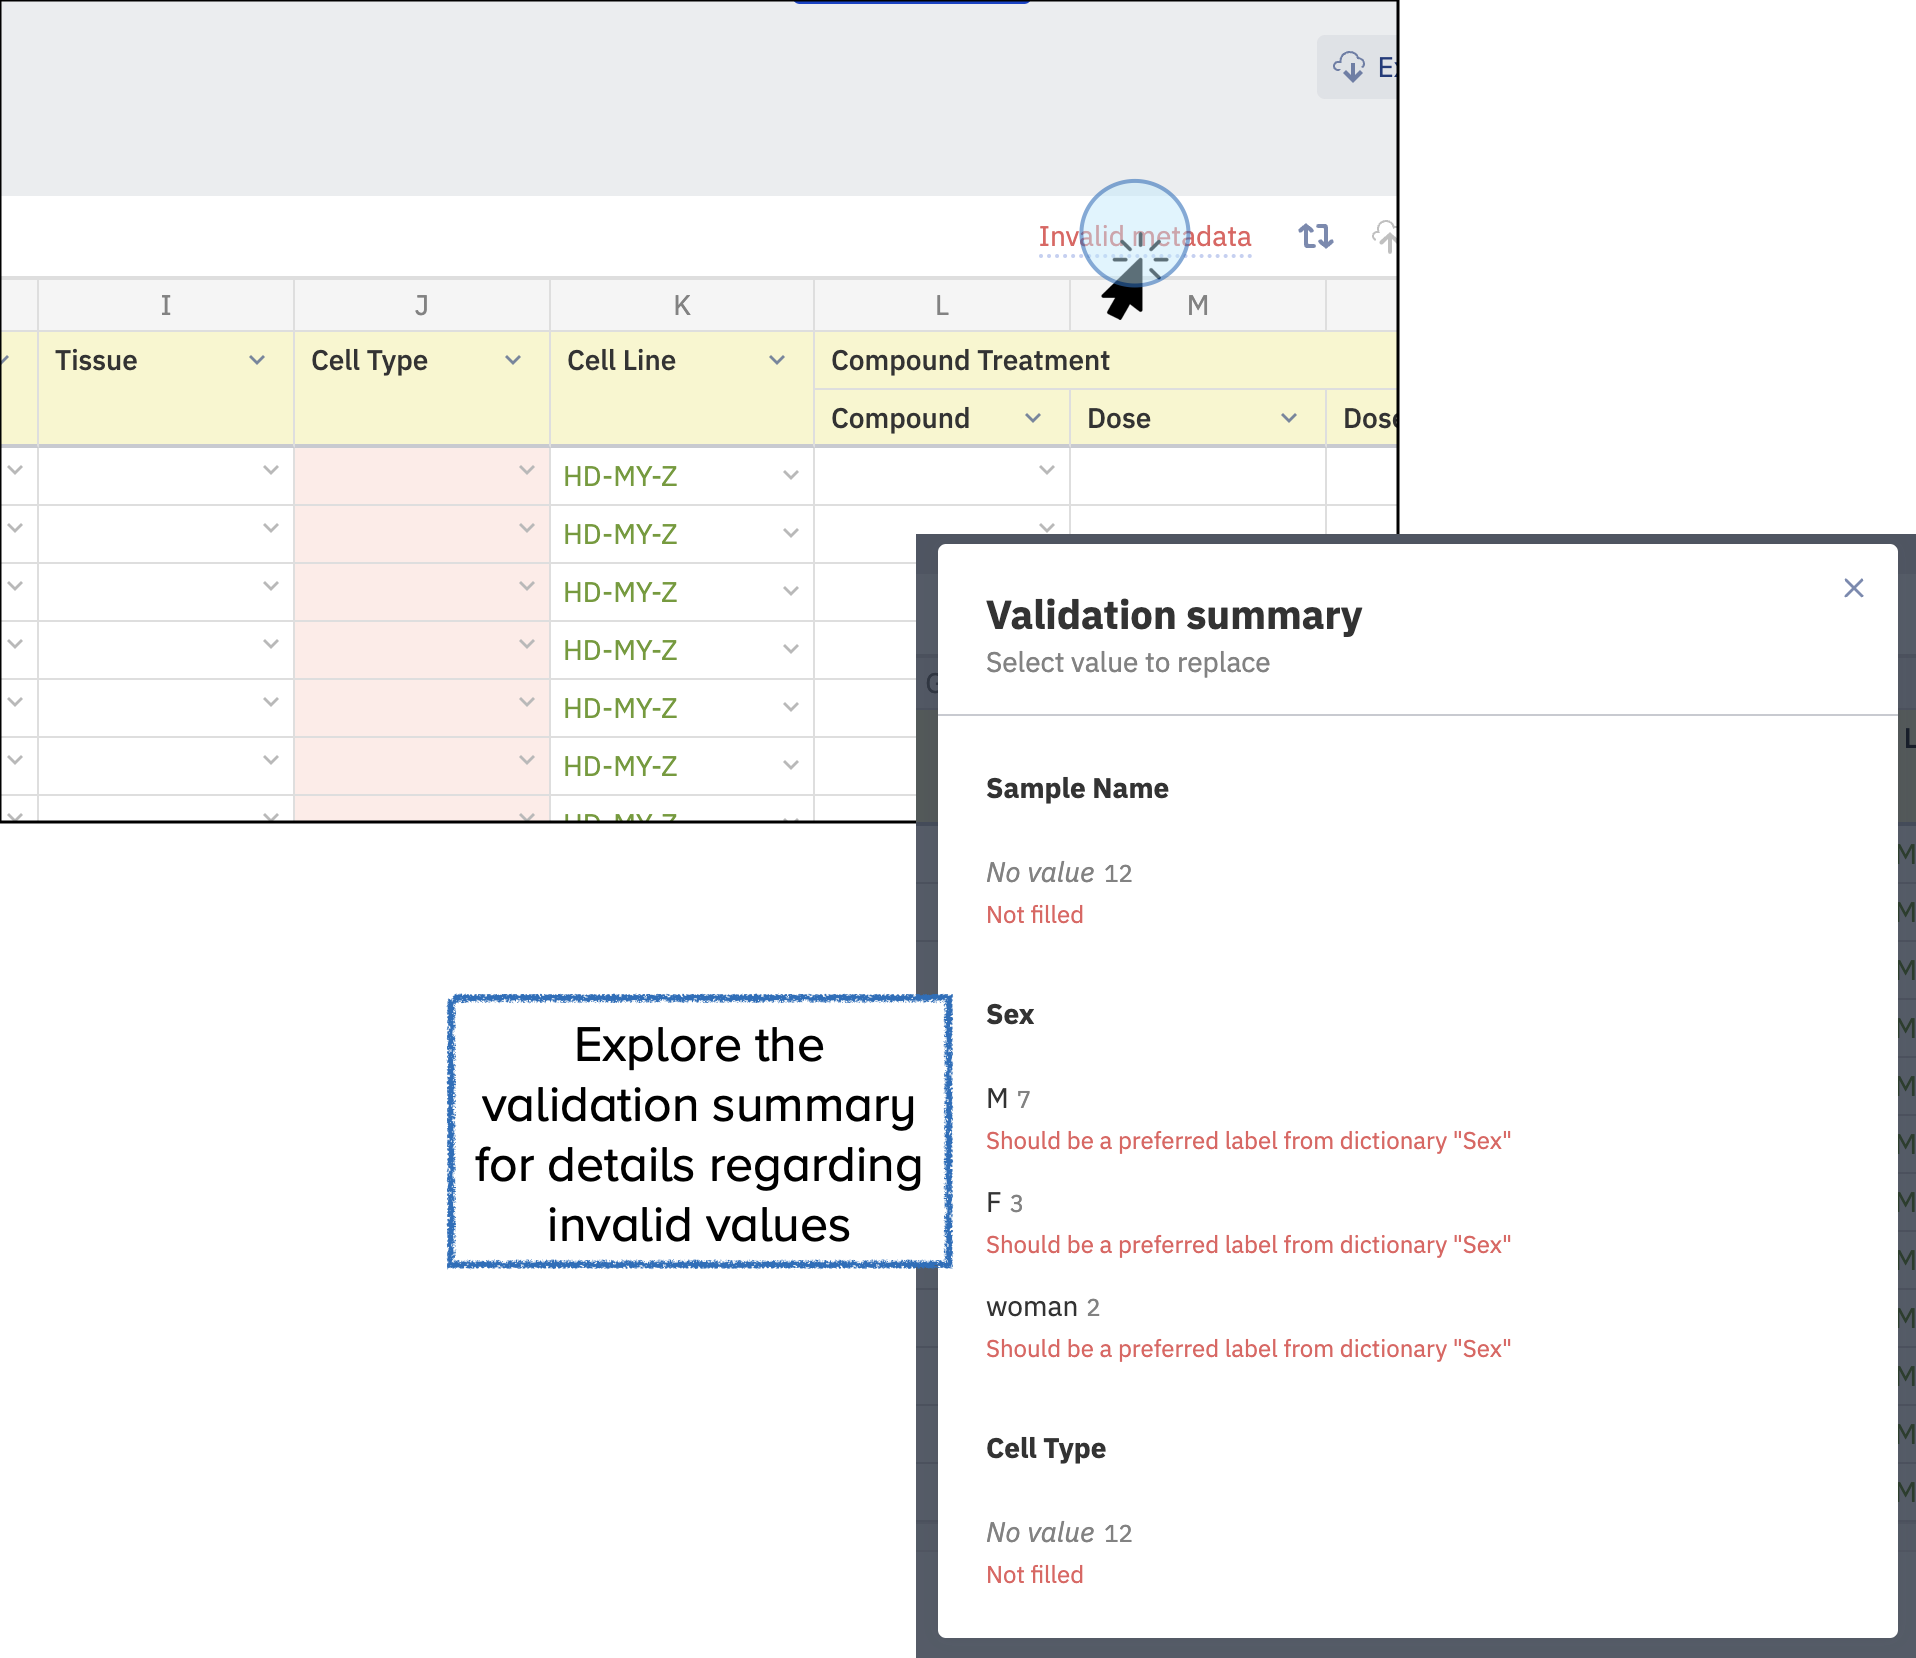
- Click on the Invalid Metadata text at the top right of your table to see an explanation of which attributes are not valid and why.
Correct Invalid Data
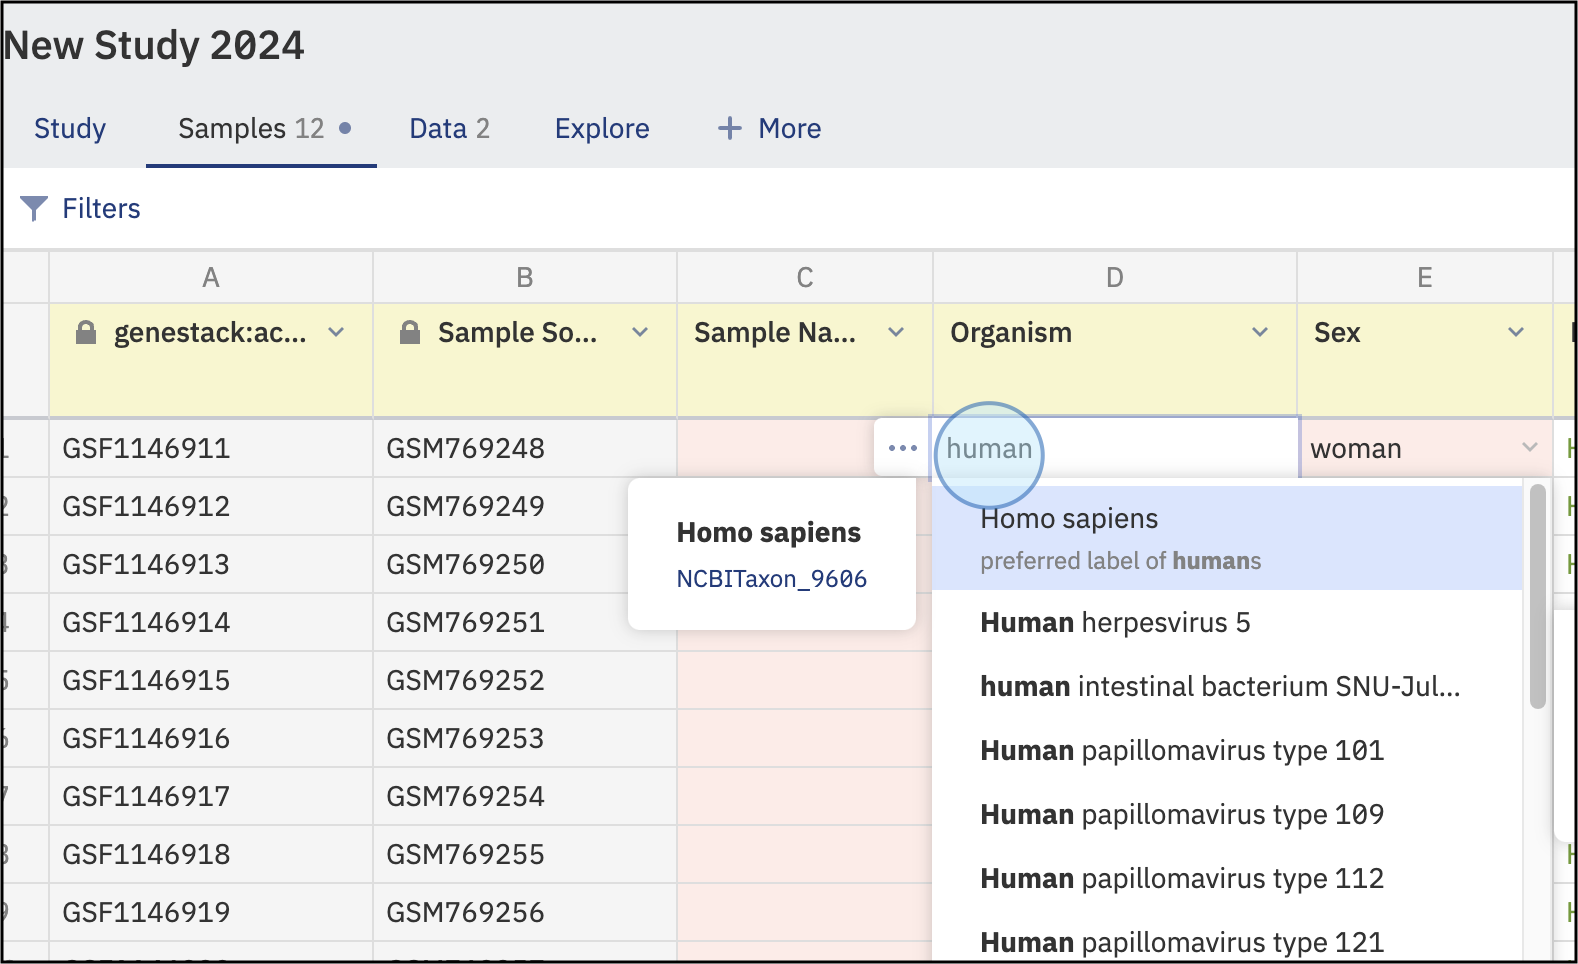
- Add or correct any invalid data by typing the details. Suggested values and labels will be based on the selected ontologies for specific features.
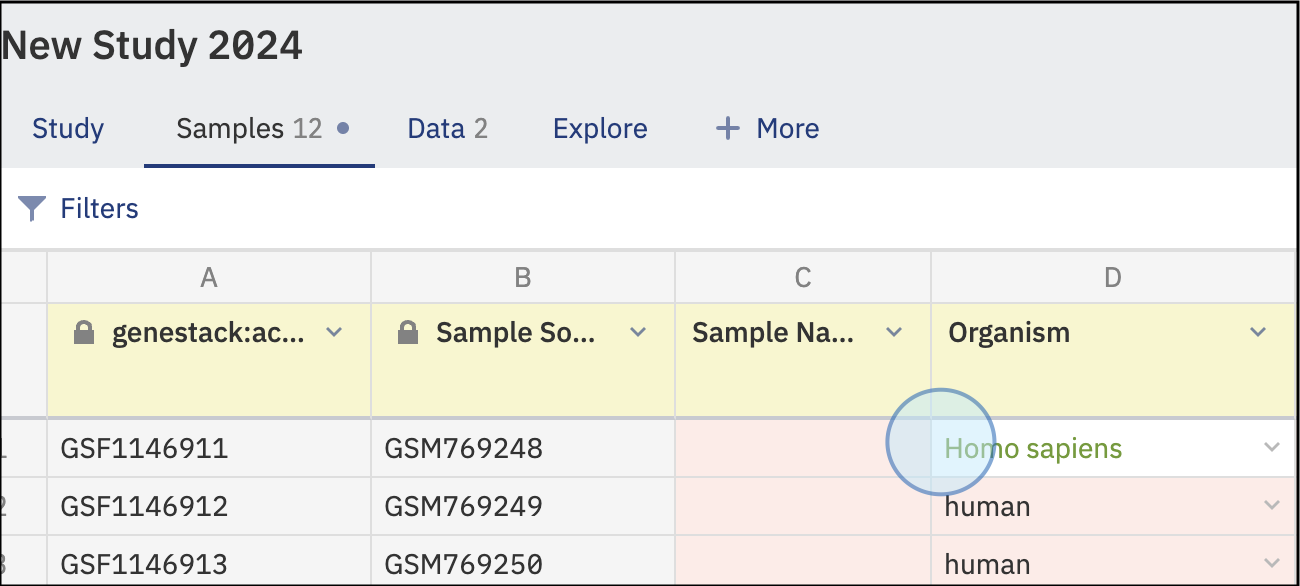
- Once the data is corrected, the new and validated values will be shown in green.
Bulk replace Values
- Replace all values in a column by clicking on Bulk replace and typing the new values. Preferred values are suggested based on the template ontologies.
- Add missing values in bulk by clicking on the empty field and typing the new value. Suggested values will appear based on the dictionaries selected for the template, e.g., for the Age unit, suggested values will be shown. Click on replace to apply the changes.
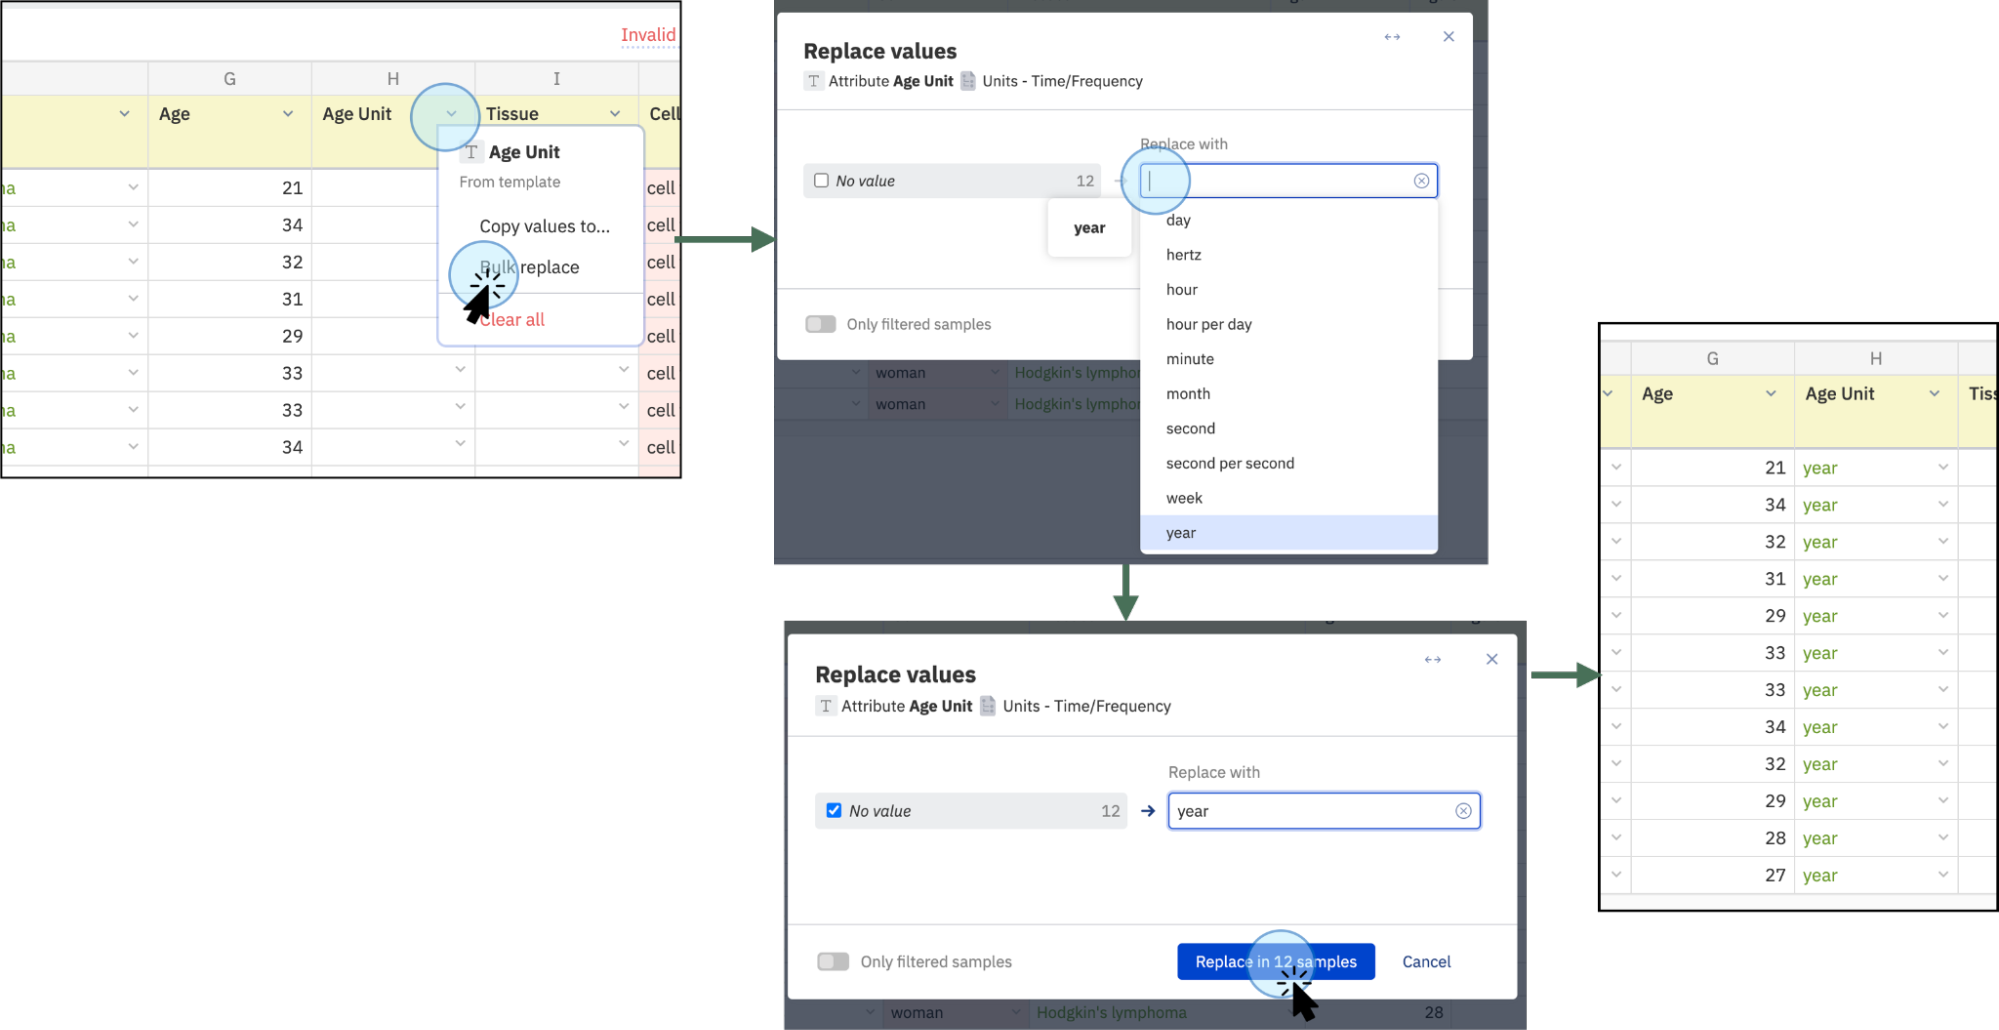
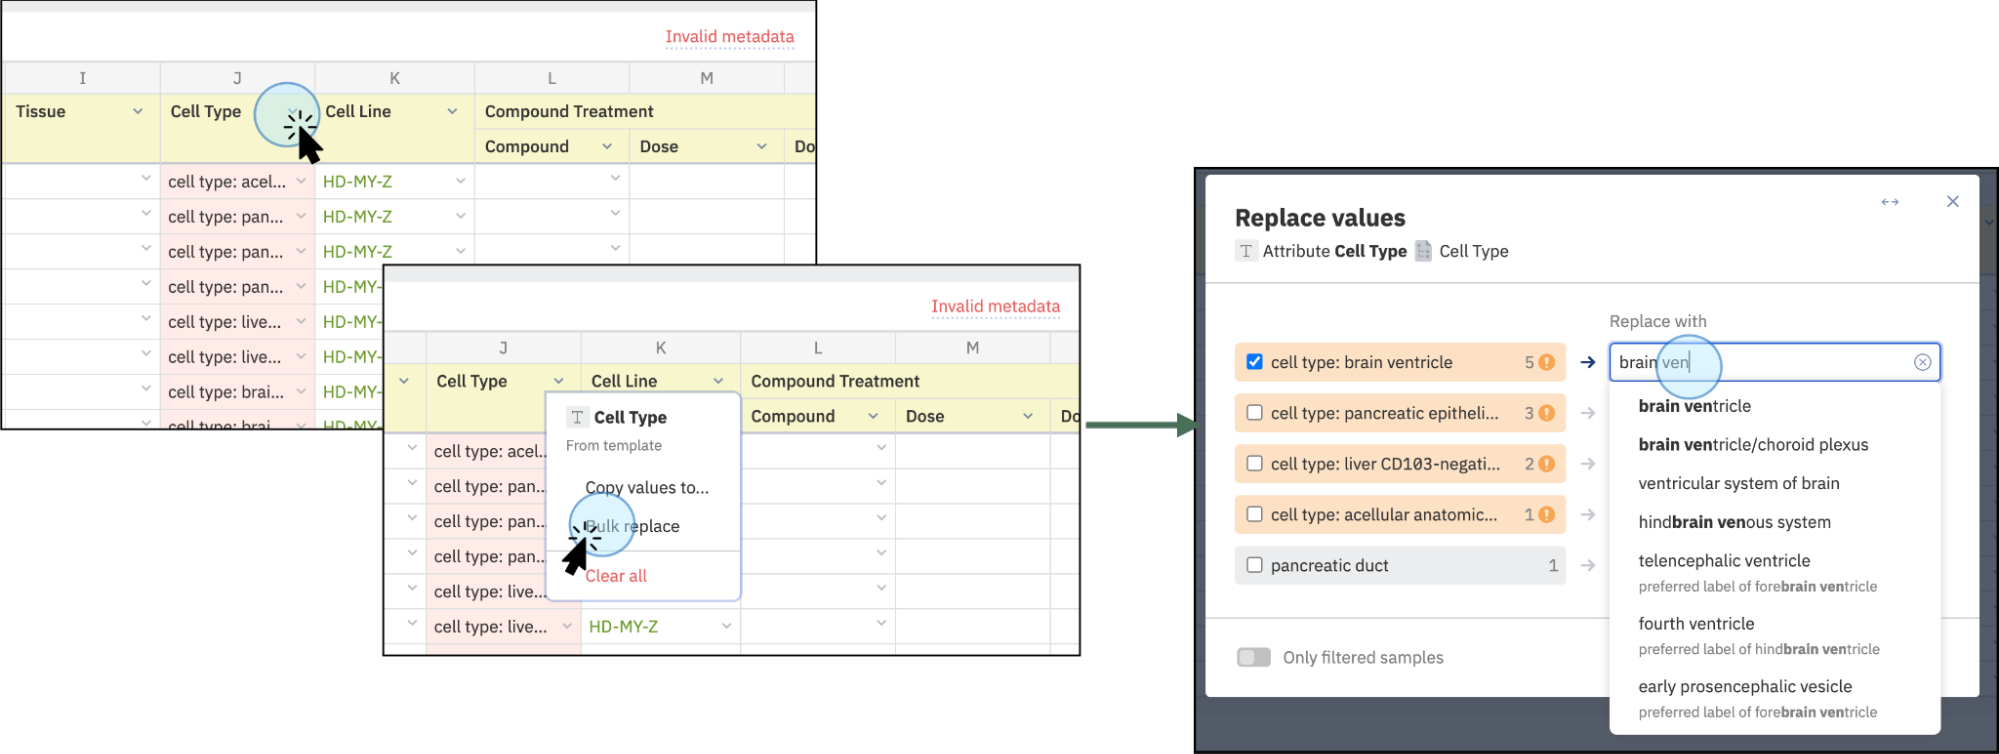
- If you are correcting invalid values rather than adding missing data, you can also use this function to correct data in groups. The process is visualised on the screenshot below.
Correct values in bulk
Correct values in bulk by selecting the new name (suggested values from the dictionary will display). Select and apply changes to replace values in the selected cells, e.g., change “cell type: brain ventricle” to “brain ventricle”. The change will apply to all 5 cells where the values are found.
Copy or Reassign Values
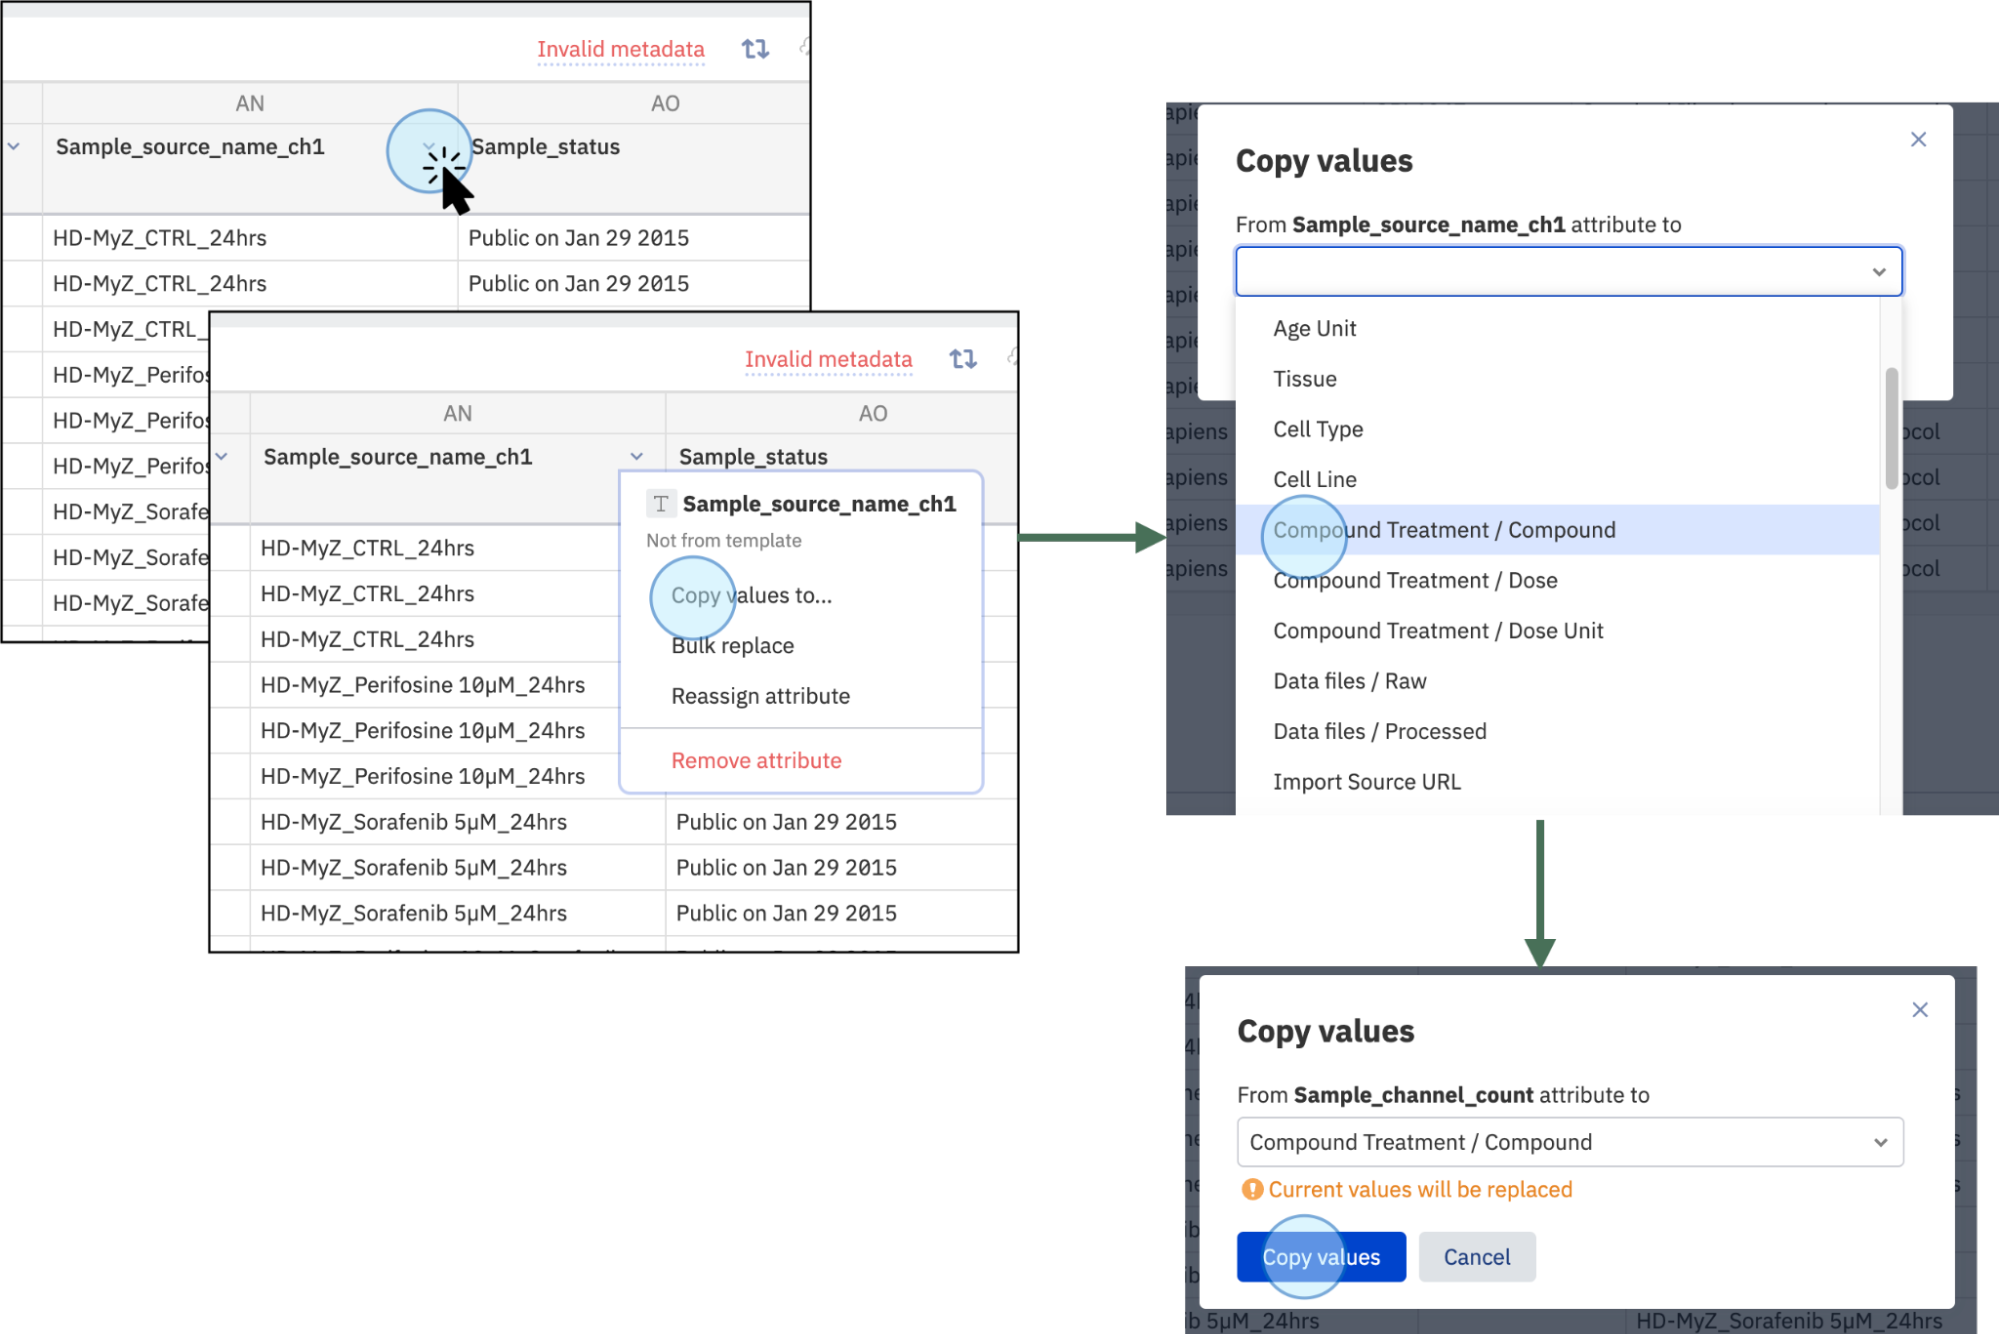
- Copy or reassign values from another column by clicking on the selected column and clicking Copy values to...
- Select the column where you want to copy the existing values and click on Copy values. If the selected column contains data, you will receive a notification to confirm you want to replace the existing data.
Save Changes
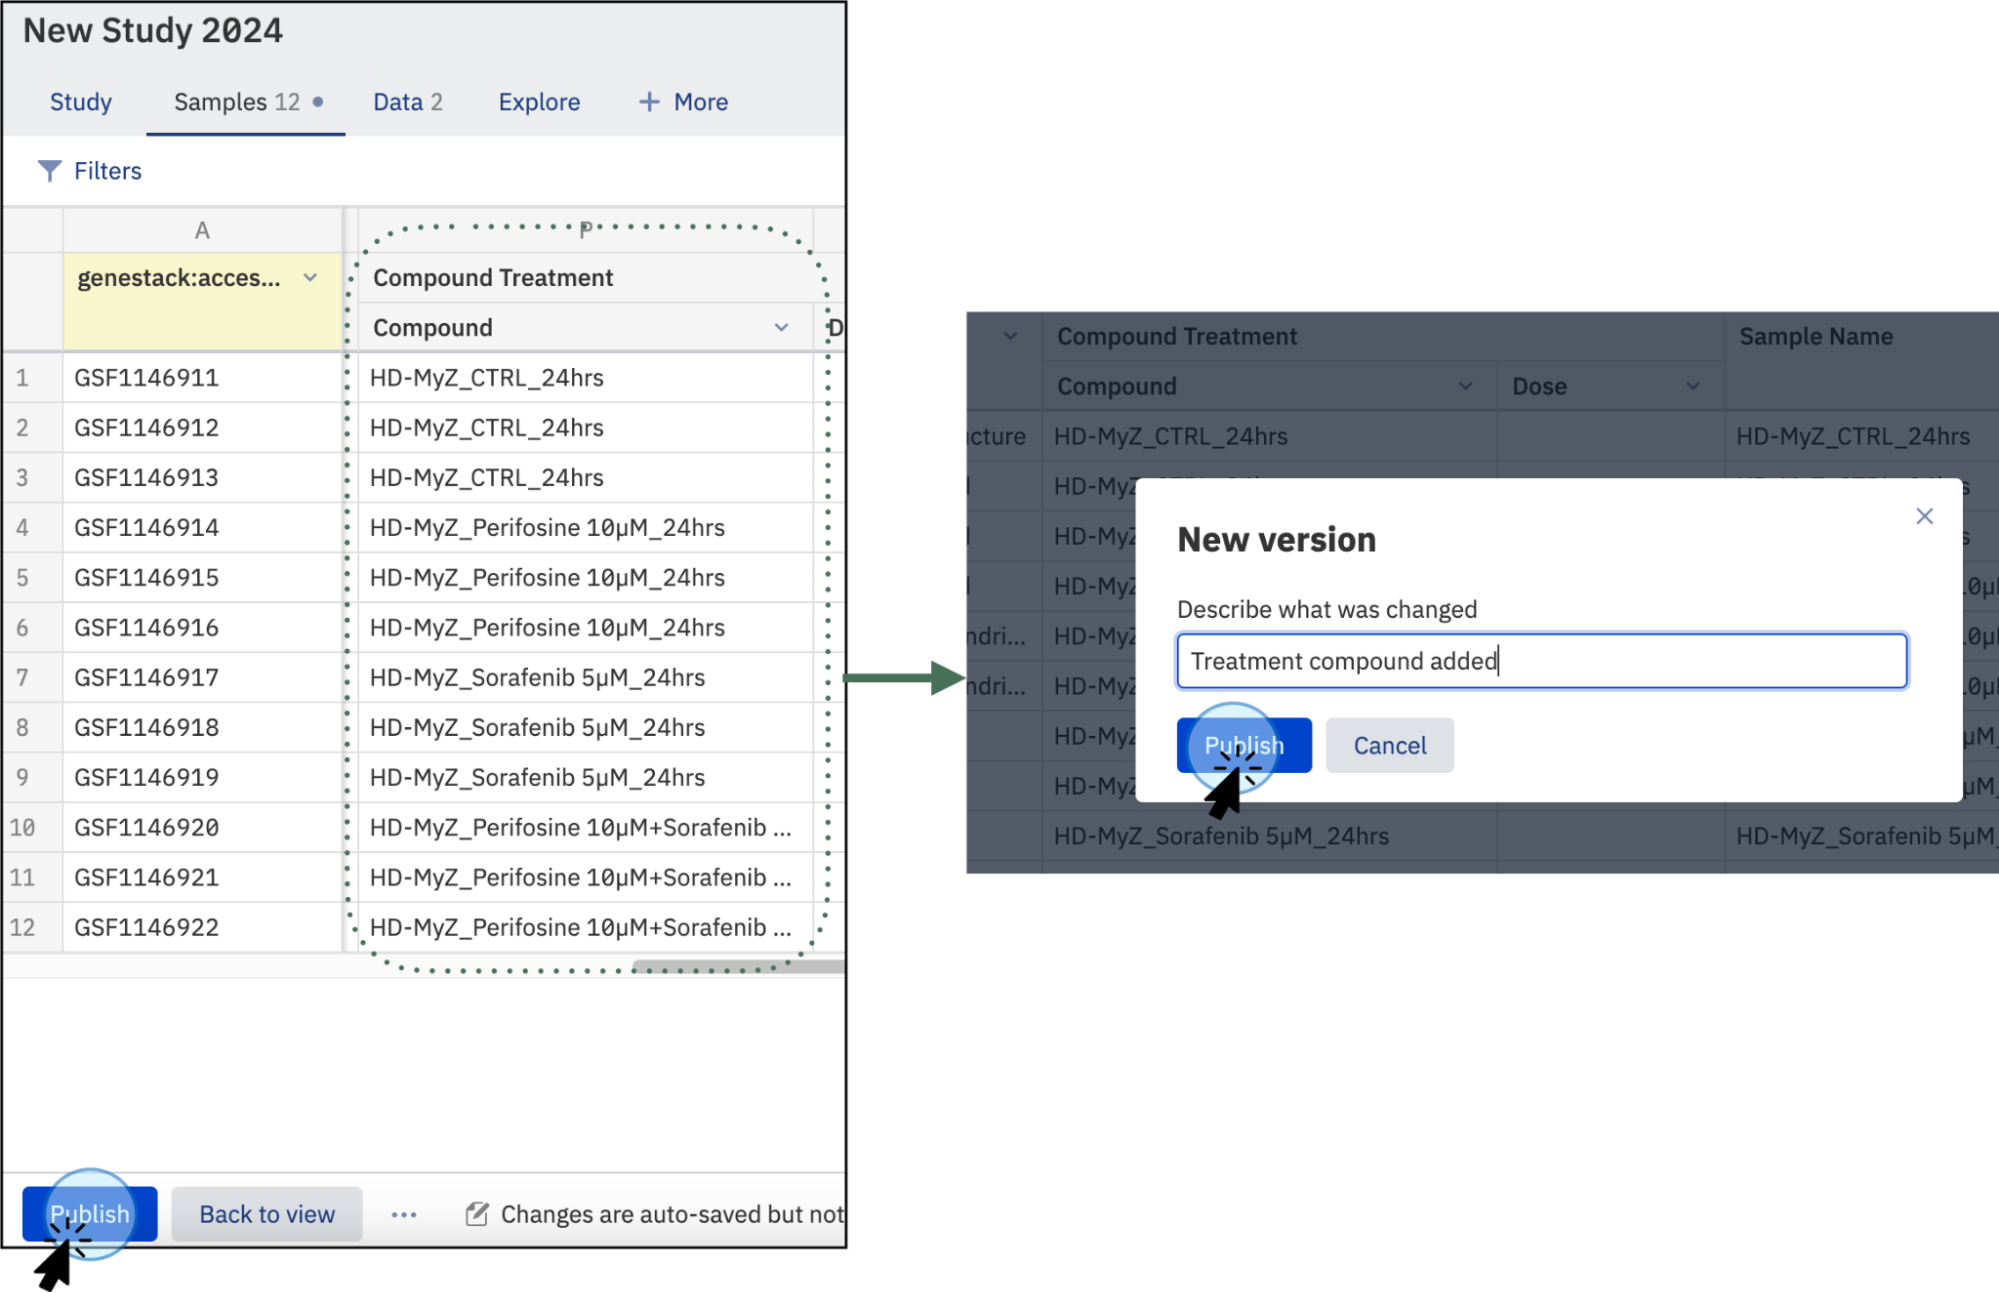
Once you are done with the changes, click on Publish at the bottom left of the page to save the current changes. Customize the name of the changes you have made in the current version.
By following these steps, you can efficiently create, manage, and curate studies as a Data Contributor using the interface of the Open Data Manager.