Administrator in the User Interface
If you have the Manage organization permission, your user account will be marked with an Admin label. As an Admin, you can create and deactivate users, reset passwords, and manage user permissions within the Open Data Manager (ODM).
To work with groups, the Manage groups permission is required. This permission allows users to:
- View all user groups and their members on the instance via the API and in the Groups section in the GUI.
- Create new user groups.
- Delete any user group, even if they are not a member or admin of that group.
- Add or remove members from any group, even without group membership or admin status.
Users without the Manage groups permission retain their standard capabilities:
- They can view and edit only the groups they are members of or own.
- They can create new groups and manage them, including editing and deleting their own groups, as they are considered the owners.
This distinction ensures that users with Manage groups permission have global access, while others have limited access tied to their group memberships.
This guide will help you navigate these features efficiently.
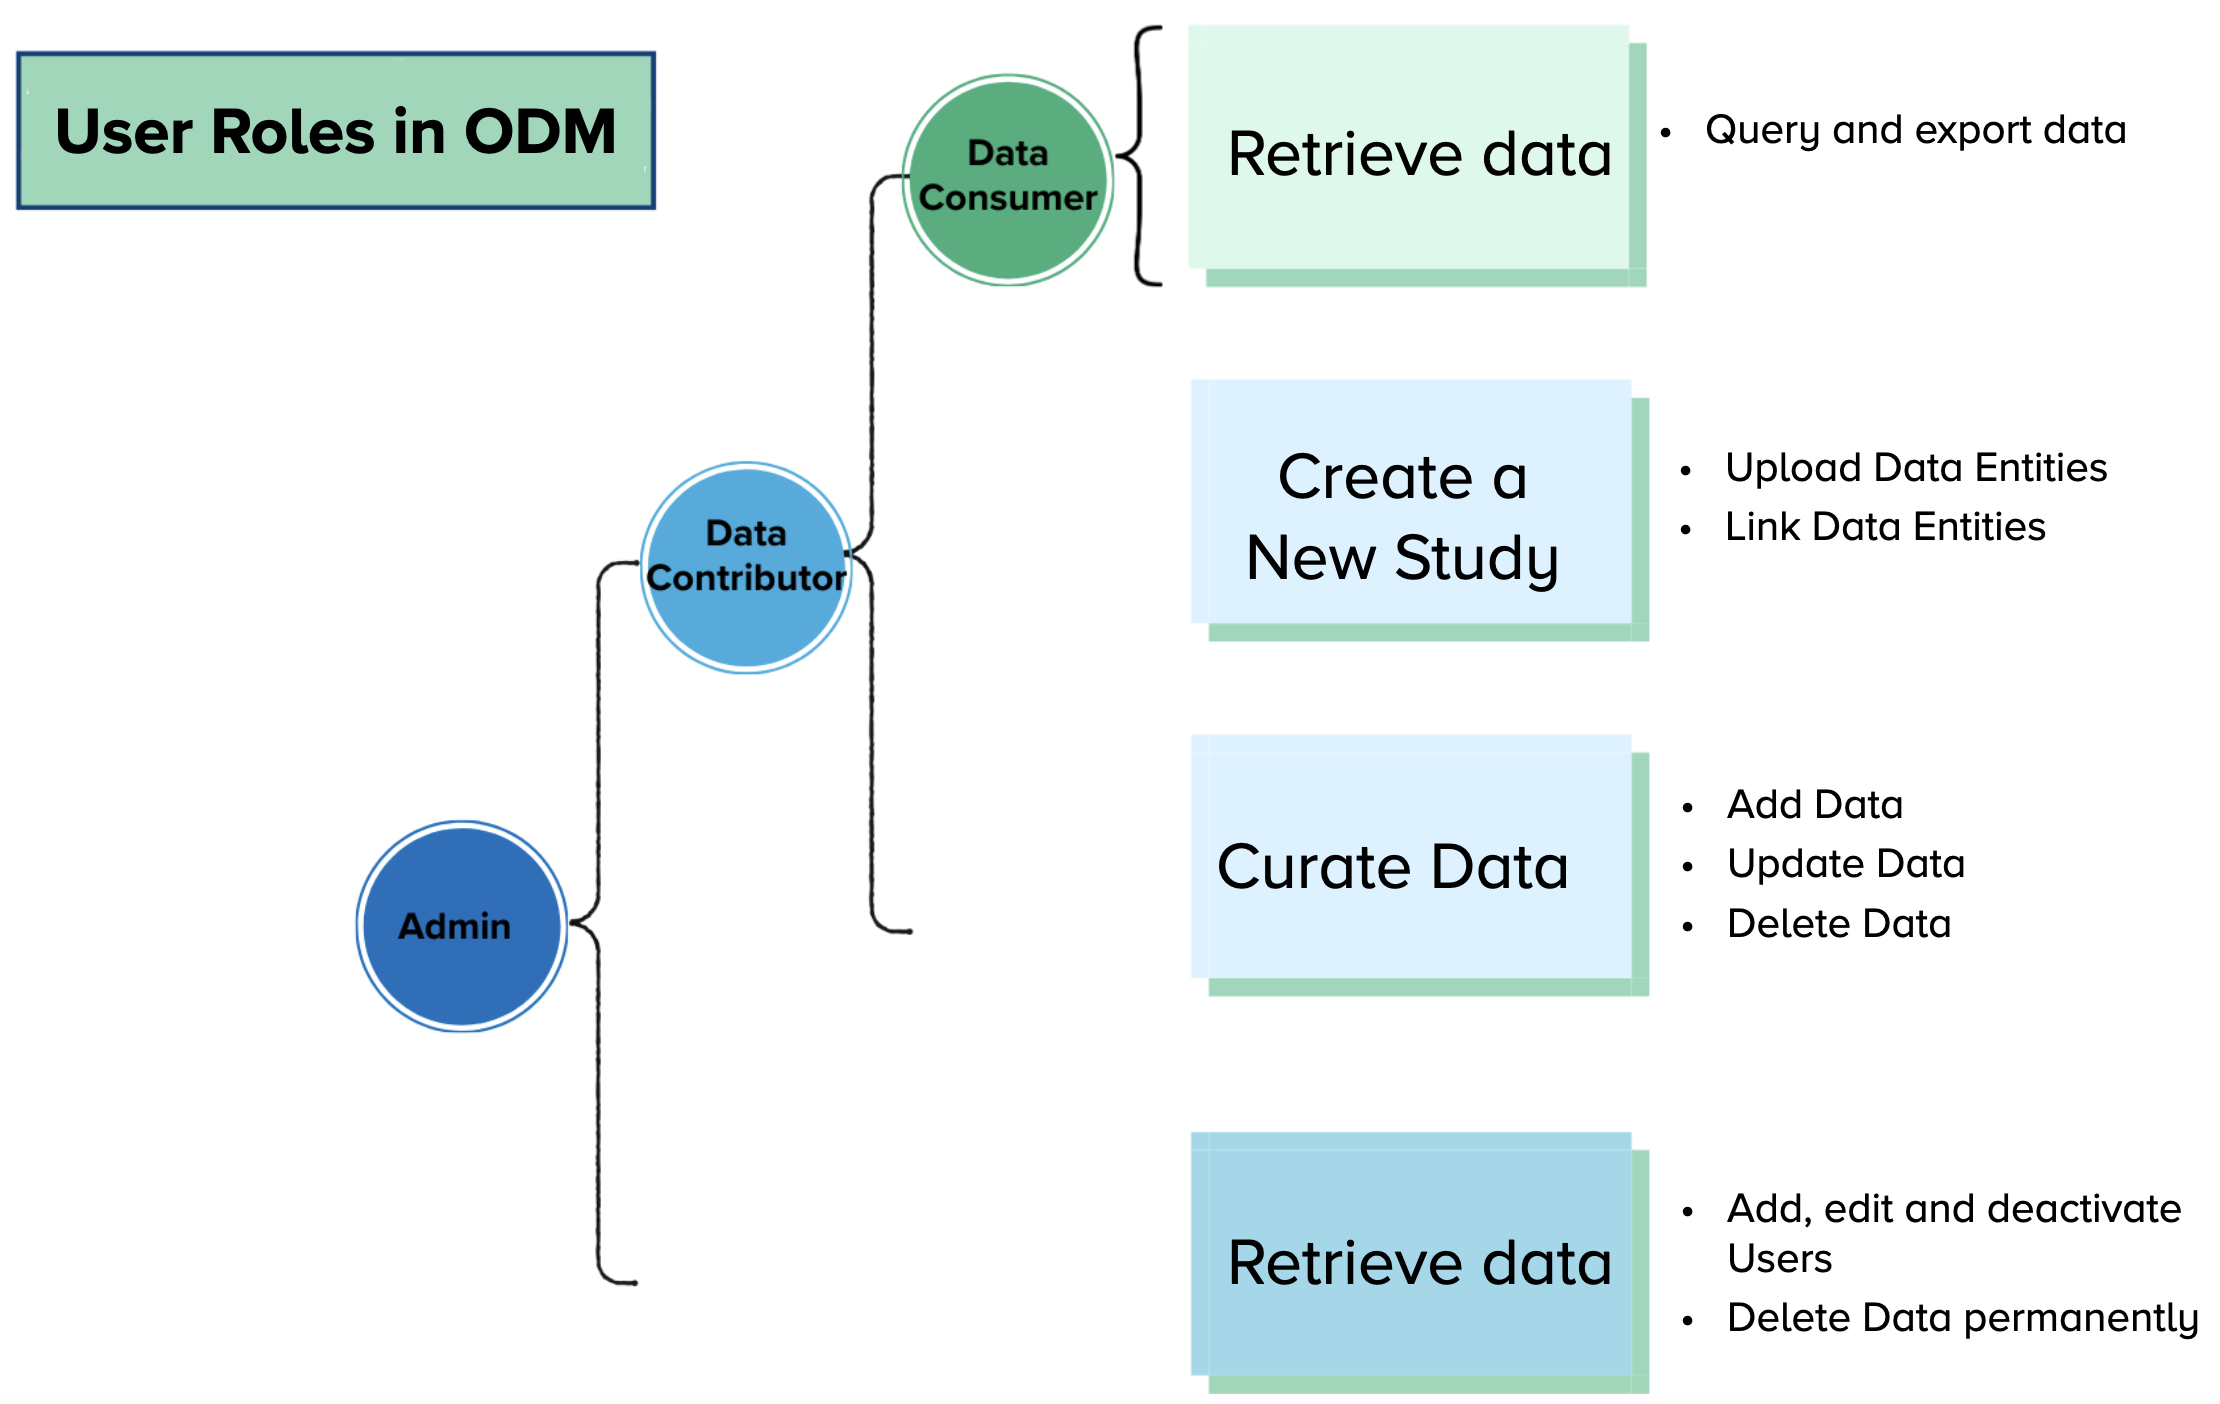
Accessing Your Profile and Permissions
-
Log into the ODM:
- Navigate to the ODM homepage.
- Click on your profile (top right of the main page)
-
Explore Permissions:
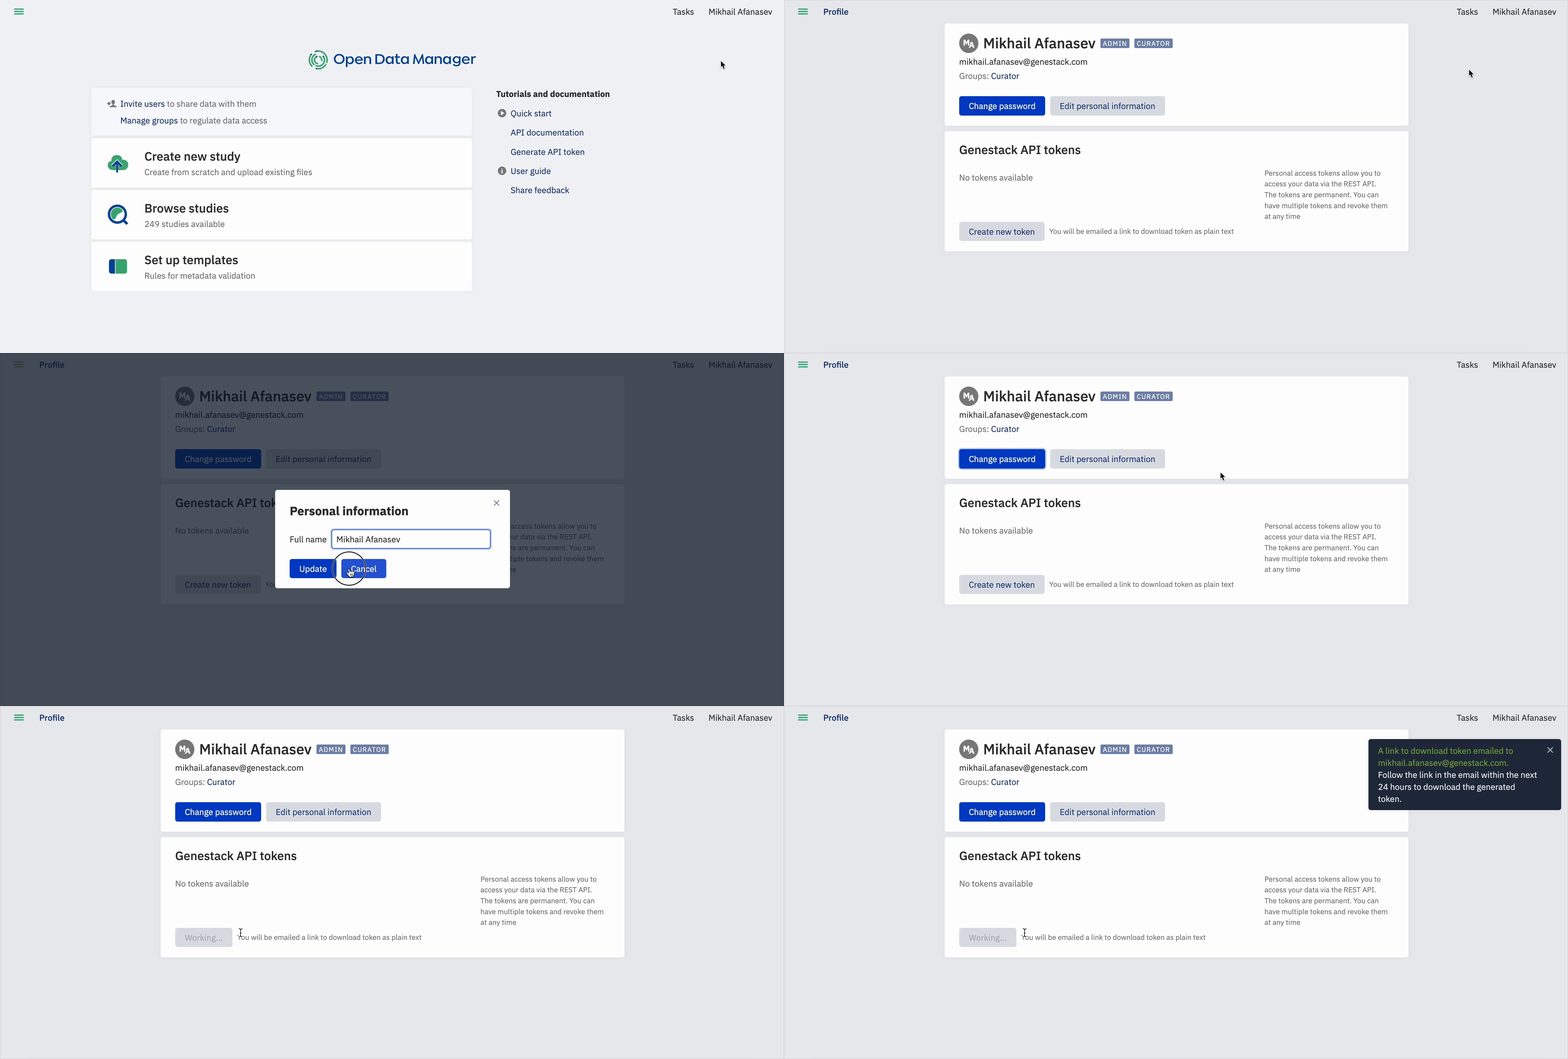
- Click on Profile to access information regarding your user permissions.
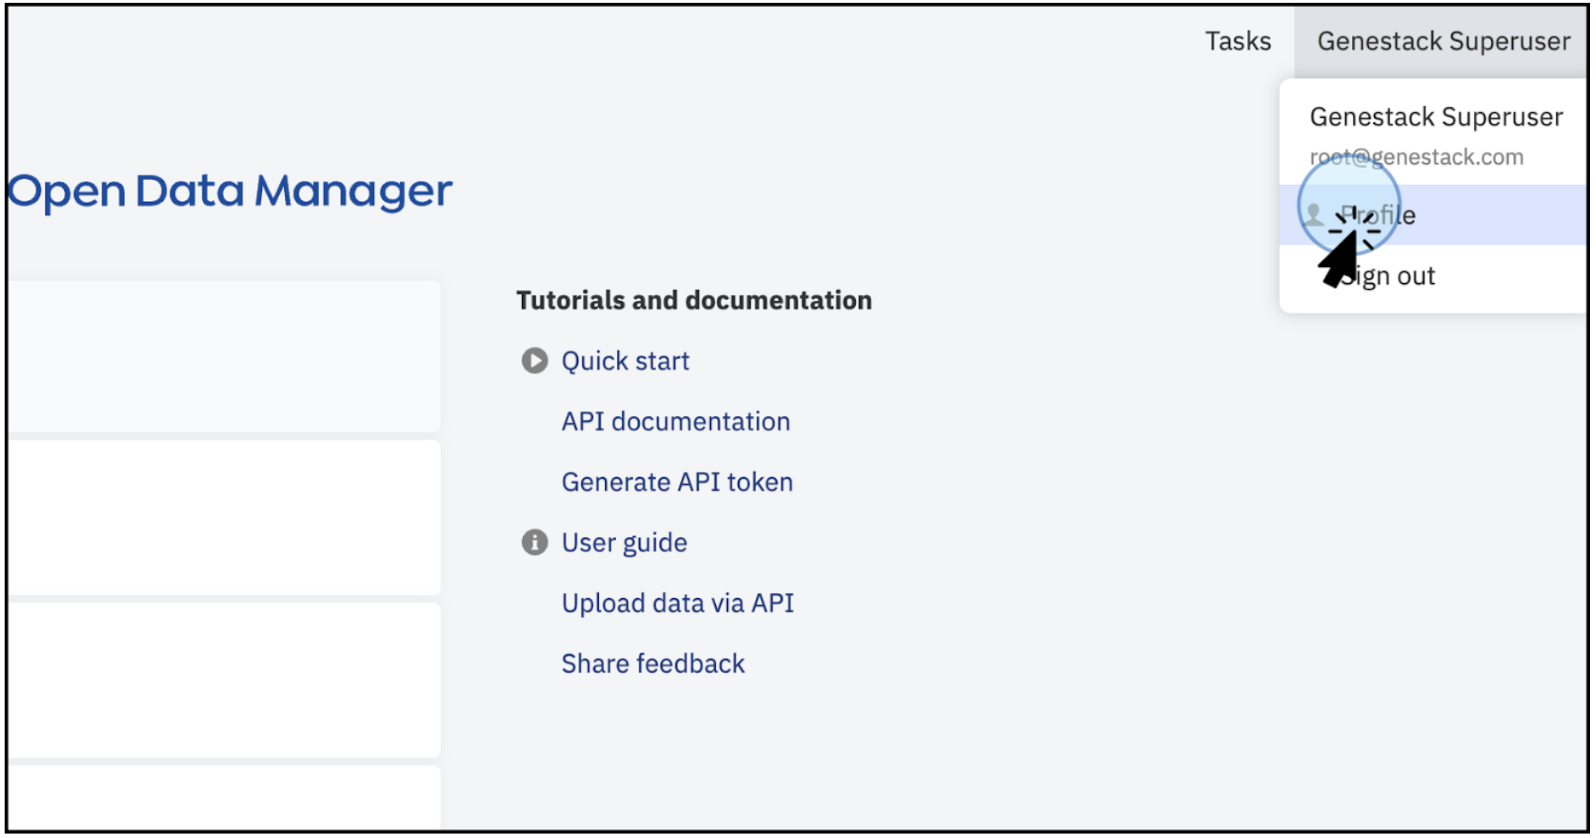
Main dashboard of the ODM. Click on your profile to access detailed information about your user capabilities. -
Permissions:
- You can add, edit, and delete data, users, and groups within the ODM.
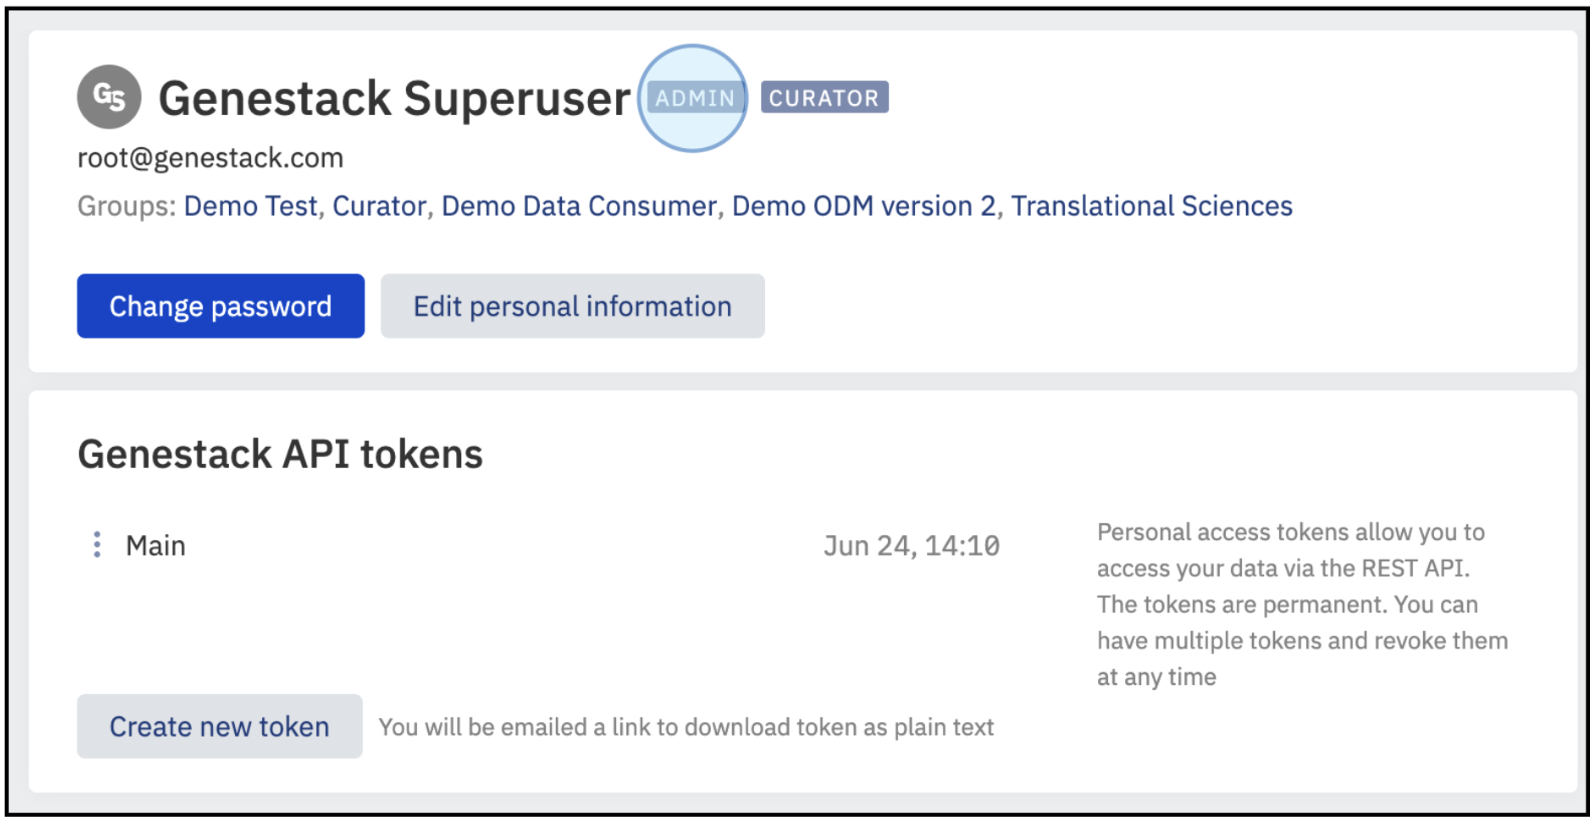
View of the user's profile. This window contains detailed information about the groups you are part of, the capabilities (admin and curator), and the active API tokens.
Use Case Example: Add and update Users
As an administrator, you can add, edit, deactivate users and delete groups.
Add and update Users
Follow these steps to add and edit users, as well as groups.
-
Access the Users and Permissions
- Click on the three-line menu button at the top left of the dashboard to access the Users and permissions section.
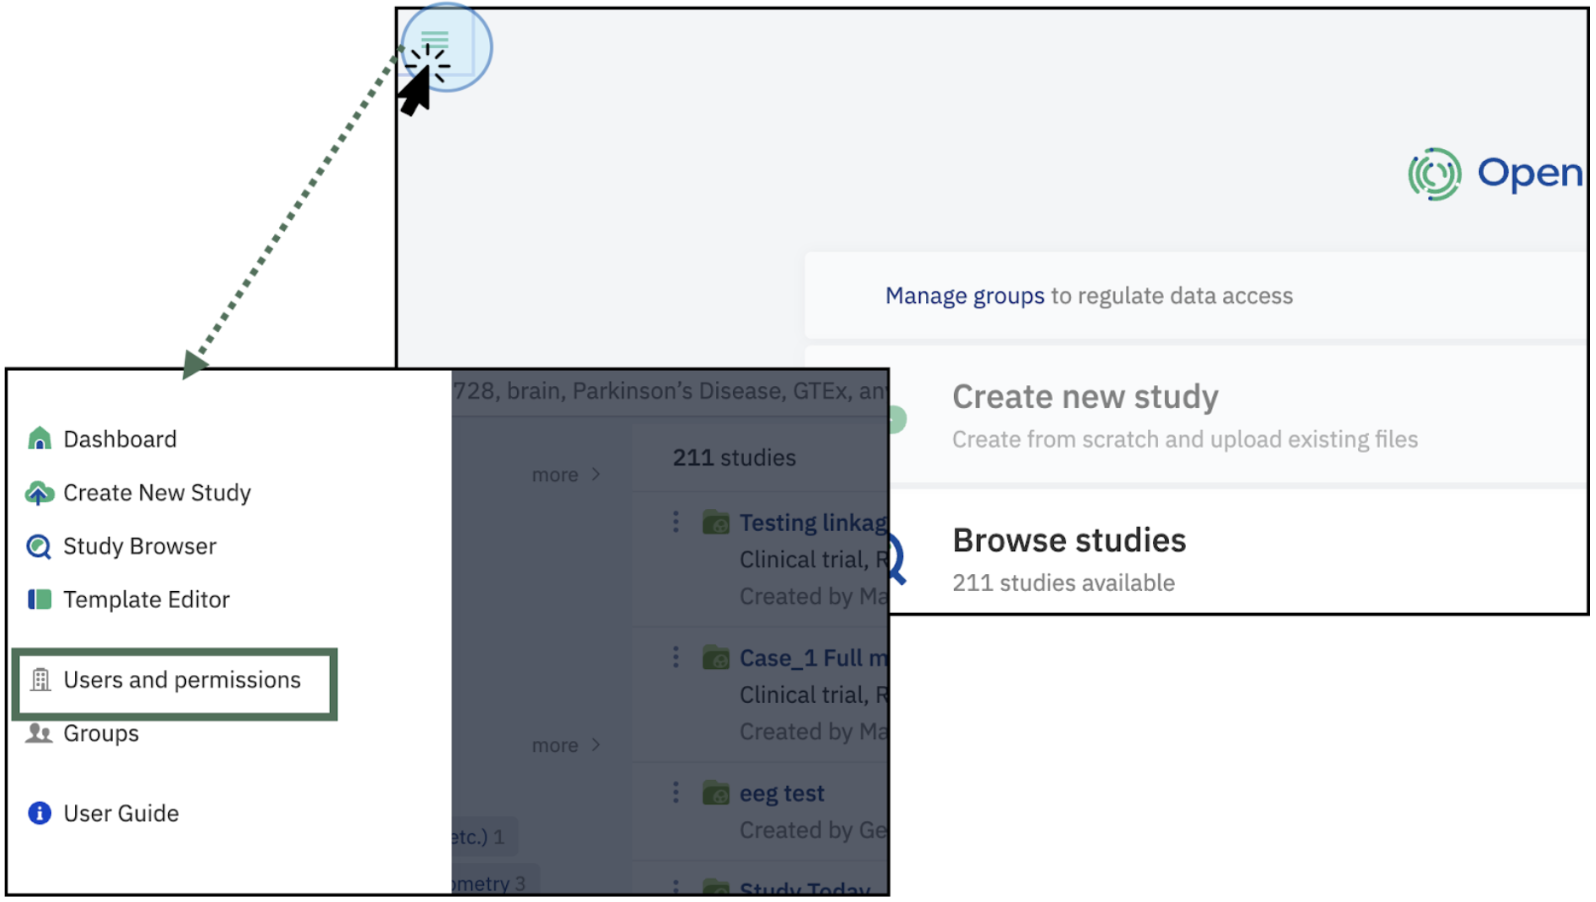
To access User and permissions, click on the three-line menu at the top left of the dashboard. This will display a menu where you can access Users and Permissions Note
If you have the relevant permissions, the menu to add and update users is also available in the Main Dashboard.
-
Add new users
- A new window will appear listing all the users.
- Click on + New user.
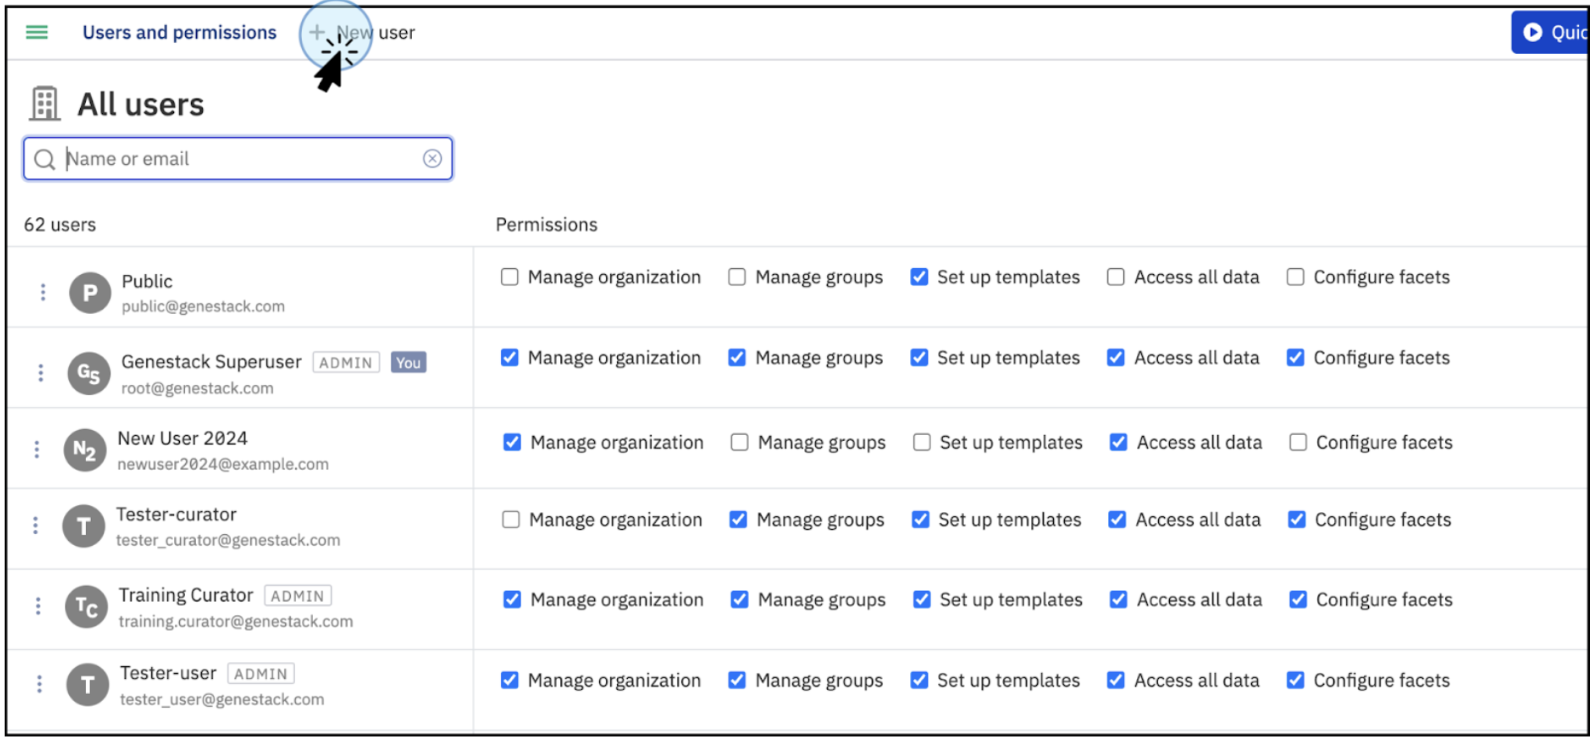
The section Users and Permissions shows the list of all users in the ODM instance. Click on +New user to add a new user - This action will open a new window where you can type the details for the new user
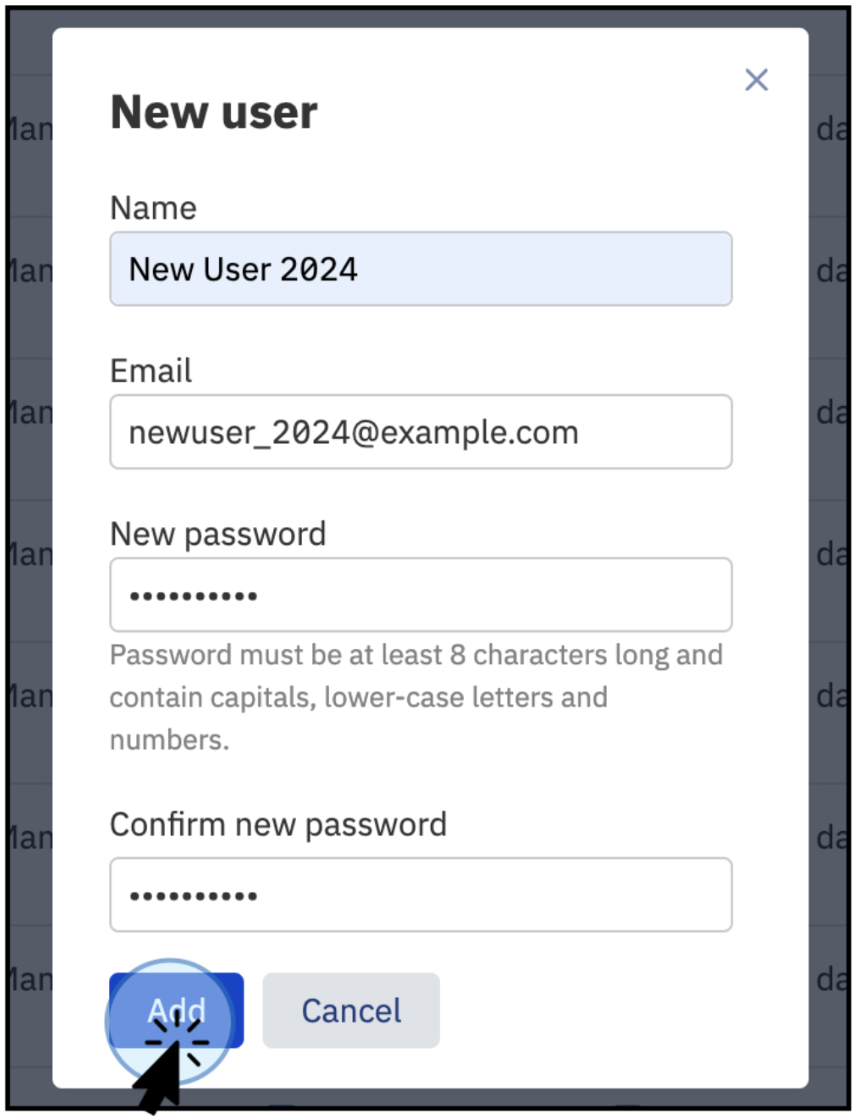
Type the details of the new user and click Add. The system will detect if a user has been previously added (by the email address) -
Confirm New Members
- After adding the details, click Add to confirm. The new member will be part of the ODM
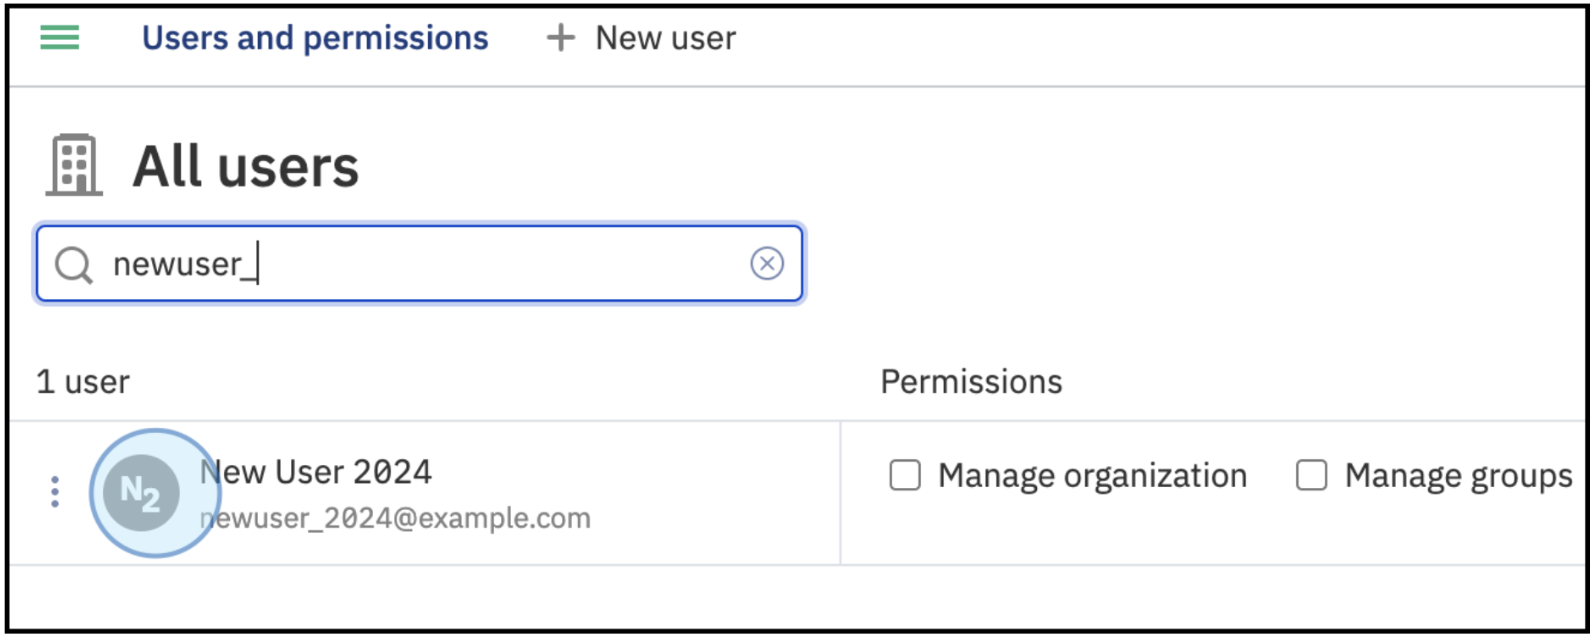
Confirmation the recently added user, New User 2024, is now part of ODM
Edit and update Permissions
Each permission defines specific actions users can perform, such as creating, editing, or deleting groups, and managing templates.
To set or change user permissions, you need to have the Manage organization permission:
-
Accessing the Permissions Menu:
- On the main dashboard, click on the three-line menu button at the top left
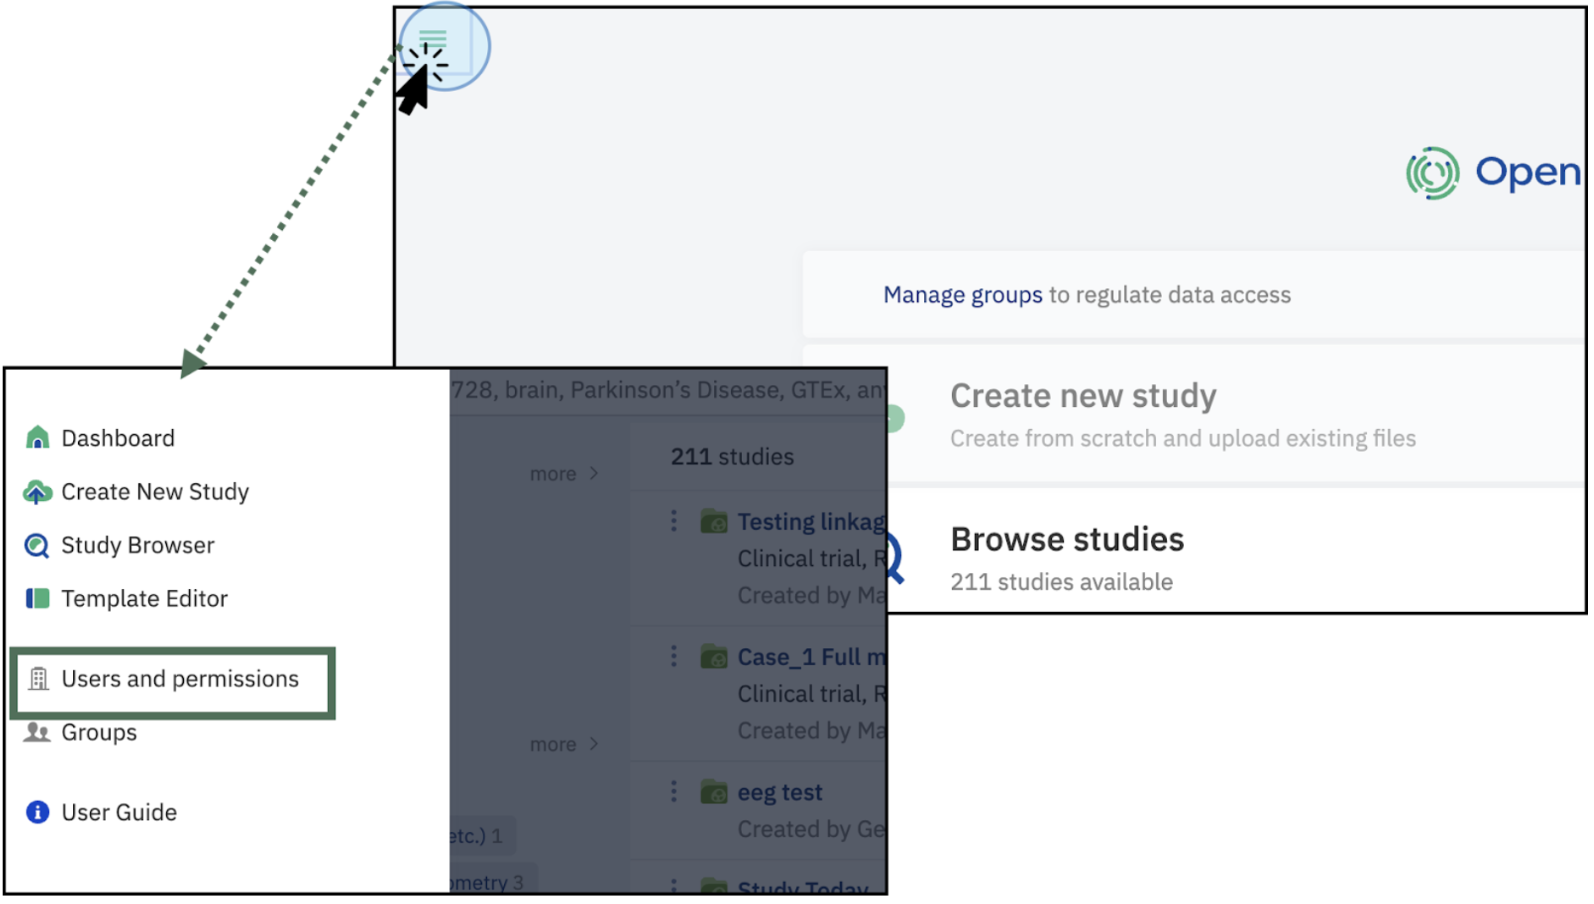
Access the Users and Permissions section by clicking on the three-line menu at the top left of the dashboard -
Managing Permissions
- A new window will open you can see all the users within your organization. You can grant or revoke permissions by ticking the corresponding boxes for options such as Manage groups, Set up templates, Access all data and Configure facets
- Use the search bar to find users you want to grant or revoke permissions to
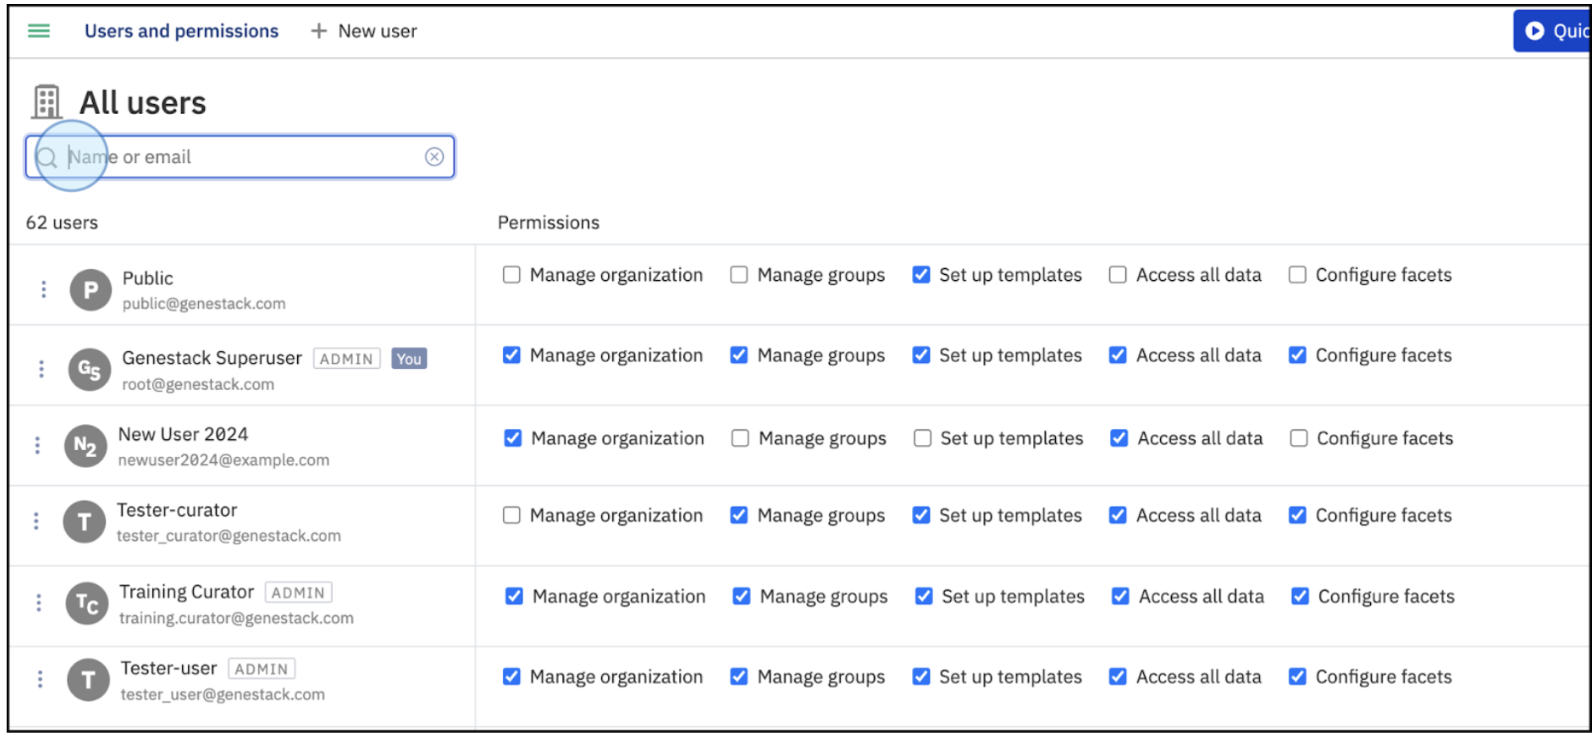
View of the Users and Permissions panel. Tick the boxes to grant or revoke permissions: Manage organization, manage groups, set up templates, access all data, and configure facets. To manage individual permissions, find the user with the search bar. -
Hover over the permissions to view a brief description of the permissions capabilities.
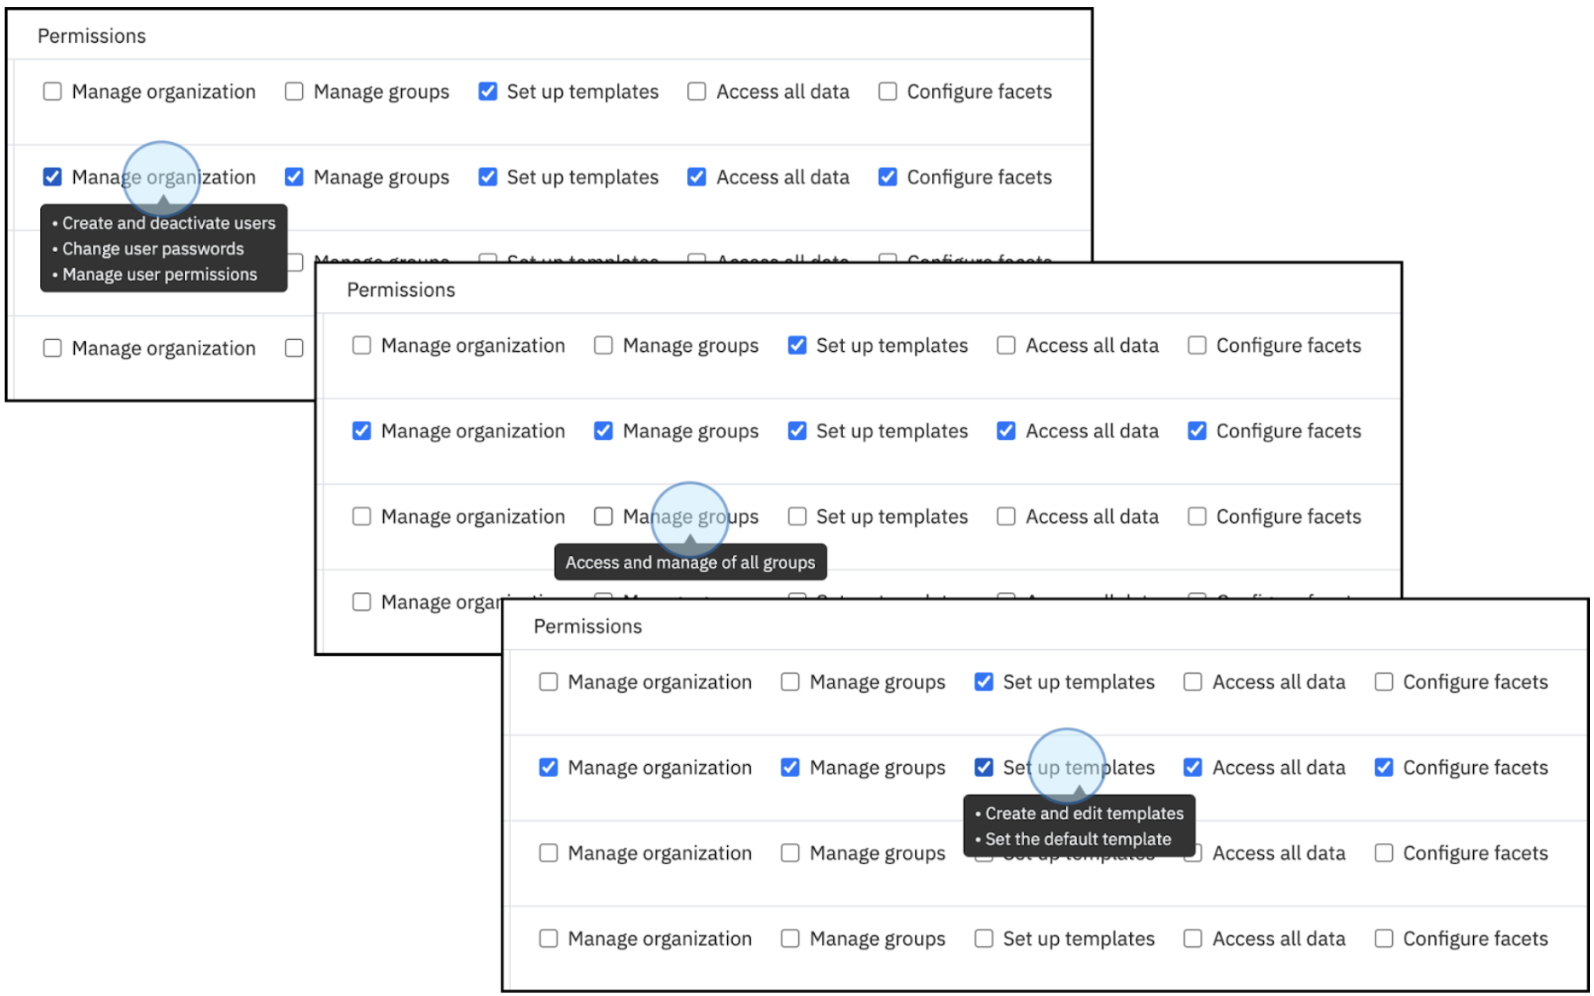
Hover over the permissions to view the its description. For example, hovering over Manage groups shows that the permission allows the user: Access and manage of all groups
Find more information about users and permissions, and their capabilities in the User, Roles, Permissions section. Find more information about users and permissions, and their capabilities in the Defining User Permissions and Groups in the ODM section.
Edit User status
To edit a user's status, follow these steps:
-
Edit User Status:
- To change a user's status to active or inactive, click on the three dots on the left side of the user's name.
- Select Deactivate to turn the user inactive immediately. To reactivate a deactivated user, select Activate.
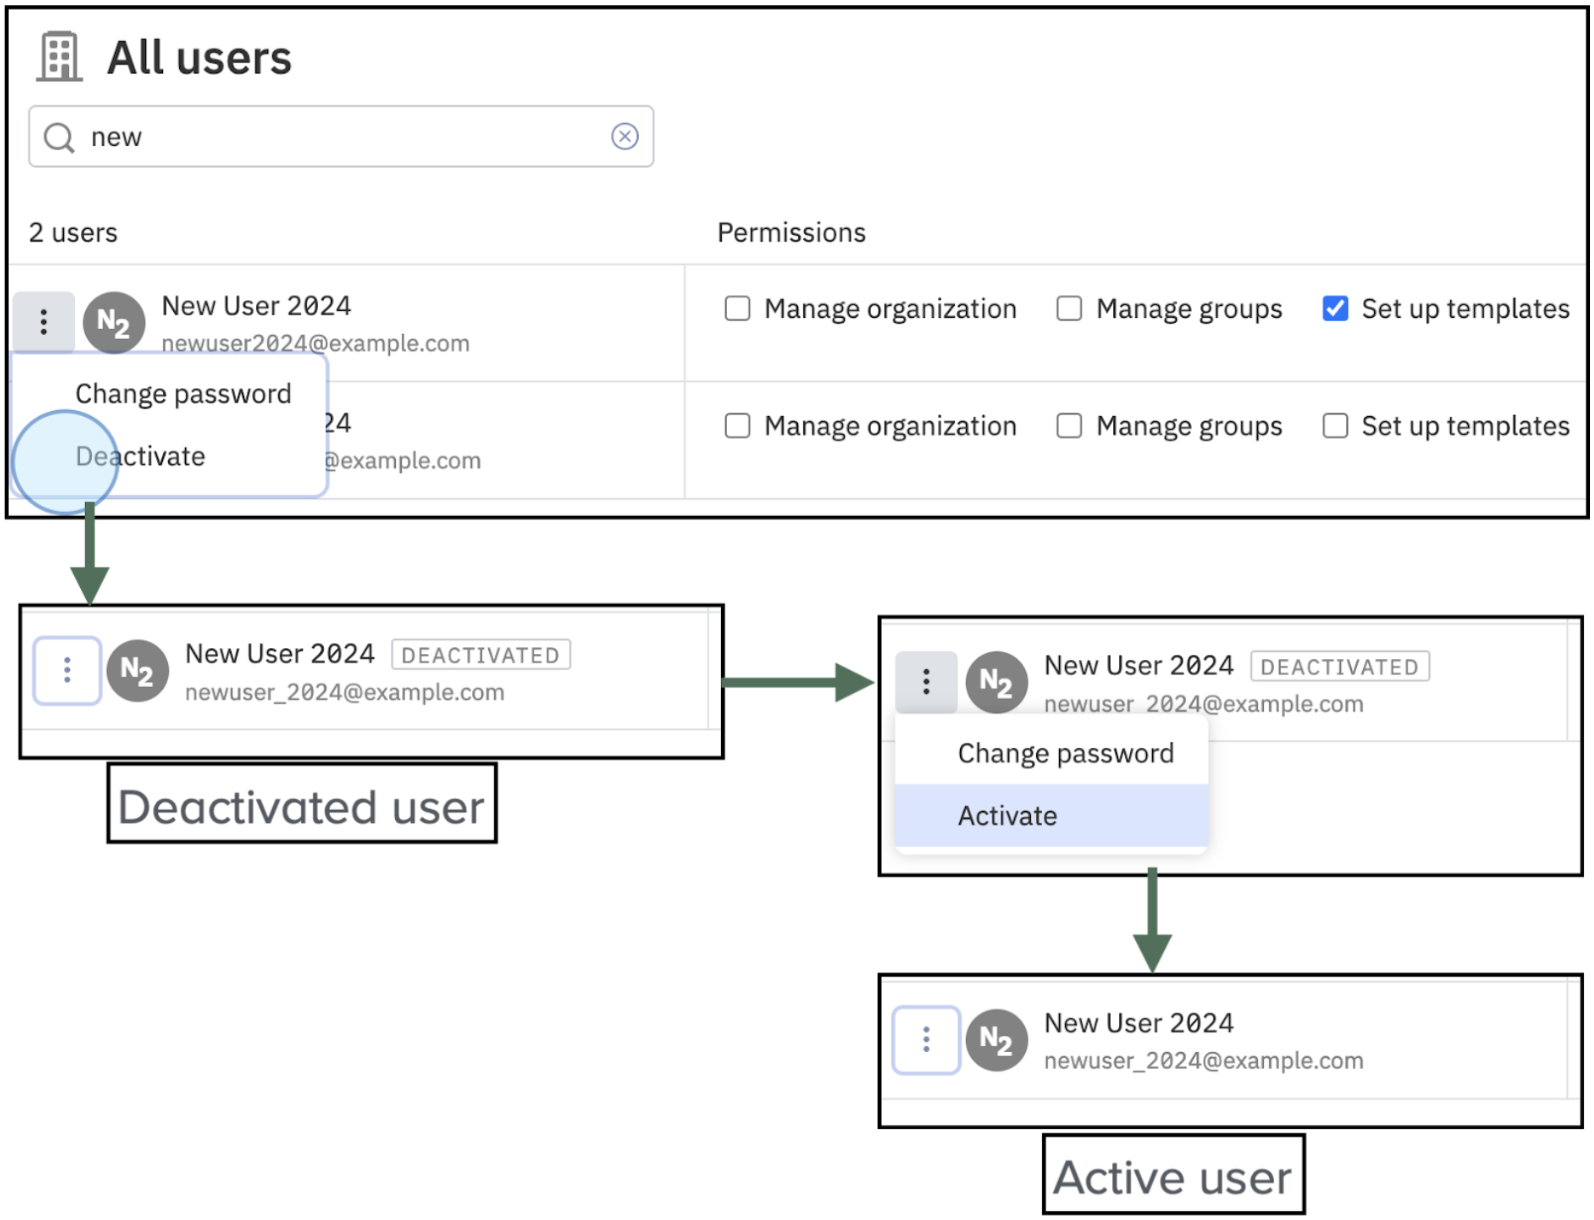
Edit user status. To activate or deactivate a user, click on the three dots next to the user’s name and select either Activate or Deactivate. This change will take effect immediately. -
Change User Password:
- To change a user's password, click on the three dots next to the user's name.
- Select Change Password. A new window will appear, prompting you to authenticate yourself as an administrator.
- After authenticating, enter and confirm the new password for the selected user. Ensure that the new password meets the required security criteria.
- A confirmation window will notify you that the password has been successfully changed
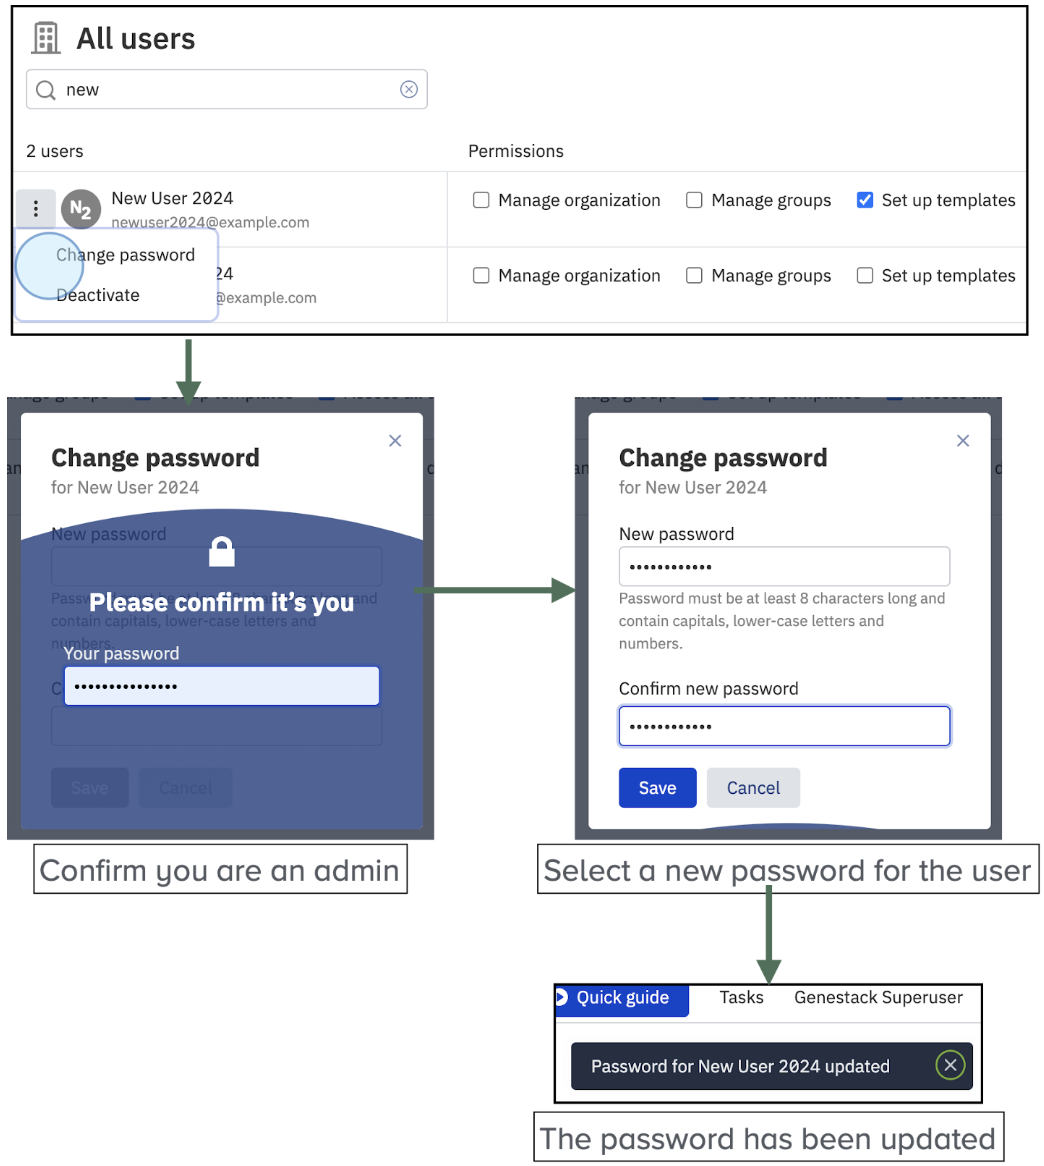
Change a user’s password. Click on the menu next to the user's name, authenticate yourself as an admin (e.g. Genestack Superuser), and then set a new password for the user (e.g. New User 2024). Ensure the new password complies with security guidelines.
As an administrator, your responsibilities include adding new users and managing their permissions, statuses, and passwords. For further details on managing permissions and groups, refer to the section Defining Permissions and User Groups in ODM.
Add, update, and delete Groups
To add, update and delete groups, the Manage groups permission is required.
Creating a Group
To create a new group manually, follow these steps:
-
Access the Groups Section
- Click on the three-line menu button at the top left of the dashboard to access the Groups section.
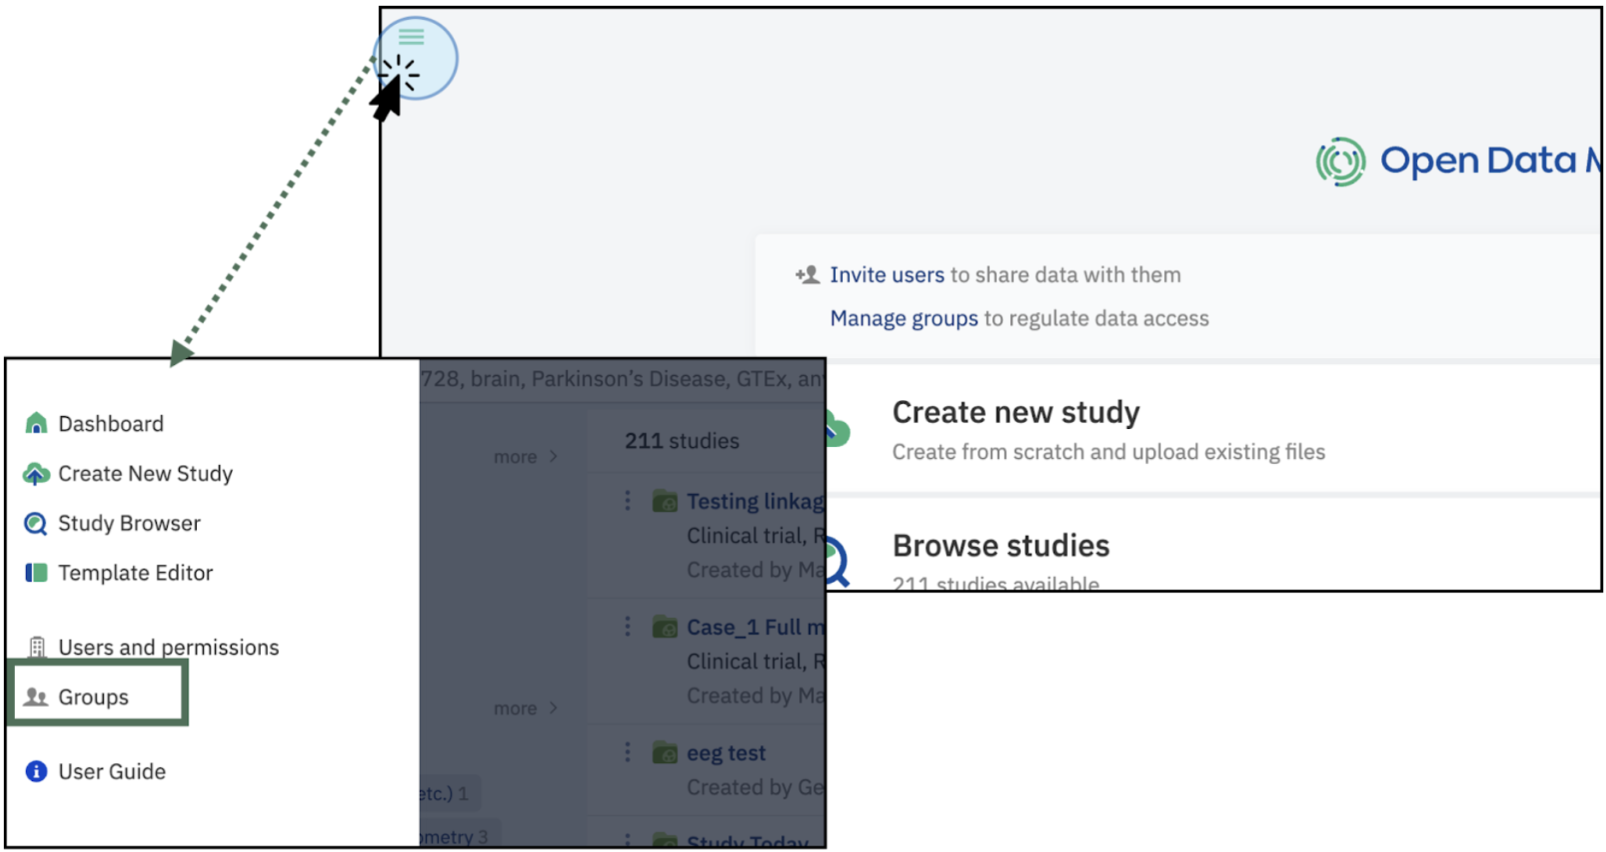
To access Groups, click on the three-line menu at the top left of the dashboard. This will display a menu where you can access Groups If you have the relevant permissions, the menu to add and update groups is also available in the Main Dashboard.
-
Create a New Group:
- In the Groups window, click on the +New Group button at the top of the window.
- Enter a name for the new group in the new window that appears.
- Click Create to finalize the creation of the group.
- A new window will be displayed showing the new group has been created. By default, the user who creates the new group is assigned as the Group Admin. It is important to notice that each group requires at least one group admin.
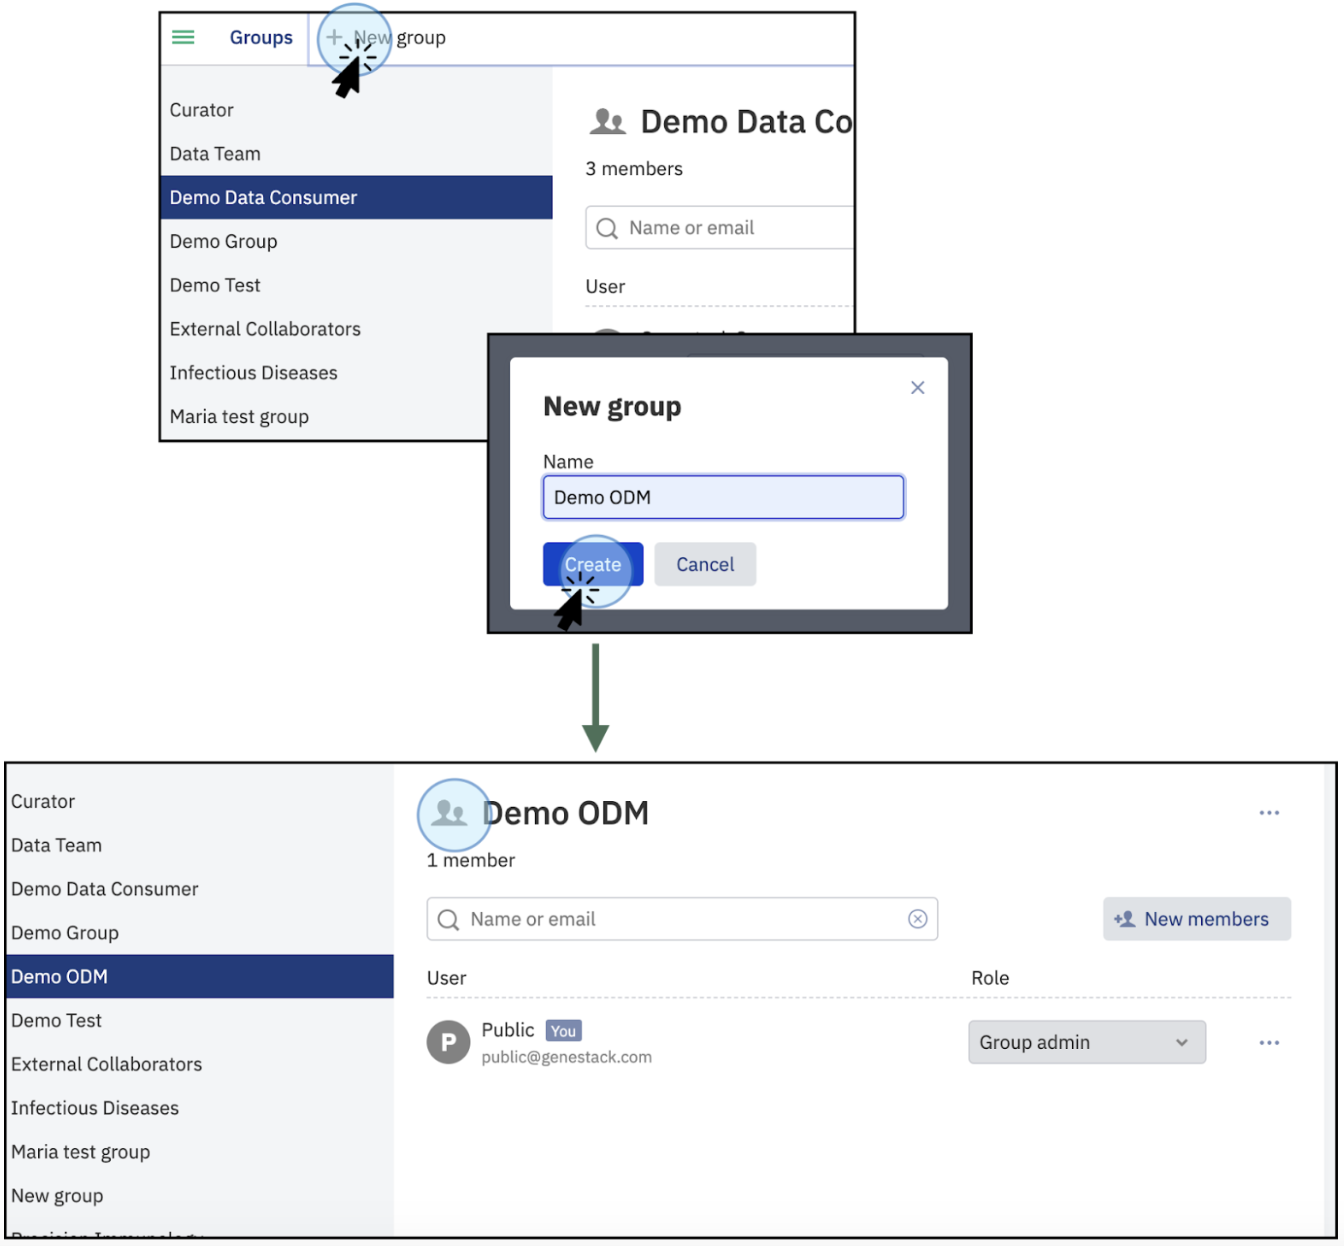
Create a new group Access the Groups section. A list of the available groups will be displayed. Click on +New Group to create a new group. Select a name for the new group, for example, Demo ODM. Click on Create. This action will create a new group named Demo ODM. The user who creates the group is automatically assigned as the Group Administrator.
Following these instructions will allow you to create a group using the GUI. There is no limit to the number of groups you can create, although it is not advisable to create multiple groups with the same name for clarity and management purposes.
Managing groups
To manage groups in the interface, navigate to the section Groups (instructions described above) and select the group you want to manage.
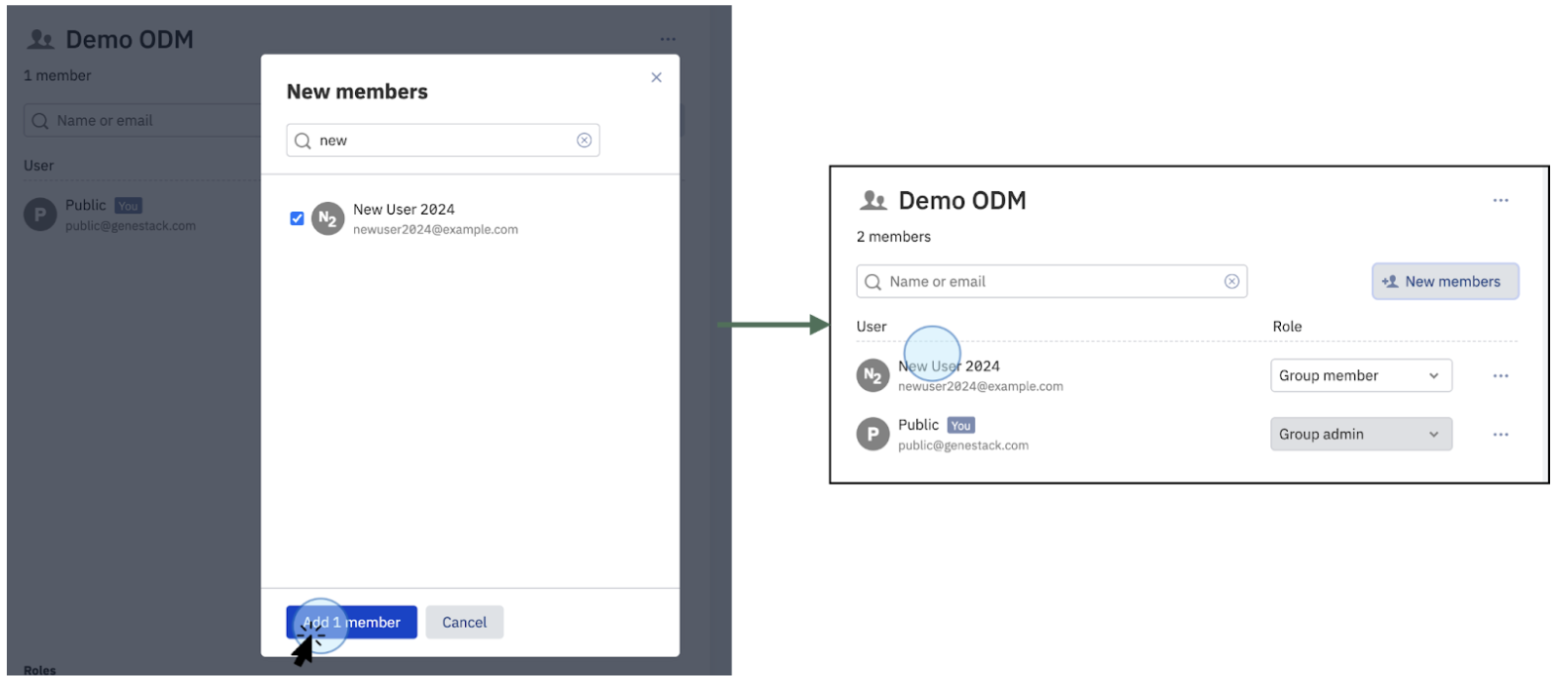
Add New Members to groups:
- Click on the New members button to add members to the group.
-
In the new window, you can select members from the list or use the search bar to find specific users.
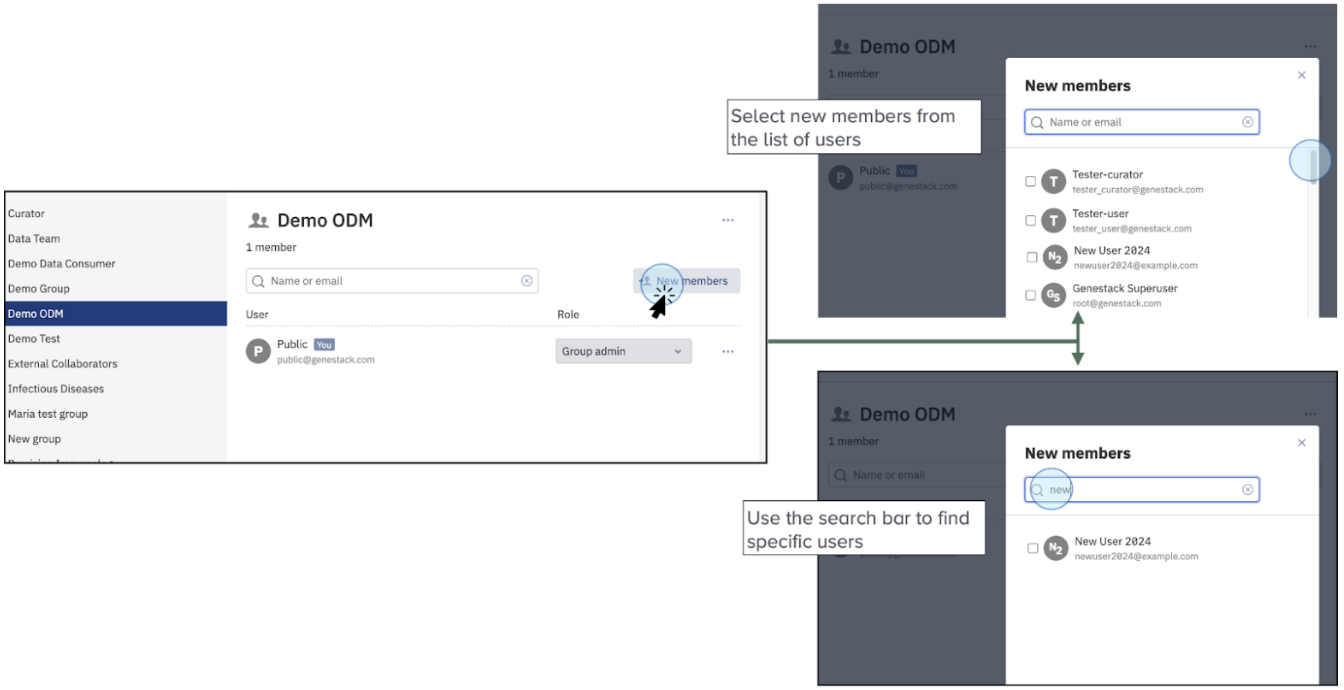
Add new members to the group by clicking on New members. A new window will appear where you can select users from the list or you can use the search bar to find specific users, e.g., New User 2024 -
Confirm New Members:
- After selecting the members, click Add member to confirm. The group will now display the recently added members.
Remove members
To remove a member from a group, follow these steps:
-
Select the Group:
- Navigate to the group from which you intend to remove a user.
- In the new window, either scroll through the list of members or use the search bar to find specific users.
-
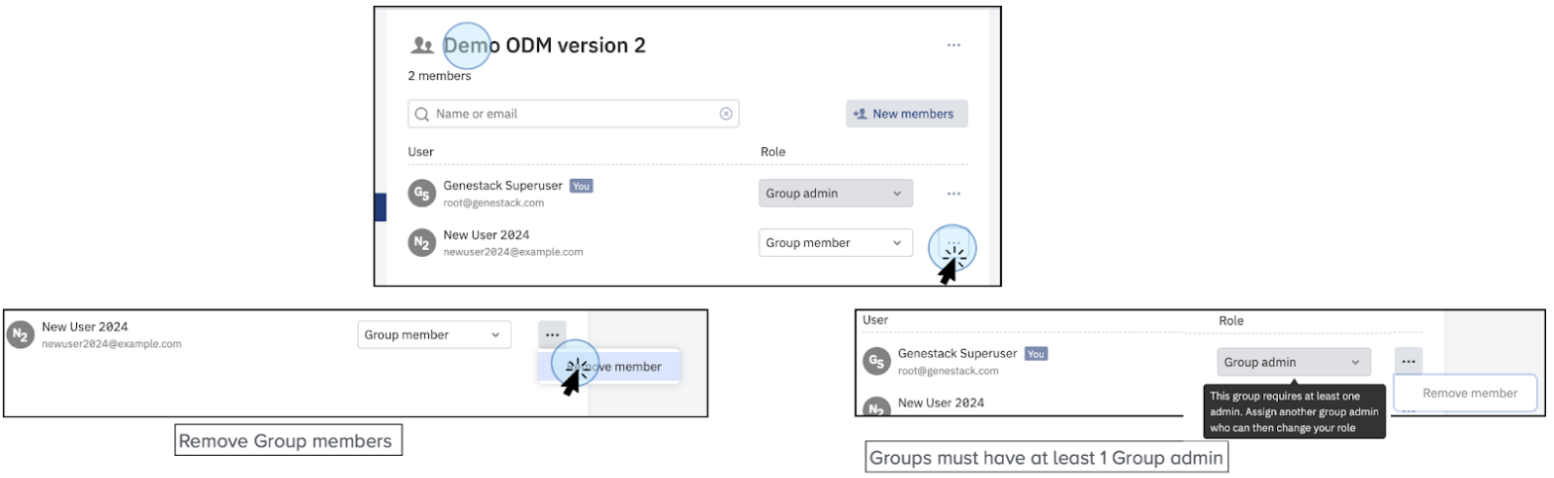
Remove the Member:
- Click on the three dots next to the member's name and select Remove member.
Important Note
Only members designated as Group members can be removed. If the user you intend to remove is an administrator, you must first ensure that another member is assigned as the group administrator, as each group must have at least one administrator. If you want to remove a user with the role of admin, you need to assign another administrator within the group.
Edit Group members:
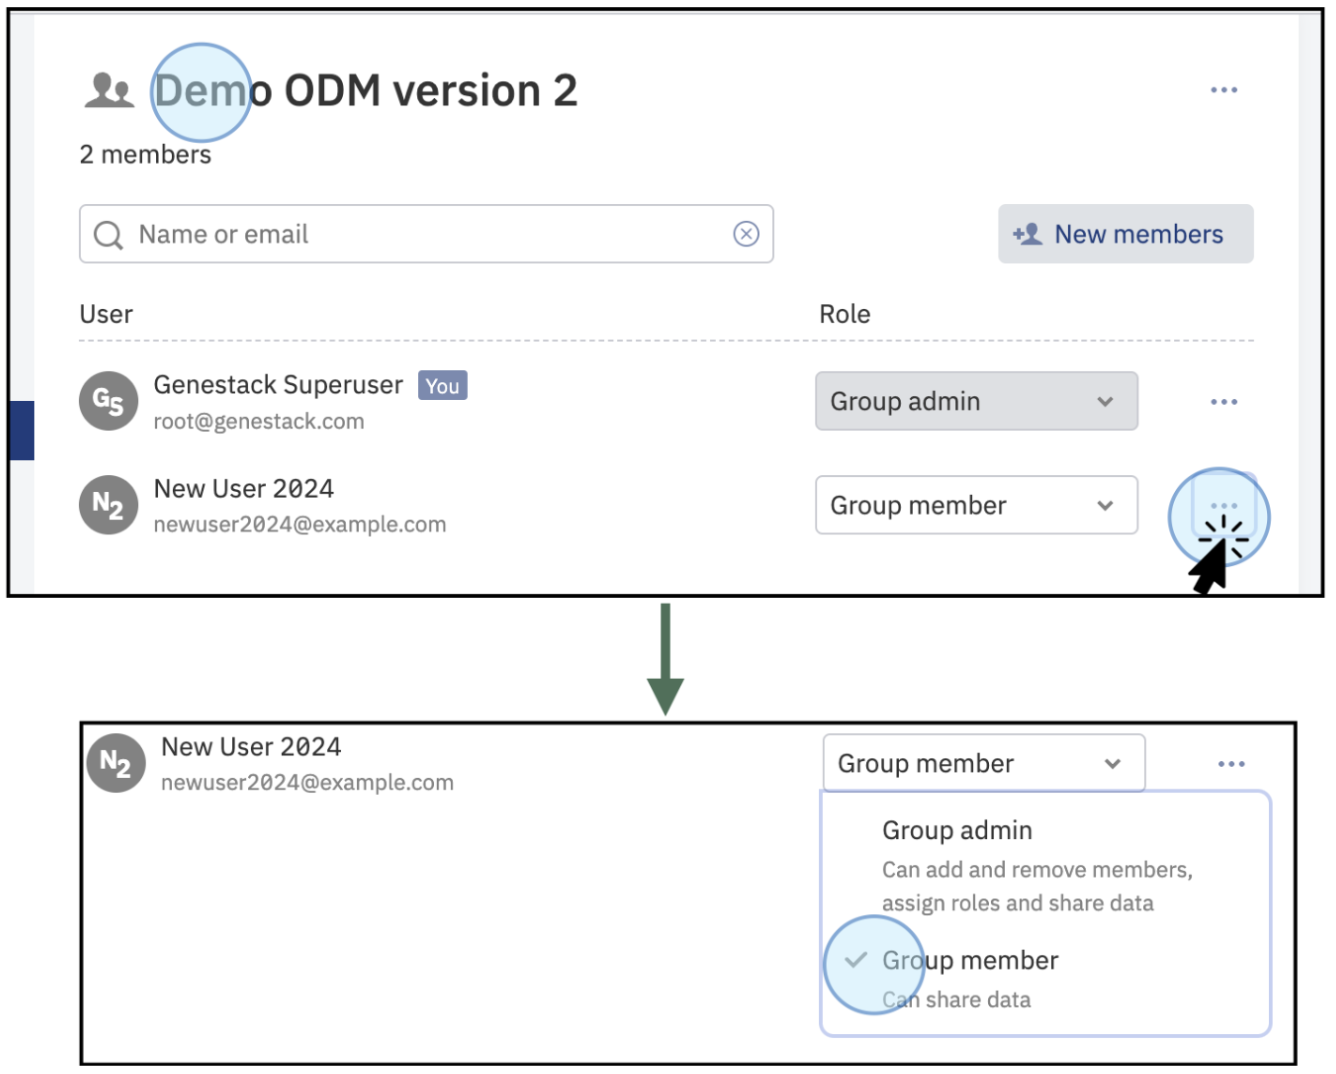
- You can edit the roles of group members by clicking on their role descriptions. You can change members to administrators or vice versa. Note that each group must have at least one administrator.
Delete Groups
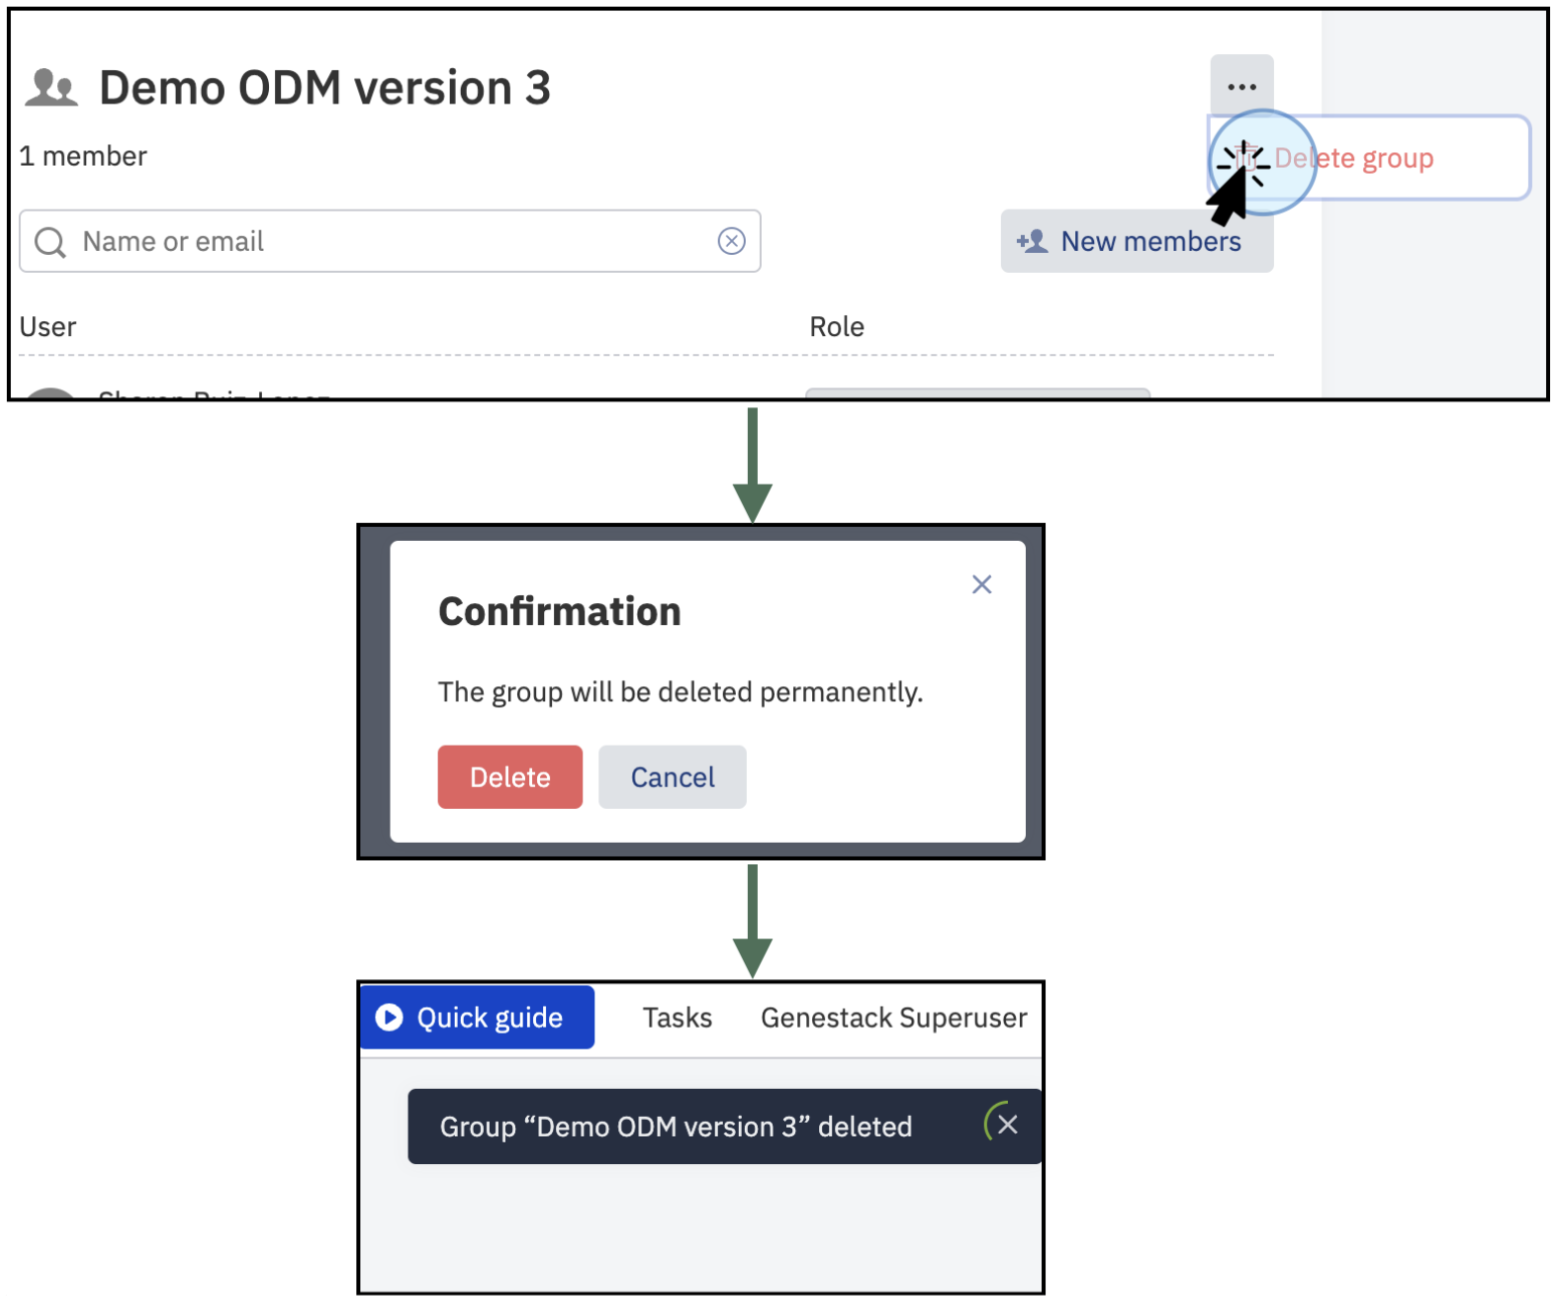
- To delete a group, navigate to the group to want to delete
- Click on the three dots on the right and select the option to delete.
Warning
Deleting groups is a permanent action
By following these steps, you can effectively manage users, permissions, and groups as an Admin using the Interface of the Open Data Manager.